background image

Refrigerator

User manual

RT16A61****

Free Standing Appliance

Untitled-2   1

2021-07-13     6:31:43

Summary of Contents for RT16A6195SR

Page 1: ...Refrigerator User manual RT16A61 Free Standing Appliance Untitled 2 1 2021 07 13 6 31 43...

Page 2: ...as 13 Additional tips for proper usage 13 Installation 14 Refrigerator at a glance 14 Step by step installation 15 Operations 18 Temperature controller 18 Special features 19 Maintenance 22 Door reve...

Page 3: ...let children clean the refrigerator or perform user maintenance on the refrigerator without supervision Warnings and Important Safety Instructions in this manual do not cover all possible conditions...

Page 4: ...in doubt consult your dealer WARNING Fill with potable water only Keep ventilation openings in the appliance enclosure or in the built in structure clear of obstruction Do not use mechanical devices...

Page 5: ...should always be plugged into its own individual electrical outlet which has a voltage rating that matches the voltage listed on the refrigerator s rating plate This provides the best performance and...

Page 6: ...lectric shock fire problems with the product or injury You need to remove all the protective plastic film before you initially plug the product in Children should be supervised to ensure that they do...

Page 7: ...urned on let it stand for 2 hours before loading it with food It is strongly recommended you have a qualified technician or service company install the refrigerator Failing to do so may result in an e...

Page 8: ...erator open while the refrigerator is unattended and do not let children enter inside the refrigerator Do not allow babies or children go inside a drawer It can cause death from suffocation by entrapm...

Page 9: ...authorized modification we will charge the full cost of parts and labor Do not use any fuse such as cooper steel wire etc other than a standard fuse If your refrigerator needs to be repaired or reinst...

Page 10: ...ersonal injury and property damage Service Warranty and Modification Any changes or modifications performed by a 3rd party on this finished appliance are not covered under Samsung warranty service nor...

Page 11: ...lace a lighted candle in the refrigerator to remove bad odors This may result in an electric shock or fire Do not spray cleaning products directly on the display Printed letters on the display may com...

Page 12: ...efrigerant This product contains flammable gas Refrigerant R 600a contact your local authority in regard to safe disposal of this product When disposing of this refrigerator remove the door door seals...

Page 13: ...ailure last more than 24 hours remove and discard all frozen food The refrigerator might not operate consistently frozen contents can thaw or temperatures can become too warm in the frozen food compar...

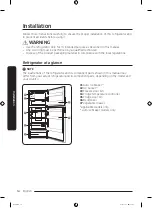
Page 14: ...aging material in compliance with the local regulations Refrigerator at a glance NOTE The illustrations of the refrigerator and its component parts shown in this manual may differ from your actual ref...

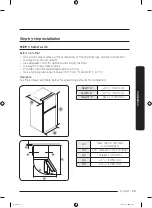
Page 15: ...Is away from any heat sources Provides room for maintenance and servicing Has a temperature range between 50 F 10 C and 109 F 43 C Clearance See the pictures and table below for space requirements fo...

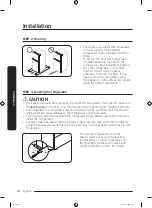
Page 16: ...erator from tipping make sure the leveling leg on the door is on the floor and fully supporting the weight of the door When installed the refrigerator must be leveled on a flat solid floor Not levelin...

Page 17: ...g steps the refrigerator should be fully functioning 1 Plug the power cord into the wall socket to turn the refrigerator on 2 Open the door and check if the interior light lights up 3 Set the temperat...

Page 18: ...35 C It may cause problems with the cooling performance Sabbath mode The Sabbath mode stays active for 85 hours once it is activated To activate or deactivate the Sabbath mode turn the dial in follow...

Page 19: ...ray with water up to the maximum level A marked on the inner rear of the tray 3 Slide the tray back into position NOTE The ice making time depends on your temperature settings NOTE Make sure the ice b...

Page 20: ...Auto Ice Maker on or off with the switch on the top of the refrigerator For first time use Let the ice maker make ice for 1 2 days Discard the first 1 2 buckets of ice to remove impurities in the wate...

Page 21: ...prevent the ice maker from working properly To prevent this make sure to empty the ice bucket before using the refrigerator Do not put fingers or any objects into the ice maker This can cause physical...

Page 22: ...ected from the power source before doing the reversal You must wait for at least an hour after door reversing is complete This is to prevent electric shock that could occur Tools required not provided...

Page 23: ...hillips screwdriver to remove the screws on the top table A Then gently pull out the top table A A 2 Decouple the wire connectors A A 3 Remove the screws fastening the top hinge A A 4 Gently lift the...

Page 24: ...h the middle hinge A A 6 Gently lift the fridge door A to remove it from the bottom hinge A 7 Use a screwdriver to remove the screws fastening the bottom hinge A A B 8 Use a screwdriver to remove the...

Page 25: ...shown in the figure and then tighten it until it is securely in place A 10 Insert the hinge bolt A into the hole next to the hinge shaft as shown in the figure and then tighten it until it is securely...

Page 26: ...ttached to the left side of the main unit A 14 Attach the leveling leg A to the opposite side A B 15 Remove the auto closer A and the stopper B from the bottom of the fridge freezer doors Then reinser...

Page 27: ...r B A 18 Separate the top hinge A and the hinge cover B A 19 Take out the wires from the hinge cover A NOTE Keep the detached hinge cover in a safe place for later use A 20 Use a flat head screwdriver...

Page 28: ...rt the hinge grommet A on the opposite side A 22 Remove the cap spacer A and then reinsert it on the opposite side A B 23 Flip the top hinge A 180 degrees Remove the hinge shaft B and then reattach it...

Page 29: ...e flange screw B Use a Phillips screwdriver to remove the flange screw B and then tighten it on the opposite side Finally close the flange screw cap A on the opposite side A 26 Flip the middle hinge A...

Page 30: ...ctive opposite side A 29 Align the middle hinge shaft to the hinge grommet on the top of the fridge door A Then lift the door and hold it so the shaft is inserted into the grommet NOTE You need two pe...

Page 31: ...nd fasten the top hinge A on the opposite side B A 33 Detach the hinge cover A from the top table B A B 34 Arrange the door wire in the hinge cover A before placing the hinge cover A onto the top hing...

Page 32: ...lish 32 Maintenance A 35 Connect the wire connectors A A B 36 Remove the hinge hole cap A from the top table B and then reinsert it on the opposite side A A 37 Insert the bar cover A Untitled 2 32 202...

Page 33: ...er door gaskets Turn them clockwise by 180 degrees and then reattach them NOTE In the future you might want to return the doors to their initial position before the doors were reversed In that case re...

Page 34: ...fridge freezer To remove the shelf hold it with both hands and lift it to release it from the rear hook Then tilt it on one side and pull it out Vegetable drawers Gently lift up the front of the draw...

Page 35: ...it out 2 Hold the vegetable shelf with both hands and lift it to release it from the rear hook Then tilt it on one side and pull it out Door bins Lift up the door bin slightly and then pull it out CAU...

Page 36: ...lint free cloth or paper towel to clean the refrigerator s interior and exterior 3 When done use a dry cloth or paper towel to dry the refrigerator well 4 Plug in the power cord of the refrigerator t...

Page 37: ...or in direct sunlight Keep the refrigerator away from direct sunlight or a heat source Not enough clearance between refrigerator and sides rear We recommend that the gap between the refrigerator and...

Page 38: ...moisture content Make sure food is wrapped airtight Water ice Auto Ice Maker models only Symptom Possible causes Solution The ice maker does not produce ice The freezer room is not cold enough Make su...

Page 39: ...bout sounds your refrigerator is making please call Samsung Customer Care at 1 800 SAMSUNG 726 7864 These sounds are normal When starting or ending an operation the refrigerator may make sounds simila...

Page 40: ...ling As the refrigerator temperature increases or decreases plastic parts contract and expand creating knocking noises These noises occur during the defrosting cycle or when electronic parts are worki...

Page 41: ...presented upon request as proof of purchase to SAMSUNG or SAMSUNG s authorized service center to receive warranty service SAMSUNG will provide in home service within the contiguous United States duri...

Page 42: ...tage fluctuations and surges damage caused by failure to operate and maintain the product according to instructions in home instruction on how to use your product and service to correct installation n...

Page 43: ...S BEEN ADVISED OF THE POSSIBILITY OF SUCH DAMAGES Some states do not allow exclusion or limitation of incidental or consequential damages so the above limitations or exclusions may not apply to you Th...

Page 44: ...Inverter Compressor 10 years Part only SECA further warrants that if this product fails to operate properly within the specified warranty period and the failure is due to improper workmanship or defec...

Page 45: ...and or other Acts of God misuse incorrect line voltage improper installation improper or unauthorized repairs commercial use or damage that occurs during shipping Customer adjustments which are expla...

Page 46: ...Memo Untitled 2 46 2021 07 13 6 31 49...

Page 47: ...Memo Untitled 2 47 2021 07 13 6 31 49...

Page 48: ...ny questions or comments relating to Samsung products please contact the SAMSUNG Customer Care Center Country Contact Center Web Site U S A 1 800 SAMSUNG 726 7864 1 844 SAM PAYS 726 7297 www samsung c...

Reviews: