background image

Refrigerator

User manual

RT18M******/RT21M******

Free Standing Appliance

Untitled-6   1

2020-11-11   PM 2:43:38

Summary of Contents for RT18M6215

Page 1: ...Refrigerator User manual RT18M RT21M Free Standing Appliance Untitled 6 1 2020 11 11 PM 2 43 38...

Page 2: ...uch as 13 Additional tips for proper usage 13 Installation 14 Refrigerator at a glance 14 Step by step installation 15 Operations 29 Feature panel 29 Special features 34 Maintenance 36 Door reversal a...

Page 3: ...et children clean the refrigerator or perform user maintenance on the refrigerator without supervision Warnings and Important Safety Instructions in this manual do not cover all possible conditions an...

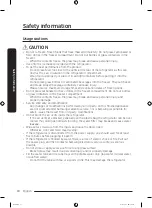
Page 4: ...pliance showing any signs of damage If in doubt consult your dealer Important safety symbols and precautions WARNING Hazards or unsafe practices that may result in severe personal injury or death CAUT...

Page 5: ...mage along its length or at either end Do not bend the power cord excessively or place heavy objects on it Do not pull or excessively bend the power cord Do not twist or tie the power cord Do not hook...

Page 6: ...e refrigerator before attempting to investigate or repair any part of the appliance Power leakages can cause severe electric shock Never use gas pipes telephone lines or other potential lightning attr...

Page 7: ...ticles may fall and cause personal injury and or material damage Do not insert hands feet or metal objects such as chopsticks etc into the bottom or into the back of the refrigerator This may result i...

Page 8: ...such as flammable sprays flammable objects dry ice medicine or chemicals near or inside of the refrigerator Do not use a hair dryer to dry the inside of the refrigerator Do not place a lighted candle...

Page 9: ...ck fire problems with the product or injury If the interior or exterior LED lamp has gone out contact your nearest Samsung service center If the refrigerator emits a burning smell or smoke unplug the...

Page 10: ...sonal injury and property damage Service Warranty and Modification Any changes or modifications performed by a 3rd party on this finished appliance are not covered under Samsung warranty service nor i...

Page 11: ...ace a lighted candle in the refrigerator to remove bad odors This may result in an electric shock or fire Do not spray cleaning products directly on the display Printed letters on the display may come...

Page 12: ...s refrigerator remove the door door seals and door latch so that small children or animals cannot become trapped inside Children should be supervised to ensure that they do not play with the appliance...

Page 13: ...ou should minimize the number of door openings while the power is off Should the power failure last more than 24 hours remove and discard all frozen food The refrigerator might not operate consistentl...

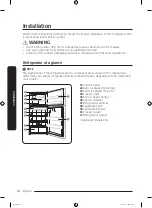
Page 14: ...cal regulations Refrigerator at a glance NOTE The illustrations of the refrigerator and its component parts shown in this manual may differ from your actual refrigerator and its component parts depend...

Page 15: ...face without carpeting or flooring that may obstruct ventilation Is away from direct sunlight Has adequate room for opening and closing the door Is away from any heat sources Provides room for mainten...

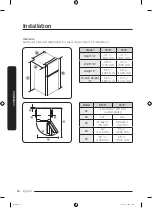
Page 16: ...8 810 mm 31 7 8 810 mm Width B 28 3 4 729 mm 32 7 8 836 mm Height C 65 3 4 1669 mm 66 3 4 1694 mm Overall Height D 66 3 4 1697 mm 67 3 4 1722 mm 03 01 03 05 02 04 Model RT18 RT21 01 more than 2 50 mm...

Page 17: ...rotect the floor put a large piece of cardboard along the path to the refrigerator s final installation location Once the refrigerator is in its final position do not move it unless necessary to prote...

Page 18: ...on the unit is for stability purposes Turn the leveling legs clockwise to lower the position or turn counter clockwise to raise CAUTION In all cases including door reversal to prevent the refrigerator...

Page 19: ...ber for professional assistance To prevent burns and product damage do not connect the water line to a hot water source Do not install the water line in areas where temperatures fall below the freezin...

Page 20: ...t A to the shut off valve B To connect the water line to the refrigerator WARNING Make sure to connect the water line only to a potable water source There are several items you must purchase to comple...

Page 21: ...ting CAUTION If you use plastic tubing A do not use it without the molded end Bulb 2 Tighten the compression nut B onto the compression fitting Do not over tighten the compression nut B 3 Turn the wat...

Page 22: ...09 Cartridge holder 10 Cut vertically by 90 degrees 1 Shut off the main water line and turn the ice maker off 2 Locate the nearest cold potable water line 3 Follow the instructions mentioned in the w...

Page 23: ...holder until the plastic line is fully inserted 2 Clamp both ends of the cartridge holder using the plastic clips 3 Turn the water line on and check for leaks CAUTION Use only potable water The filte...

Page 24: ...that ship with this refrigerator are properly packed for transportation and safety reasons Unpack those accessories and put them in place Door guards There are four door guards provided with the produ...

Page 25: ...r optional To purchase a new auto ice maker part type RA TIMO63PP AA visit the Samsung website www samsung com or contact your retailer Ice maker kit Ice maker Ice bucket Tools required not provided P...

Page 26: ...screws x2 from the cover and then remove the cover by pulling it to the front 3 Connect the wire connector of the ice maker to the socket marked in the figure on the main unit Make sure the connector...

Page 27: ...CAUTION If you don t intend to use the ice maker or if you are going for a business trip or vacation turn off the ice maker Do not turn the ice maker on without the ice bucket in place The ice cubes p...

Page 28: ...and the motor should be running smoothly 4 Wait until the refrigerator reaches the set temperature The refrigerator is now ready for use STEP 8 Final check When installation is complete confirm that T...

Page 29: ...anel Type A 01 04 05 05 02 03 Type B 01 04 05 05 02 03 01 Power Freeze Ice Maker applicable models only 02 Freezer Freezer Convert 03 Fridge Fridge On Off 04 Power Cool 05 Sabbath mode Operations Unti...

Page 30: ...he previous temperature NOTE Using Power Freeze increases power consumption Make sure you turn it off and have the Freezer return to its previous temperature if you no longer need Power Freeze on Ice...

Page 31: ...atically turns on Your changes will be set and activated after 10 seconds To cancel or change the mode again press and hold Freezer Convert again for 3 seconds Then follow the instructions above NOTE...

Page 32: ...rature of the fridge or freezer remains under 59 F 15 C to prevent mold and odors The refrigerator uses less electricity Do not store food or beverages in the refrigerator when the refrigeration or fr...

Page 33: ...equentially from left LED to right LED To cancel Cooling Off mode press and hold Power Freeze Freezer and Fridge simultaneously again for 5 seconds 05 Sabbath mode The Sabbath mode stays active for 85...

Page 34: ...ill the tray with water up to the maximum level A marked on the inner rear of the tray 3 Slide the tray back into position NOTE The ice making time depends on your temperature settings NOTE Make sure...

Page 35: ...ys Discard the first 1 2 buckets of ice to remove impurities in the water supply system When the upper ice tray is full use the lower ice tray A If the auto ice maker does not make ice remove the ice...

Page 36: ...osition before plugging it in Tools required not provided Phillips screwdriver Flat head screwdriver 7 16 11 mm spanner for hinge shaft 5 16 8 mm socket wrench for bolts 3 8 10 mm socket wrench for bo...

Page 37: ...s 1 Use a Phillips screwdriver to loosen the screws x3 in three holes on the top table Then gently pull out the top table 2 Decouple the wire connectors 3 Loosen the bolts on the top hinge 4 Gently li...

Page 38: ...h 38 Maintenance 5 Use the screwdriver and the wrench to loosen the bolts and remove the middle hinge 6 Gently slide the fridge door out of the hinge shaft and then pull up to remove Untitled 6 38 202...

Page 39: ...2 Remove the hinge and the door shaft 1 Use the screwdriver to remove the screw on the bottom hinge 2 Use the screwdriver to remove the hinge bolt Then use the wrench to remove the door shaft Untitled...

Page 40: ...with care and then do the following 1 Remove the auto closer and the stopper from the bottom of the fridge door Then reinsert them on the opposite side of the fridge door as shown 2 Use a flat head sc...

Page 41: ...er and the top hinge 1 Pull up to remove the bar cover on the top of the freezer door 2 Remove the top hinge with its cover 3 Separate the top hinge from the hinge cover 4 Arrange the door wire in the...

Page 42: ...lish 42 Maintenance 5 Remove the cap spacer and then reinsert it on the opposite side 6 Remove the door shaft from the top hinge flip it 180 degrees as shown and then reinsert it Untitled 6 42 2020 11...

Page 43: ...ewdriver to remove the flange screw cap to reveal the flange screw Use a Phillips screwdriver to remove the flange screw and then tighten it on the opposite side Finally close the flange screw cap on...

Page 44: ...flat head screwdriver to remove both the hinge grommet on one side and the hinge hole cap on the other side Reinsert them on their respective opposite side 6 Gently slide the fridge door into the cor...

Page 45: ...then tighten it until it is securely in place 2 Insert the hinge bolt into the bottom hinge plate from the top as shown and then tighten it until it is securely in place 3 Position the bottom hinge p...

Page 46: ...remaining parts 1 Insert and tighten the top hinge on the opposite side 2 Detach the hinge cover manually from the top table 3 Arrange the door wire in the hinge cover before placing the hinge cover...

Page 47: ...the wire connectors 5 Remove the hinge hole cap from the top table and then reinsert it on the opposite side 6 Insert the top table and then fix it firmly to the refrigerator using the screws x3 Unti...

Page 48: ...kwise by 180 degrees and then reattach them NOTE In the future you might want to return the doors to their initial position before the doors were reversed In that case refer to the instructions on the...

Page 49: ...shelf hold it with both hands and lift to release from the rear hooks Then pull it halfway to the front Fresh room Slide out the sliding shelf of the Fresh room Vegetable drawers Gently lift up the fr...

Page 50: ...ont of the drawer and then slide it out 2 Hold the vegetable shelf with both hands and then slide it out Door shelves Lift up the door shelf slightly and then pull it out CAUTION To prevent accidents...

Page 51: ...rator to turn the refrigerator on NOTE If you have removed any removable parts such as shelves for cleaning refer to the overall layout in the Refrigerator at a glance section to make sure you have re...

Page 52: ...in direct sunlight Keep the refrigerator away from direct sunlight or a heat source Not enough clearance between refrigerator and sides rear We recommend that the gap between the refrigerator and near...

Page 53: ...or walls Door is not closed properly Make sure food does not block the door Clean the door gasket Fruits or vegetables are frozen Fruits or vegetables are stored in the Fresh Chef Zone The Fresh Chef...

Page 54: ...ake sure the ice maker is turned on Press and hold Power Freeze for 3 seconds and check if the corresponding indicator turns on The wire connector of the ice maker is not connected properly Make sure...

Page 55: ...out sounds your refrigerator is making please call Samsung Customer Care at 1 800 SAMSUNG 726 7864 These sounds are normal When starting or ending an operation the refrigerator may make sounds similar...

Page 56: ...ing As the refrigerator temperature increases or decreases plastic parts contract and expand creating knocking noises These noises occur during the defrosting cycle or when electronic parts are workin...

Page 57: ...resented upon request as proof of purchase to SAMSUNG or SAMSUNG s authorized service center to receive warranty service SAMSUNG will provide in home service within the contiguous United States during...

Page 58: ...age fluctuations and surges damage caused by failure to operate and maintain the product according to instructions in home instruction on how to use your product and service to correct installation no...

Page 59: ...BEEN ADVISED OF THE POSSIBILITY OF SUCH DAMAGES Some states do not allow exclusion or limitation of incidental or consequential damages so the above limitations or exclusions may not apply to you This...

Page 60: ...verter Compressor 10 years Part only SECA further warrants that if this product fails to operate properly within the specified warranty period and the failure is due to improper workmanship or defecti...

Page 61: ...nd or other Acts of God misuse incorrect line voltage improper installation improper or unauthorized repairs commercial use or damage that occurs during shipping Customer adjustments which are explain...

Page 62: ...Memo Untitled 6 62 2020 11 11 PM 2 43 54...

Page 63: ...Memo Untitled 6 63 2020 11 11 PM 2 43 54...

Page 64: ...questions or comments relating to Samsung products please contact the SAMSUNG Customer Care Center Country Contact Center Web Site U S A 1 800 SAMSUNG 726 7864 1 844 SAM PAYS 726 7297 www samsung com...

Reviews: