background image

13

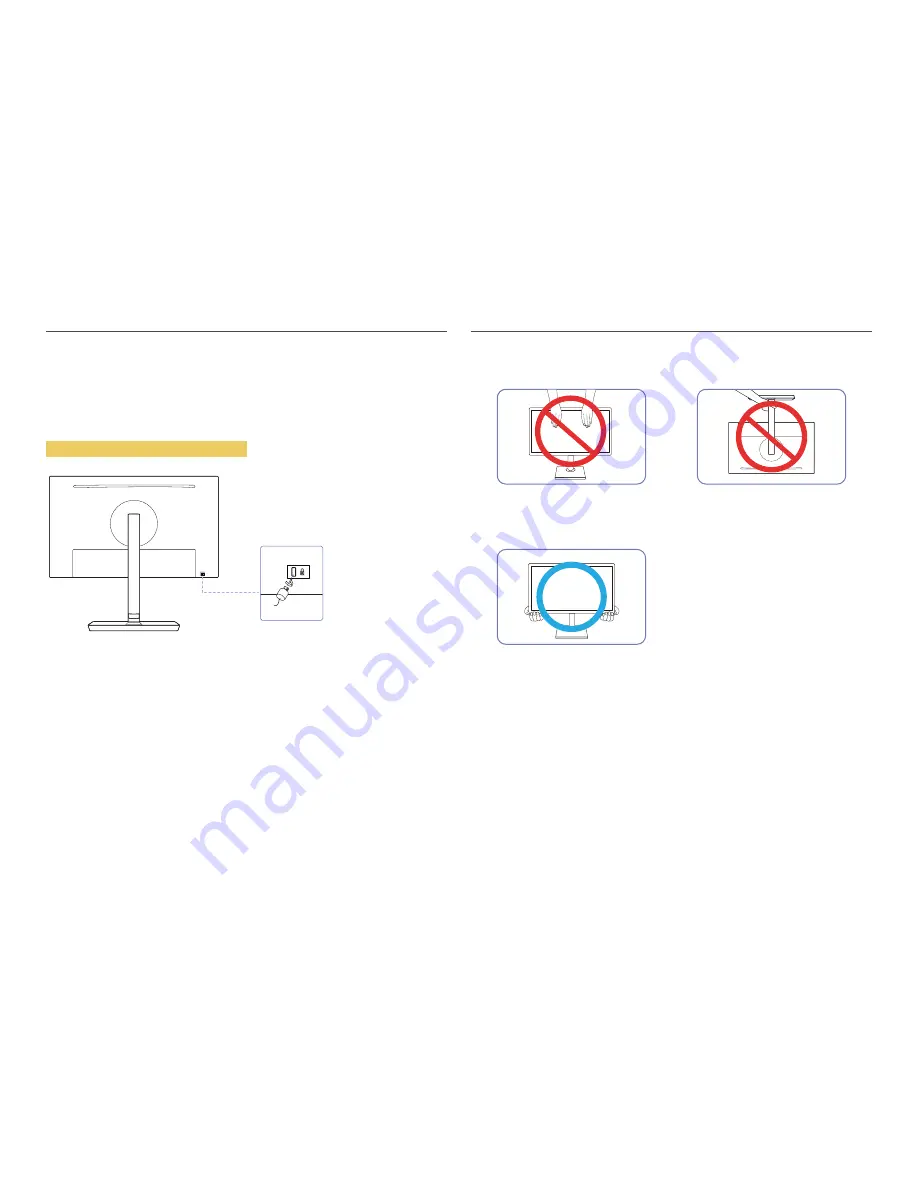
Anti-theft Lock


An anti-theft lock allows you to use the product securely even in public places.


The locking device shape and locking method depend on the manufacturer. Refer to the user guide 
provided with your anti-theft locking device for details.

To lock an anti-theft locking device:

Fix the cable of your anti-theft locking device to a heavy object such as a desk.

Put one end of the cable through the loop on the other end.

Insert the locking device into the anti-theft lock slot at the back of the product.

Lock the locking device.


An anti-theft locking device can be purchased separately.


Refer to the user guide provided with your anti-theft locking device for details.


Anti-theft locking devices can be purchased at electronics retailers or online.

Precautions for moving the monitor


Do not directly apply pressure on the screen.


Do not hold the screen when moving the 
monitor.


Do not hold the product upside down only by 
the stand.


Hold the lower corners or edges of the 
monitor when moving it.


Summary of Contents for S*H65*

Page 1: ...tirety without the authorization of Samsung Electronics is prohibited Trademarks other than that of Samsung Electronics are owned by their respective owners S H65 An administration fee may be charged if either a an engineer is called out at your request and there is no defect in the product i e where you have failed to read this user manual b you bring the unit to a repair center and there is no d...

Page 2: ...S24H650GD S27H650FD 18 Removing the Stand S24H650FD 19 Connecting and Using a Source Device Read below before installing the monitor 20 Connecting and Using a PC 20 Connection Using the D SUB Cable Analog Type 20 Connection Using the HDMI Cable 21 Connection Using an HDMI DVI Cable 21 Connection Using the DP Cable 21 Connecting to Headphones 21 Connecting the Power 22 Connecting a USB device 23 Ti...

Page 3: ...allation 34 System Requirements 34 Troubleshooting Guide Requirements Before Contacting Samsung Customer Service Center 35 Testing the Product 35 Checking the Resolution and Frequency 35 Check the following 35 Q A 37 Specifications General 38 Standard Signal Mode Table 40 Appendix Responsibility forthe Pay Service Cost to Customers 43 Not a product defect 43 A Product damage caused by customer s f...

Page 4: ...ce fee will be charged Do not press the monitor screen with hands or other objects There is a risk of damaging the screen Safety Precautions Caution RISK OF ELECTRIC SHOCK DO NOT OPEN Caution TO REDUCE THE RISK OF ELECTRIC SHOCK DO NOT REMOVE COVER OR BACK THERE ARE NO USER SERVICEABLE PARTS INSIDE REFER ALL SERVICING TO QUALIFIED PERSONNEL This symbol indicates that high voltage is present inside...

Page 5: ...ng Do not use a damaged power cord or plug or a loose power socket Do not use multiple products with a single power socket Do not touch the power plug with wet hands Insert the power plug all the way in so it is not loose Connect the power plug to a grounded power socket type 1 insulated devices only Do not bend or pull the power cord with force Be careful not to leave the power cord under a heavy...

Page 6: ...product within the reach of young children The product may fall and injure children Edible oil such as soybean oil may damage or distort the product Keep the product away from oil pollution And do not install or use the product in the kitchen or near the kitchen stove Caution Do not drop the product while moving Do not set down the product on its front When installing the product on a cabinet or s...

Page 7: ...rm power off the product and remove the power cable Do not drop objects on the product or apply impact Do not move the product by pulling the power cord or any cable If a gas leakage is found do not touch the product or power plug Also ventilate the area immediately Do not lift or move the product by pulling the power cord or any cable Do not use or keep combustible spray or an inflammable substan...

Page 8: ...ll and become damaged or cause an injury Looking at the screen too close for an extended period of time can deteriorate your eyesight Do not use humidifiers or stoves around the product Rest your eyes for more than 5 minutes or look at distance objects for every1 hour of product use Do not touch the screen when the product has been turned on for an extended period of time as it will become hot Sto...

Page 9: ... The Eye SaverMode function can be used by pressing the button The Eye SaverMode is available even when the OSD control is locked Press to enable or disable Eye SaverMode The items below are not available if the Eye SaverMode function is enable Picture Brightness Game Mode SAMSUNG MAGICBright Color System Smart ECO Saving Move to the upper or lower menu or adjust the value for an option on the OSD...

Page 10: ...ress the corresponding button again The Key Guide may vary depending on the function or product model Refer to the actual product Reverse Side The color and shape of parts may differ from what is shown Specifications are subject to change without notice to improve quality Port Description Connect the power cord foryour monitor to the POWER IN port on the back of the product Connect to a USB device...

Page 11: ...enu is not available when Smart ECO Saving is enabled This menu is not available when Eye SaverMode is enabled Contrast This menu is not available when SAMSUNG MAGICBright is in Cinema or Dynamic Contrast mode This menu is not available when Game Mode is enabled Changing the Volume setting Adjust the Volume by pressing the button when the Key Guide is displayed Volume Brightness Contrast 10 The di...

Page 12: ...uct malfunction Rotating the Monitor Screen You can rotate your monitor as shown below The color and shape of parts may differ from what is shown Specifications are subject to change without notice to improve quality 1 2 3 4 5 6 Be sure to fully extend the stand before rotating the monitor If you rotate the monitorwithout fully extending the stand the corner of the monitor may hit the floor and ge...

Page 13: ...rough the loop on the other end 3 Insert the locking device into the anti theft lock slot at the back of the product 4 Lock the locking device An anti theft locking device can be purchased separately Refer to the user guide provided with your anti theft locking device for details Anti theft locking devices can be purchased at electronics retailers or online Precautions for moving the monitor Do no...

Page 14: ...nal injury Samsung shall not be held liable for any damage or injury caused by using improper screws or attaching the wall mount kit or desktop stand using excessive force Samsung shall not be held liable for any product damage or personal injury caused by using a wall mount kit other than the one specified or from an attempt to install the wall mount kit on your own To mount the product on a wall...

Page 15: ...nal injury Samsung shall not be held liable for any damage or injury caused by using improper screws or attaching the wall mount kit or desktop stand using excessive force Samsung shall not be held liable for any product damage or personal injury caused by using a wall mount kit other than the one specified or from an attempt to install the wall mount kit on your own To mount the product on a wall...

Page 16: ...e the protective Styrofoam cushion included in the package on the floor and place the product facing down on the Styrofoam as shown in the image If Styrofoam is unavailable use a thick sitting mat Place the stand neck on the display as shown in the figure When you place the stand neck ensure that the raised button on the display can be inserted into the groove of the stand neck Turn the stand neck...

Page 17: ...ctive Styrofoam cushion included in the package on the floor and place the product facing down on the Styrofoam as shown in the image If Styrofoam is unavailable use a thick sitting mat Place the stand neck on the display as shown in the figure When you place the stand neck ensure that the raised button on the display can be inserted into the groove of the stand neck Turn the stand neck of the dis...

Page 18: ...m of the stand base and then remove the stand neck from the stand base by pulling it in the arrow direction as shown in the figure Caution Do not press down on the monitor There is a risk of damaging the monitor Caution Do not hold the product upside down only by the stand Removing the Stand S24H650GD S27H650FD Before removing the stand from the monitor place the monitor on a flat and stable surfa...

Page 19: ... direction to detach it from the display Unfasten the connecting screw at the bottom of the stand base and then remove the stand neck from the stand base by pulling it in the arrow direction as shown in the figure Caution Do not press down on the monitor There is a risk of damaging the monitor Caution Do not hold the product upside down only by the stand Before removing the stand from the monitor ...

Page 20: ...rrent 3 After connecting all signal cables connect the power cables for the monitor and external devices to the power outlet 4 Read the user manual to familiarize yourself with the monitor functions precautions and proper use before using the installed monitor Connecting and Using a PC Select a connection method suitable foryour PC Connecting parts may differ in different products Provided ports m...

Page 21: ...e power cables for the monitor and external devices such as computers and set top boxes are not connected to the power outlet HDMI IN Connection Using the DP Cable Check to make sure that the power cables for the monitor and external devices such as computers and set top boxes are not connected to the power outlet A DP cable shorter under1 5 m in length is recommended Using a cable longer than 1 5...

Page 22: ...22 Connecting the Power To use the product connect the power cable to a power outlet and the POWER IN port on the product The input voltage is switched automatically ...

Page 23: ...as the same as those for using an external device connecting to the PC You can connect and use a keyboard and mouse You can play a file from a media device Examples of media devices MP3 digital camera etc You can run move copy or delete the files on the storage device Examples of storage devices external memory memory card memory reader HDD type MP3 player etc You can use other USB devices that ca...

Page 24: ...les Arrange the cables through the groove on the COVER REAR and then attach the COVER REAR SUB When you attach the COVER REAR SUB please aim six ribs of the COVER REAR SUB to the bottom holes of the COVER REAR at first 5 6 7 Arrange each of the two cables through either side of the COVER STAND CABLE as shown in the figure Rotate the machine to the horizontal position Assembly is complete ...

Page 25: ...plete Rotate the machine to the highest vertical position Connect the cables to their correct ports and then arrange each of the two cables through either side of the COVER STAND CABLE as shown in the figure Rotate the machine to the horizontal position 5 Assembly is complete ...

Page 26: ... Do the Eye excercises or blink frequently then eye fatigue will be relieved Driver Installation You can set the optimum resolution and frequency for this product by installing the corresponding drivers To install the latest version of the product driver download it from the Samsung Electronics website at http www samsung com Setting Optimum Resolution An information message about setting optimum ...

Page 27: ...required Standard Obtain a picture quality suitable for editing documents or using Internet Cinema Obtain the brightness and sharpness of TVs suitable for enjoying video and DVD content Dynamic Contrast Obtain balanced brightness through automatic contrast adjustment In AV mode When the external input is connected through HDMI DP and PC AV Mode is set to AV SAMSUNG MAGICBright has four automatic p...

Page 28: ...lable when Game Mode is enabled Color Adjust the tint of the screen This menu is not available when SAMSUNG MAGICBright is set to Cinema or Dynamic Contrast mode This menu is not available when Game Mode is enabled This menu is not available when Eye SaverMode is enabled Red Adjust the red saturation level Values closer to 100 mean greater intensity for the color Green Adjust the green saturation ...

Page 29: ...I Black Level feature is only activated at a certain AV resolution such as 720P and1080P Eye Saver Mode Set to an optimum picture quality suitable for eye relaxation TÜV Rheinland Low Blue Light Content is a certification for products which meet requirements for lower blue light levels When Eye SaverMode is On the blue light that wavelength is around 400nm will decrease and it will provide an opti...

Page 30: ...n the following conditions are satisfied A digital output device is connected using the HDMI DP cable The input signal is 480p 576p 720p or1080p and monitor can display normally Not every model can support all of these signals This can only be set when the external input is connected through HDMI DP and PC AV Mode is set to AV Screen Adjustment This menu is only available when Picture Size is set ...

Page 31: ...out notice to improve quality Transparency Set the transparency for the menu windows Position Adjust the menu position Language Set the menu language A change to the language setting will only be applied to the onscreen menu display It will not be applied to other functions on your PC Display Time Set the on screen display OSD menu to automatically disappear if the menu is not used for a specified...

Page 32: ...setting The reduction of power consumption depends on the customer screen brightness condition Off Timer Plus Configuring Off Timer Off Timer Turn on Off Timer mode Turn Off After The off timer can be set within a range of1 to 23 hours The product will automatically power off after the specified number of hours This option is only available when Off Timer is set to On For products for the market i...

Page 33: ...ge Check Signal Cable press the button to display the On Screen Display OSD You can select PC or AV Source Detection Select either Auto or Manual as the method to recognize input signal Key Repeat Time Control the response rate of a button when the button is pressed Acceleration 1 sec or 2 sec can be selected If No Repeat is selected a command responds only once when a button is pressed Reset All ...

Page 34: ...asy Setting Box icon may not appear depending on the computer system and the product specifications If the shortcut icon does not appear press the F5 key Restrictions and Problems with the Installation The Easy Setting Box installation may be affected by the Graphics Card Motherboard and the Networking Environment System Requirements OS Hardware Windows XP 32Bit 64Bit Windows Vista 32Bit 64Bit Win...

Page 35: ...resolution may vary depending on the computer system settings and cables Check the following Installation issue PC mode The screen keeps switching on and off Check the cable connection between the product and PC and ensure the connectors are locked Blank spaces are found on all foursides of the screen when an HDMI orHDMI DVI cable is connected to the product and PC The blank spaces found on the sc...

Page 36: ...s There is no image on the screen and the power LED blinks every 0 5 to1 second The product is operating in power saving mode Press any key on the keyboard or move the mouse to return to normal operating mode Text is blurry If using a Windows OS e g Windows 7 Windows 8 Windows 8 1 orWindows 10 Go to Control Panel Fonts Adjust ClearType text and change Turn on ClearType Video playback is choppy Pla...

Page 37: ...000 Go to Control Panel Display Settings and adjust the resolution Windows Vista Go to Control Panel Appearance and Personalization Personalize Display Settings and adjust the resolution Windows 7 Go to Control Panel Appearance and Personalization Display Adjust Resolution and adjust the resolution Windows 8 Windows 8 1 Go to Settings Control Panel Appearance and Personalization Display Adjust Res...

Page 38: ...m H x 0 27 mm V 0 01063 Inches H x 0 01063 Inches V 0 2745 mm H x 0 2745 mm V 0 010807 Inches H x 0 010807 Inches V 0 3114 mm H x 0 3114 mm V 0 01226 Inches H x 0 01226 Inches V Maximum Pixel Clock 154 MHz 148 5 MHz 148 5 MHz Power Supply AC 100 240 V 10 50 60 Hz 3 Hz Refer to the label at the back of the product as the standard voltage can vary in different countries Signal connectors D SUB HDMI ...

Page 39: ... of the manufacturing of this product approximately1 pixel per million 1ppm may be brighter or darker on the LCD panel This does not affect product performance The above specifications are subject to change without notice to improve quality This device is a Class B digital apparatus For detailed device specifications visit the Samsung Electronics website USA only Dispose unwanted electronics throu...

Page 40: ...en may be blank even though the power LED turns on In such a case change the settings according to the following table by referring to the graphics card user manual S24H650GD Resolution Horizontal Frequency kHz Vertical Frequency Hz Pixel Clock MHz Sync Polarity H V VESA 640 x 480 31 469 59 940 25 175 VESA 800 x 600 35 156 56 250 36 000 VESA 800 x 600 37 879 60 317 40 000 VESA 1024 x 768 48 363 60...

Page 41: ...80 37 500 75 000 31 500 VESA 800 x 600 35 156 56 250 36 000 VESA 800 x 600 37 879 60 317 40 000 VESA 800 x 600 48 077 72 188 50 000 VESA 800 x 600 46 875 75 000 49 500 VESA 1024 x 768 48 363 60 004 65 000 VESA 1024 x 768 56 476 70 069 75 000 VESA 1024 x 768 60 023 75 029 78 750 VESA 1152 x 864 67 500 75 000 108 000 VESA 1280 x 720 45 000 60 000 74 250 VESA 1280 x 800 49 702 59 810 83 500 VESA 1280...

Page 42: ...d horizontal frequency Horizontal frequency is measured in kHz Vertical Frequency Repeating the same picture dozens of times per second allows you to view natural pictures The repeat frequency is called vertical frequency or refresh rate and is indicated in Hz This product can be set to only one resolution for each screen size to obtain the optimum picture quality due to the nature of the panel Us...

Page 43: ...am If customer requests software installation and setup for the product If a service technician removes cleans dusts or foreign materials inside of the product If customer requests an installation additionally after purchasing a product through home shopping or online A Product damage caused by customer s fault Product damage caused by customer s mishandling orwrong repair If a product damage is c...

Page 44: ...rranty Samsung guarantee that replacement parts will be available for 5 years after the end of production After 5 years in the event that the Samsung s service center has run out of replacement parts and cannot repair the product Samsung will replace your product at no additional charge If the model you purchased is no longer available Samsung replace it with the current equivalent model ...

Reviews: