background image

7

Caution


Leaving the screen fixed on a stationary image for an extended period of time may cause 
afterimage burn-in or defective pixels.


Set the screen to power-saving mode or moving-picture screen saver when not using the 
product for an extended period of time.


Disconnect the power cord from the power socket if you do not plan on using the product for an 
extended period of time (vacation, etc).


Dust accumulation combined with heat can cause a fire, electric shock or electric leakage.


Use the product at the recommended resolution and frequency.


Your eyesight may deteriorate.


Do not put AC/DC adapters together.


Remove the plastic bag from the AC/DC adapter before you use it.


Do not let water enter the AC/DC adapter device or get the device wet.


An electric shock or fire may result.


Avoid using the product outdoors where it can be exposed to rain or snow.


Be careful not to get the AC/DC adapter wet when you wash the floor.


Do not put the AC/DC adapter near to any heating apparatus.


Otherwise, a fire may result.


Keep the AC/DC adapter in a well-ventilated area.


If you place the AC/DC power adapter hanging with the cord input facing upwards, water or other 
foreign substances could enter the Adapter and cause the Adapter to malfunction.
Make sure to rest the AC/DC power adapter flat on a table or the floor.


Do not hold the product upside-down or move it by holding the stand.


The product may fall and become damaged or cause an injury.


Looking at the screen too close for an extended period of time can deteriorate your eyesight.


Do not use humidifiers or stoves around the product.


Rest your eyes for more than 5 minutes or look at distance objects for every 1 hour of product use.


Do not touch the screen when the product has been turned on for an extended period of time as it 
will become hot.


Store small accessories out of the reach of children.


Exercise caution when adjusting the product angle or stand height.


Your hand or finger may get stuck and injured.


Tilting the product at an excessive angle may cause the product to fall and an injury may result.


Do not place heavy objects on the product.


Product failure or personal injury may result.


When using headphones or earphones, do not turn the volume too high.


Having the sound too loud may damage your hearing.

Summary of Contents for S27C390EAE

Page 1: ...is manual are subject to change without notice to improve quality Samsung Samsung owns the copyright for this manual Use or reproduction of this manual in parts or entirety without the authorization o...

Page 2: ...14 Direct Key Guide 15 2 Menu Picture 21 OnScreen Display 26 System 27 Support 30 Installing the Software Easy Setting Box 31 Restrictions and Problems with the Installation 31 System Requirements 31...

Page 3: ...oduct damage caused by customer s fault 39 Others 39 FreeSync 40 Troubleshooting Guide Requirements Before Contacting Samsung CustomerService Centre 32 Product diagnosis Screen issue 32 Checking the R...

Page 4: ...o protective earth ground Caution Consult instructions for use This symbol instructs the user to consult the user manual for further safety related information Electricity and Safety Warning Do not us...

Page 5: ...ren Edible oil such as soybean oil may damage or distort the product Keep the product away from oil pollution And do not install or use the product in the kitchen or near the kitchen stove Caution Do...

Page 6: ...hunderstorm power off the product and remove the power cable Do not drop objects on the product or apply impact Do not move the product by pulling the power cord or any cable If a gas leakage is found...

Page 7: ...er in a well ventilated area If you place the AC DC power adapter hanging with the cord input facing upwards water or other foreign substances could enter the Adapter and cause the Adapter to malfunct...

Page 8: ...e the cloth to wipe the exterior of the product clean Do not apply a cleaning agent that contains alcohol solvent or surfactant to the product Do not spray water or detergent directly on the product 4...

Page 9: ...ormal position Align the stand with the stand neck guide and then turn the screw on the bottom of the stand to fix the stand 4 4 5 6 Place the protective Styrofoam cushion included in the package on t...

Page 10: ...otective Styrofoam cushion included in the package on the floor and place the product facing down on the Styrofoam as shown in the image If Styrofoam is unavailable use a thick sitting mat Press the l...

Page 11: ...by the stand Do not press down on the product There is a risk of damaging the product Checking the space around the product Make sure to have enough space forventilation when placing the product An in...

Page 12: ...t tilt can be adjusted Hold the lower part of the product and adjust the tilt carefully Caution After adjusting the product tilt and height if the screen is not level take the following actions 1 1 Ho...

Page 13: ...r details To lock an anti theft locking device 1 Fix the cable of your anti theft locking device to a heavy object such as a desk 2 Put one end of the cable through the loop on the other end 3 Insert...

Page 14: ...screen is turned on Custom Key Custom Key is used to directly access the function set in Setup Custom Key Setup Custom Key Return Eye Saver Mode Auto Source Switch Go to System Setup Custom Key and ch...

Page 15: ...hanged Brightness Volume Source Eye Saver Mode Off Features The Direct Key Guide screen shows if Eye SaverMode is enabled Off Low High When the product not displays the OSD menu the JOG Button could b...

Page 16: ...bles from both the product and the external device to prevent damage to the product due to a short circuit or over current 3 After all signal cables have been properly connected connect the power cabl...

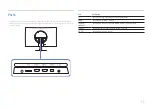
Page 17: ...ations are subject to change without notice to improve quality Refer to the actual product Port Description Connect to an audio output device such as headphones Connects to a PC using a DP cable Conne...

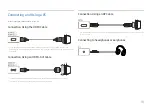
Page 18: ...u use a unauthorized HDMI cable the image quality may be degrade Connection Using an HDMI DVI Cable The audio function is not supported if the source device is connected using the HDMI DVI cable The o...

Page 19: ...Rated power consumption for adapters differs depending on the model Use an adapter that meets the power consumption specification of the model 2 Next connect the power cable to the power outlet 3 Pre...

Page 20: ...ect a language on information message and change the resolution on your PC to the optimum setting If the optimum resolution is not selected the message will appear up to three times for a specified ti...

Page 21: ...screen settings Cinema Obtain the brightness and sharpness of monitors suitable for enjoying video and DVD content In AV mode When the external input is connected through HDMI DP and PC AV Mode is se...

Page 22: ...ast between the objects and background Range 0 100 A highervalue will increase the contrast to make the object appear clearer This menu is not available when Picture Mode is set to Cinema mode This me...

Page 23: ...fset Adjust low level red intensity G Offset Adjust low level green intensity B Offset Adjust low level blue intensity Gamma Adjust the middle level of luminance Saturation Adjust the saturation level...

Page 24: ...0 Hz and 1080p 60 Hz Eye SaverMode Set to an optimum picture quality suitable for eye relaxation Game Mode Configure the product screen settings for game mode Use this feature when playing games on a...

Page 25: ...ll of these signals This can only be set when the external input is connected through HDMI DP and PC AV Mode is set to AV Screen Adjustment Adjust the position of the screen or increase the picture qu...

Page 26: ...H Position Move the menu position to the left or right V Position Move the menu position up or down Language Set the menu language A change to the language setting will only be applied to the onscree...

Page 27: ...hannel for sound output This menu is disabled if headphones or earphones are connected to the monitor Eco Saving Plus The Eco Saving Plus function reduces power consumption by controlling the electric...

Page 28: ...he product will automatically power off after the specified number of hours This option is only available when Off Timer is set to On For products for the market in some regions the Off Timer is set t...

Page 29: ...e display automatically switches to the newly connected device This function may not be supported depending on the model or geographical area Key Repeat Time Control the response rate of a button when...

Page 30: ...rming update make sure that only one BIN file bin is saved in the root directory If the No USB devices detected Please check and try again message is displayed this is probably due to the following re...

Page 31: ...ications If the shortcut icon does not appear press the F5 key Restrictions and Problems with the Installation The Easy Setting Box installation may be affected by the Graphics Card Motherboard and th...

Page 32: ...following Caution When the product makes popping cracking sound The sound may be caused by contraction or expansion from temperature change of external components or internal circuit of the product Th...

Page 33: ...e Check the cable connection and the settings of the source device appears Check that the cable is properly connected to the product Check that the device connected to the product is powered on Check...

Page 34: ...the volume is still low after turning it up to the maximum level adjust the volume on your PC sound card or software programme Video is available but there is no sound Sound cannot be heard if an HDM...

Page 35: ...n refresh rate under Monitorsettings How can I change the resolution Windows 7 Go to Control Panel Appearance and Personalization Display Screen Resolution Adjust Resolution Windows 8 Windows 8 1 Go t...

Page 36: ...ing Storage Temperature 20 C 45 C 4 F 113 F Humidity 5 95 non condensing Plug and Play This product can be installed and used with any Plug and Play compatible systems Two way data exchange between th...

Page 37: ...the power LED turns on In such a case change the settings according to the following table by referring to the graphics card user manual Resolution Horizontal Frequency kHz Vertical Frequency Hz Pixel...

Page 38: ...reen is called a horizontal cycle The reciprocal number of a horizontal cycle is called horizontal frequency Horizontal frequency is measured in kHz Vertical Frequency Repeating the same picture dozen...

Page 39: ...gramme If customer requests software installation and setup for the product If a service technician removes cleans dusts or foreign materials inside of the product If customer requests an installation...

Page 40: ...frequency from the graphics card The response rate during the game may fluctuate depending on the resolution A higher resolution generally decreases the response rate The sound quality of the monitor...

Reviews: