background image

Instruction manual

SADPCI-202

Digital Satellite Receiver

Summary of Contents for SADPCI-202

Page 1: ...Instruction manual SADPCI 202 Digital Satellite Receiver ...

Page 2: ...ation 13 15 Parental Control 14 16 Parental Lock 14 17 Advanced users guide 16 18 Tuning Modes 17 19 Setup Satellite 18 20 Editing Channels 19 21 Arrange 19 22 Sort Free to Air Channel s 20 23 Deleting Channels 21 24 Installation 22 LNB TV VCR settings Preferences Set local time System Information 25 Reset to factory defaults 25 26 Trouble shooting 26 27 Analogue option 27 28 Using the analogue op...

Page 3: ...ts Never expose the unit to water moisture extreme cold or direct sunlight Slots are provided for proper ventilation for the unit do not obstruct them Do not insert or drop small objects into the unit Install the unit in a well ventilated location Never cover the unit or operate the unit near any heat source It is advisable to unplug the unit from the mains TV and the satellite dish when a thunder...

Page 4: ...3 Accessories User Manual 1 Batteries 2 UHF TV cable 1 Remote Control Unit 1 SIGNAL 4 7 1 F 2 F 1 HELP 0 5 6 9 8 3 2 INFO T V MENU V O L C H ESC V O L O K M U T E C H RADIO LANG I TV SAT ...

Page 5: ...nce all connections are made please check again before connecting the equipment to the mains outlet The following shows a typical installation of a satellite receiver If you require further assistance for the installation of your satellite receiver please contact your local distributor ...

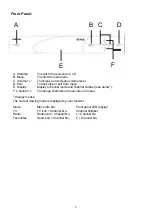
Page 6: ...enu E Display Displays channel mode and channel number see below F Channel To change channels or move cursor in menu Display modes The current viewing mode is displayed by your receiver Mode Menu info bar Front panel LED display TV TV icon Channel No Channel Number Radio Radio icon Channel No r Channel No Favourites Heart icon Channel No F Channel No A A B C D F E ...

Page 7: ...h TV UHF output TV SCART Use this connector to connect you TV to the receiver via a SCART cable VCR SCART Use this connector to connect you VCR to the receiver via a SCART cable Video Composite video output for connecting to a monitor etc 0 12V 0 or 12V output for external control switch Audio L R Audio outputs for connecting to an external stereo amplifier S Video Out Additional output f or recor...

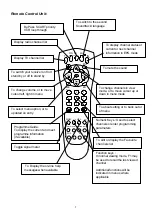
Page 8: ...o recall the last viewed channel Additional functions will be indicated in menus where applicable Display TV channel list Programme Guide To display the current and next programme information if available Toggle signal meter Display radio channel list To edit or display the Favourite channels list To Display the on line help messages when available To select menu option or to updated on entry To c...

Page 9: ...A box and turn the option to on Provided your dish is installed correctly and aligned to the relevant satellite both the Signal and Data bars should display a GREEN bar which denotes the following The first bar shows the actual satellite SIGNAL strength You should see a GREEN bar showing your satellite signal is medium to good If it is RED this normally indicates that either your dish LNB set up i...

Page 10: ... menu Once all the channels are found the Finished message will be displayed at the bottom of the menu indicating that the process has finished Now press the OK key to store the new channels You should now be able to view the first channel found by your receiver The channel number channel information and the clock will be displayed at the top of the screen for a few seconds You may recall this inf...

Page 11: ...ill store in dedicated satellite groups For more details please refer to the Advanced User Guide List by satellite To access your channels press the TV or Radio key To access the list of channels on a different satellite press F1 or F2 keys Within each list you may use the Up Down Left Right keys to highlight the required channel and press OK to select it List in Alphabetical order Alternatively f...

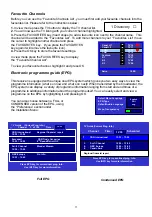
Page 12: ...by the broadcaster the EPG system can display a variety of programme information ranging from start and end times of a programme to additional information about the programme itself You can easily select and view a programme on the EPG by highlighting it and pressing OK You can also choose between a FULL or CONDENSED version of the EPG using the Preferences section under the Installation Menu Full...

Page 13: ...u will display the available audio channels and the user can then select either channel L or R for the desired language Otherwise the default L R setting would have the two languages mixed together and they will be heard at the same time From this menu the left column indicates the default languages available and the right column indicates the available audio sub channels The User may then move th...

Page 14: ...ist dish alignment or fault finding should there be a reception problem Diagnostic Information For more information on the receiving signal press the INFO key to display the diagnostic Screen The diagnostic screen displays detailed broadcast information in real time Press INFO key again to return to the signal meters or ESC to return to the Picture Memory Status At any time you can check the memor...

Page 15: ...hannel Set up or Installation menus without entering a PIN Note Once the correct PIN has been entered to temporarily disable a lock this will remain unlocked until the receiver has been switched to standby mode Lock Unlock Channels Highlight this option and press OK to display the Channel Lock menu Use UP DOWN LEFT RIGHT to select the channels you wish to lock press F2 to turn the LOCK tag ON and ...

Page 16: ...r re enter the new PIN or press ESC to abort the PIN change If the PIN is accepted this will now be your new PIN Don t forget your PIN number Please write down your PIN code below and keep in a safe place If you have forgotten your PIN code please call an Authorised Service Agent Factory PIN Code 0 0 0 0 New PIN Code Please keep this section or this manual in a safe place Enter new PIN Confirm Cha...

Page 17: ...th the Signal and Data bar graphs are GREEN you may now select a tuning method If the message No Signal is shown please check that your tuning parameters are correct and amend if necessary Check you LNB settings are correct you can access the LNB set up menu by highlighting the LNB Settings button and press OK see page 22 for LNB set up information If your Manual Tuning Menu tuning and LNB setting...

Page 18: ...nter the channel name and three other parameters Video PID Audio PID PCR PID and Text PID optional These values can either be in Decimal ranging from 0 to 9 or Hexadecimal ranging from 0 to 9 and A to F for each digit After selecting from the Preset List or Manually entering the basic channel parameters Frequency Symbol Rate Polarity and FEC value move the cursor to highlight the Manual button and...

Page 19: ... satellite will be added to the Manual list on the screen Highlight the new satellite in the list and press OK to return to the Channel tuning menu You will find your new satellite displayed in the Satellite box Enter the transponder parameters and check for signal availability Commence downloading your new channels Now any manual channels downloaded under these parameters will be listed under the...

Page 20: ... facility allows you to drag and drop channels to your preferred location Within the Channel Setup menu you will find the Sort Channels option Move the cursor to highlight Arrange in the Channel Setup menu and press OK Use the TV or Radio keys to select the listing you wish to sort Use the UP DOWN LEFT RIGHT keys to move the cursor highlight the channel you wish to move and press OK to select It T...

Page 21: ...mode of operation use the Left Right or OK key Use F1 key to start the sorting progress and ESC to abort The Sort Unscrambled Channels Menu Mode Select either to delete all scrambled channels or move all scrambled channels to the end of the channel list Scope Select sort TV channels only Radio channels only or sort both at the same time Channel Displays the current channel being checked Progress D...

Page 22: ...tion or press any Other key to return to the Delete Channels menu 2 Clear All Channel Info Only use this option if you would like to DELETE ALL CHANNELS stored in your receiver All stored channels in the receiver will be erased at the end of the following procedure From the Main Menu select Channel Setup and Delete You will be prompted with a warning screen Follow the on screen messages to proceed...

Page 23: ... the High Band L O frequency in the High Column e g For a Universal LNB the Low Band L O frequency is 9750 MHz and the High Band L O Frequency is 10600 MHz Tone Your digital receiver is equipped with switch controls 12V 22kHz tone as well as DiSEqC 1 0 DiSEqC With the DiSEqC options switched on you can select between LNBs from A to D Note You may use these controls independently to select differen...

Page 24: ...nel VCR or you are experiencing picture interference use this option to re tune your satellite receiver to a different UHF channel Remember to re tune your TV and VCR to the new channel Enable TV SCART RGB When OFF the TV SCART outputs composite video signal If you have a RGB compatible TV switch this option to ON to enjoy better picture quality Enable TV SCART S Video Select this option only if y...

Page 25: ...The time is displayed on the channel information banner and on the EPG so that you will never miss your favourite programme wherever the programmes are transmitted from Offset from GMT Enter the time difference between your local time and GMT in this box Local Time Some broadcasters may not transmit the time together with their programme content In this case you may need to enter the local time of...

Page 26: ...firm this once more Pressing OK at this point will enable the Reset to Factory Default function Pressing any other key will return you back to the installation menu Beyond this point all stored settings including LNB TV VCR configurations parental installation access control and preferences will be lost This final screen confirms the receiver has been reset to factory defaults Warning Are you sure...

Page 27: ...there is power at the mains socket Receiver is ON but no picture or sound Check that your TV is switched on Receiver is on no picture or sound except Channel scrambled menus Check tuning and set up Check Signal and Data levels Dish moved or LNB is faulty Interference on picture sound OK Local TV interference tune the output to another channel or connect to TV via SCART or phonos Interference on pi...

Page 28: ...r channels from the most popular satellites together with automatic video frequency scan selectable LNB local oscillators setting 22kHz tone and DiSEqC support The most commonly used audio settings are also pre stored in the first 25 audio presets 50 in total with the remainder 25 presets being fullycustomisable by the user Optional system installation In addition to the connectors shown on page 4...

Page 29: ...3 Re connect your receiver to the mains outlet and switch your receiver on 4 Follow the instructions on page 6 in the main manual and tune your TV to the receiver 5 Press the Analogue button to switch to analogue receiver mode You should now see a picture or a blue screen with a channel number Refer to your channel list and enter the channel number for the satellite your dish is set up to receive ...

Page 30: ...liary Left Right keys to change channels whilst in menu mode allowing quick changes to the settings of other channels AUDIO P001 IO NO 33 FREQ L 6 60MHZ FREQ R 6 60MHZ MODE MONO BANDWIDTH 280KHZ DEMEMPHASIS 50US 50US UP DN LR 0 9 OK ESC MEN 2 Audio Menu Audio No Numbers 1 25 are factory pre set audio sub carrier frequencies and 26 50 are user definable pre sets For complete audio preset list refer...

Page 31: ... A or B of a DiSEqC switch SWITCH OPTION Use to select between option A or B of a DiSEqC switch Note The DiSEqC function is enabled in the Installation menu DiSEqC Turns the DiSEqC control function ON or OFF Switch this option ON when you are using DiSEqC controlled equipment EPG Key Pressing the EPG key in analogue mode will display the Channel Lock Menu Menu Lock You can set the menu lock NO and...

Page 32: ...similar programming parameters for a range of channels without the need to exit from menu mode Analogue You can use the Analogue key at any time to toggle between the analogue and digital receiving mode of you receiver Favourite Key Press the favourite key to display the Favourite Menu Up to 40 favourite channels can be stored By using the Up Down Left Right keys to move the cursor to select a fav...

Page 33: ...d to edit the satellite name SAT STORED When SAT STORED NO all channels with the same satellite name will be assigned to this satellite position DISH POSITION Displays the current dish position EAST LIMIT You may store the current dish position as the East limits by moving the cursor here and press STORE WEST LIMIT You may store the current dish position as the West limits by moving the cursor her...

Page 34: ... Move the dish until the correct channel is found 4 Move the cursor to SAT STORED and change the setting from NO to YES and press store 5 All the channels assigned to that SATELLITE NAME will now be stored to that dish position 6 Repeat the steps above to locate other satellites of your choice New satellites For satellites not listed to the pre programmed list you may either use the SPARE channels...

Page 35: ... 900 V Ku 7 38 50uS 022 EL BAHDJA 11 900 V Ku 7 56 DNR 023 AL IRAQ 11 938 V Ku 7 02 50uS 024 ISA 11 938 V Ku 7 20 50uS 025 IRAQ INT 11 938 V Ku 7 38 50uS 026 QATAR RADIO 12 521 H Ku 7 00 50uS 027 RADIO AMMAN 12 578 V Ku 7 02 50uS 028 AFS 12 578 V Ku 7 38 50uS 029 V O K 1 12 661 V Ku 7 20 50uS 030 AL QURAN AL KARIM 12 661 V Ku 7 92 DNR 031 V O K 1 12 720 H Ku 7 20 50uS 032 SHARJAH TV 3 720 V C 6 60...

Page 36: ... CLASSIC 4 167 V C 7 40 50uS 074 YEMEN RADIO 4 180 H C 7 20 DNR 075 ADEN RADIO 4 180 H C 7 92 DNR 7 0W NILESAT 101 102 076 FEED 11 919 H Ku 6 60 50uS 077 JSC 11 977 V Ku 6 60 50uS 19 2E ASTRA 1A 1H 078 ARTE 10 714 H Ku 7 02 7 20 DNR 079 CNBC 10 729 V Ku 7 02 7 20 DNR 080 ANIMAL PLANET 10 744 H Ku 7 02 7 20 DNR 081 QVC 10 759 V Ku 7 02 7 20 DNR 082 JSTV 10 773 H Ku 7 02 7 20 DNR 083 N24 10 803 H Ku...

Page 37: ... 406 V Ku 7 02 7 20 DNR 122 MTV 11 421 H Ku 7 02 7 20 DNR 123 SKY MOVIAX 11 436 V Ku 7 02 7 20 DNR 124 PREMIERE 11 464 H Ku 7 02 7 20 DNR 125 SKY PRIER 11 479 V Ku 7 02 7 20 DNR 126 ARD 11 494 H Ku 7 02 7 20 DNR 127 SKY SPORTS 1 11 509 V Ku 7 02 7 20 DNR 128 DSF 11 523 H Ku 7 02 7 20 DNR 129 VH 1 11 538 V Ku 7 02 7 20 DNR 130 UK GOLD 11 553 H Ku 7 02 7 20 DNR 131 SCI FI 11 568 V Ku 7 02 7 20 DNR 1...

Page 38: ...DNR 172 RTL 11 391 H Ku 7 74 7 92 DNR 173 HOREB 11 406 V Ku 7 38 DNR 174 SUNSHINE 11 406 V Ku 7 74 7 92 DNR 175 SBN 11 421 H Ku 7 38 50uS 176 N JOY 11 464 H Ku 7 38 7 56 DNR 177 SUNRISE 11 479 V Ku 7 38 DNR 178 TAMIL 11 479 V Ku 7 56 DNR 179 SWR 3 11 494 H Ku 7 38 7 56 DNR 180 100 6 11 523 H Ku 7 74 7 92 DNR 181 MELODIE 11 523 H Ku 7 38 7 56 DNR 182 WRN 1 11 538 V Ku 7 38 DNR 183 RTE 1 11 538 V Ku...

Page 39: ... DNR 222 TVE INT 11 785 H Ku 6 60 50uS 223 M2 12 131 H Ku 7 02 7 20 DNR 224 ERT SAT 12 284 H Ku 6 65 50uS 225 KOSSUTH 10 815 H Ku 6 60 50uS 226 RADIO BU 10 815 V Ku 7 02 7 20 DNR 227 PETOFI R 10 815 V Ku 7 02 7 20 DNR 228 MAGYAR R 10 815 H Ku 6 60 50uS 229 RADIO SW 10 853 H Ku 6 65 50uS 230 RCI RA 10 853 V Ku 6 60 50Us 231 WRN ISRA 10 853 H Ku 6 60 DNR 232 MUSIC 10 949 V Ku 6 60 DNR 233 TRT FM 10 ...

Page 40: ...38 7 56 DNR 273 RNE 11 785 H Ku 7 74 7 92 DNR 274 BARTOK R 12 131 H Ku 7 74 7 92 DNR 30 5E ARABSAT 2B 275 RTM 1 3 876 V C 6 65 50uS 276 MAURITANIE 3 918 V C 6 60 50uS 277 ASBU FEEDS 3 968 V C 6 60 50uS 278 ASBU FEEDS 3 991 V C 6 60 50uS 279 FEED 4 044 V C 6 60 50uS 280 FEED 4 058 H C 6 60 50uS 281 RTD 4 080 V C 6 60 50uS 282 FEED 4 099 H C 6 60 50uS 283 FEED 4 126 V C 6 60 50uS 284 FEED 4 140 H C ...

Page 41: ...50uS 318 SONY ENTERTAINMENT 3 907 H C 6 60 50uS 319 DD NEWS 4 157 H C 6 30 50uS 320 MTV INDIA 4 182 H C 7 56 7 74 DNR 321 ZEE MUSIC 4 185 H C 6 60 50uS 62 0E INTELSAT 602 322 IRIB TV 4 10 964 V Ku 6 80 50uS 323 IRIB TV 2 10 998 V Ku 6 80 50uS 324 IRIB TV 3 11 096 V Ku 6 80 50uS 325 IRIB TV 1 11 174 V Ku 6 80 50uS 326 M NET 3 927 H C 6 80 50uS 60 0E INTELSAT 604 327 NEWS FEED 4 166 V C 6 60 50uS 32...

Page 42: ... TRT AVRASYA 11 553 H Ku 6 65 50uS 364 D FUN 11 564 V Ku 6 65 50uS 365 TRT 2 11 585 H Ku 6 65 50uS 366 KRAL TV 11 660 H Ku 6 65 50uS 367 SUPER SPORT 11 683 V Ku 6 65 50uS 36 0E TELSAT SEASAT W4 368 D FEED 10 976 V Ku 6 60 50uS 369 RASIA TV 12 225 H Ku 6 80 50uS 370 CCG TEST CARD 12 322 H Ku 6 60 50uS 31 3E TURKSAT 1B 371 APCA TV 11 090 V Ku 6 65 50uS 21 5E TELSAT II F3 372 TEST 11 012 H Ku 6 60 50...

Page 43: ...Ku 6 60 50uS 409 MTV NORD 12 207 V Ku 6 60 50uS 410 CYPRUS S 12 265 H Ku 6 60 50uS 411 VIASAT S 12 322 V Ku 6 60 50uS 412 KANAL 5 12 476 V Ku 6 60 50uS 413 TEST CARD 12 437 V Ku 6 50 50uS 414 THE VOICE 11 938 V Ku 7 74 7 92 DNR 415 RIK 1 12 265 H Ku 7 20 DNR 416 RIK 3 12 265 H Ku 7 74 DNR 417 RIK 3 12 265 H Ku 7 74 7 92 DNR 418 THE VOICE 12 476 V Ku 7 74 7 92 DNR 1 0W THOR1 2 3 INTELSAT707 419 TV ...

Page 44: ...32 V Ku 5 80 50uS 8 0W TELECOM 2A 2D 456 C FRANCE 12 640 V Ku 7 02 7 20 DNR 11 0W EXPRESS 3A 457 ORT 3 675 V C 6 60 50uS 12 5W TELSAT II F2 458 DIGITALY 12 554 H Ku 6 60 50uS 18 0W INTELSAT 705 6 60 50uS 459 FEED 11 012 V Ku 6 60 50uS 460 FEED 11 052 H Ku 6 60 50uS 461 FEED 11 092 H Ku 6 60 50uS 462 FEED 11 095 H Ku 6 60 50uS 463 FEED 11 136 H Ku 6 60 50uS 464 FEED 11 138 V Ku 6 60 50uS 465 FEED 1...

Page 45: ...1 010 V Ku 7 20 50uS 494 MTA INT 11 010 V Ku 7 38 50uS 495 MTA INT 11 010 V Ku 7 56 DNR 496 MTA INT 11 010 V Ku 7 74 DNR 497 MTA INT 11 010 V Ku 7 92 DNR 498 FEED 11 010 V Ku 6 60 50Us 499 FEED 4 166 V Ku 6 60 50uS 500 FEED 4 188 V Ku 6 60 50uS 40 5W NSS 806 501 ATC 4 167 H C 6 60 50uS 43 0W PAS 3R 6 6B 502 CHURCH 12 515 H Ku 6 60 50uS 503 TEST CARD 12 525 H Ku 6 60 50uS 504 US PGA 12 540 H Ku 6 6...

Page 46: ... 50 130 50uS 022 STER 5 58 5 76 130 50uS 023 STER 5 94 6 12 130 50uS 024 STER 6 30 6 48 130 50uS 025 MONO 6 80 6 80 130 50uS 026 MONO 7 40 7 40 180 50uS 027 MONO 7 74 7 74 130 DNR 028 MONO 6 70 6 70 180 DNR 029 MONO 7 38 7 38 130 50uS 030 MONO 7 50 7 50 130 DNR 031 MONO 7 90 7 90 130 50uS 032 MONO 8 40 8 40 130 50uS 033 MONO 7 80 7 80 280 50uS 034 MONO 7 92 7 92 130 DNR 035 MONO 6 66 6 66 280 50Us...

Page 47: ...module The SMART card must be inserted with the gold contact pad facing up Ensure that these contacts are clean before inserting it into the CI module Note Both the SMART card and CI modules support hot plugging this means that the SMART card and CI module may be inserted or removed with the receiver switched on Both the CI module and SMART card contain delicate electronic circuitry please handle ...

Page 48: ... You may require a different SMART card for this programme You should note that these messages come from the CI SMART card module and so will vary Please refer to the information provided with your Subscription CI module Sometimes the above screen may appear over a de scrambled channel This may be caused by having two identical CI modules inserted but each with a SMART card from a different servic...

Page 49: ...F type Tuner Loop though Digital tuner with LNB input and loop output Full power loop through supported Frequency Range at LNB input 920 2150MHz Input connector F type female Impedance 75Ω Input sensitivity 30 to 65dBm LNB supply voltages Supply voltage software switchable 13V 18V Current limit 0 to 400mA Software controlled LNB power on off LNB 22kHz Tone switching Amplitude 0 6Vpp 0 2V Frequency...

Page 50: ... NTSC Video Memory 16Mbit Audio Decoder Type MPEG1 Layers I and II Audio Modes Mono Dual Stereo Joint Stereo Output Sample Rates Supported 16kHz 22 05kHz 24kHz 32kHz 44 1kHz 48kHz Data rates supported 8 to 448 Kbps PAL NTSC Encoder Supported Outputs Composite RGB S Video NTSC M PAL B D G H I M N Nc country dependent UHF VHF Modulator Tuning Range UHF CH21 to CH69 or VHF CH3 4 country dependent Pro...

Reviews: