1-10
1-9
DIGITAL VIDEO RECORDER
6
Attaching/Detaching HDD
Caution
Caution
Be sure to lock the hard drive rack in place for normal operation of the system. Unless
the hard drive rack is locked, the system cannot recognize your hard drive.
When removing the hard drive rack, be sure to wait until your hard drive's power LED
goes off. When replacing your hard drive with another one, be sure to turn off the sys-
tem's power. If you replace your hard drive with the power on, your hard drive may
malfunction or be damaged.
If you want to use a hard drive from another machine, be sure to format it from a PC
before using it. The system may not work normally if you use it without formatting it
first. Hard disk drives recommended for use with the DVR COMBO are Samsung
Spinpoint SV0802N and SEAGATE Barracuda 7200.7 80G.
Note
Note
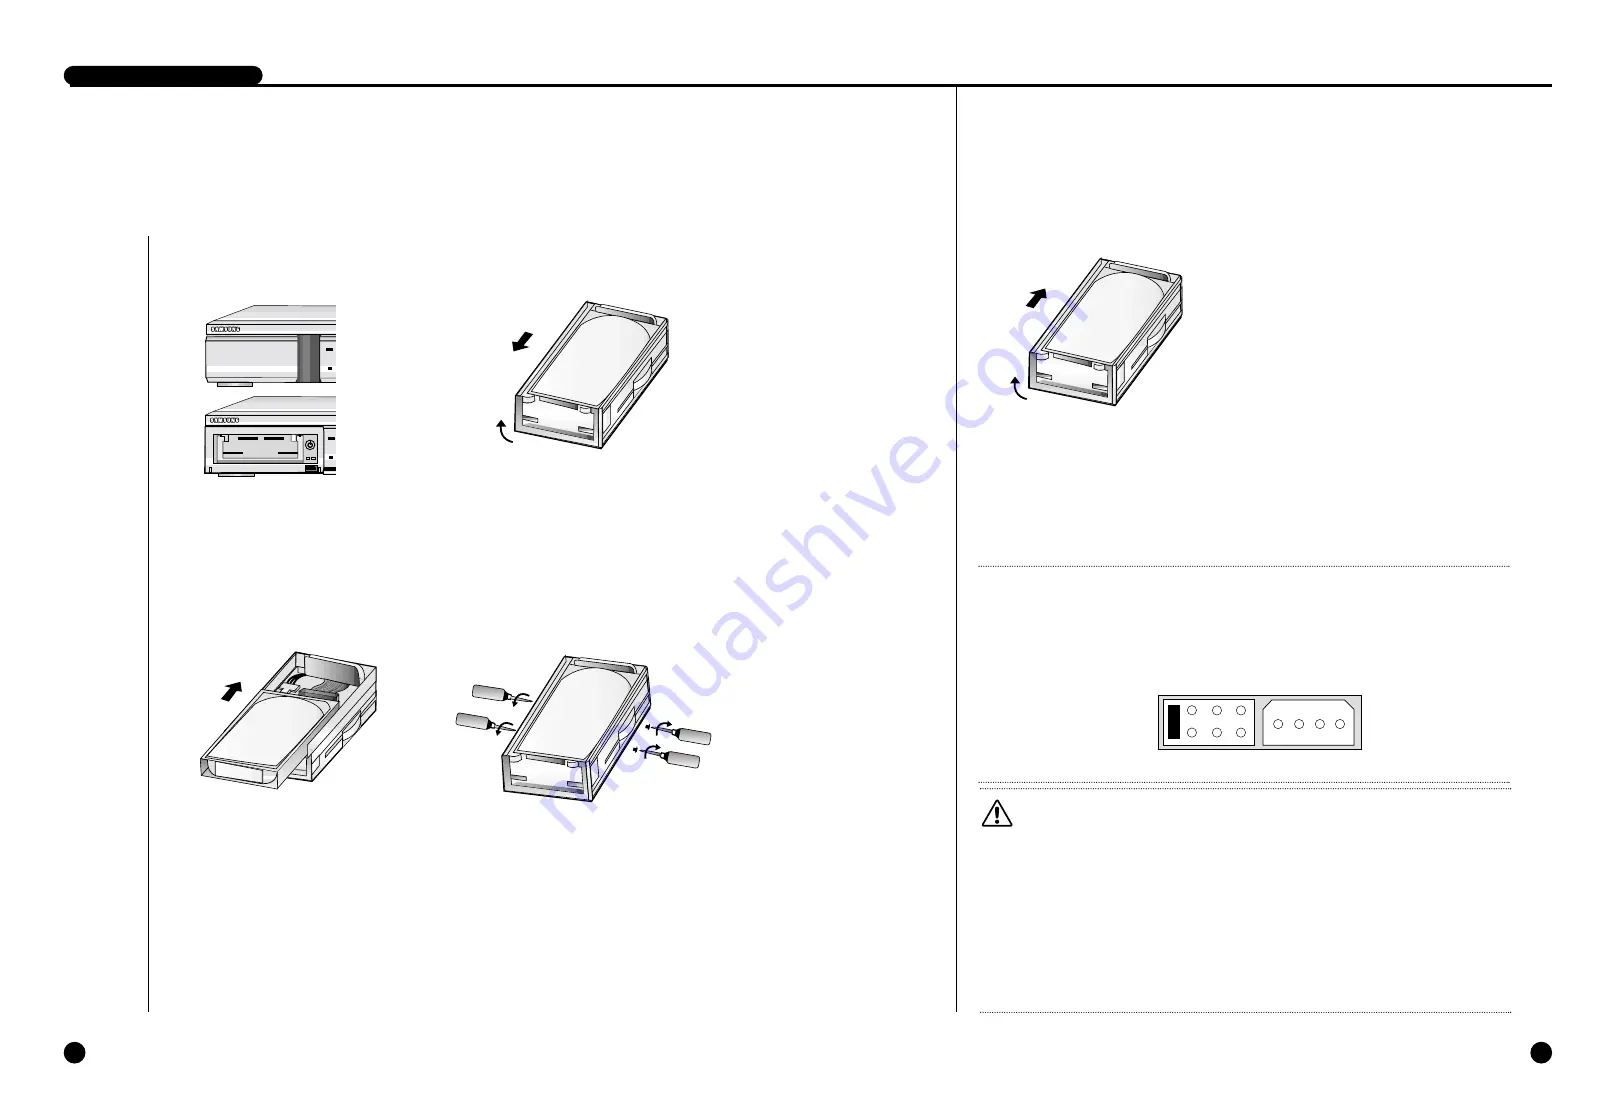
When installing a HDD into the hard drive rack, be sure to set the HDD as Master
mode. Otherwise, the system will not recognize the HDD. For instructions on how to
set the HDD as Master mode, please refer to the HDD's manual. For example, for a
Samsung Spinpoint V80 HDD, set the mode as follows:
H.D.D.
Lift up
5. Lift up the rack's front handle and push
the rack into the main unit. Once the
hard drive rack is fully inserted into the
main unit, lower the front handle to
secure it
6. Lock the hard drive rack with the
key, and then turn on the power.
Mounting HDD
2. Remove the hard drive rack from the
main unit by lifting up the handle on
the front of the rack and pulling
straight out.
3. Connect the removable rack's
data cable and power cord to
your hard drive.
POWER
ALARM
LAN
CHECK
REC
VCR
SEA
REC LOCK
ARCHIVE
POWER
ALARM
LAN
CHECK
REC
VCR
SEAR
REC LOCK
ARCHIVE
H.D.D.
Lift up
H.D.D.
H.D.D.
1. First, open the hard drive rack cover
on the front of the main unit. Next,
open the lock on the front of the rack
with the key.
4. Slide your hard drive into the
removable rack and fasten with
screws.
Master Mode
Summary of Contents for SCR-3000N
Page 4: ...1 I Zusammenfassung D ...
Page 10: ...II Anschluss anderer Geräte 2 D ...
Page 14: ...III Grundlagen der Bedienung 3 D ...
Page 19: ...IV DVR Menüs 4 D ...
Page 36: ...VI Aufnahme 6 D ...
Page 40: ...VII Daten suchen und wiedergeben 7 D ...
Page 49: ...VIII Sonstiges 8 D ...
Page 51: ...Anhänge 9 D ...
Page 57: ...1 I Sommaire ...
Page 63: ...II Brancher d autres appareils 2 ...
Page 67: ...III Méthode de base à suivre 3 ...
Page 72: ...IV DVR Menu 4 ...
Page 89: ...VI Enregistrer 6 ...
Page 101: ...VIII Autre 8 ...
Page 103: ...Appendices 9 ...
Page 109: ...1 I Sommario ...
Page 115: ...II Collegamento con altri dispositivi 2 ...
Page 119: ...III Operazioni principali 3 ...
Page 124: ...IV Menu DVR 4 ...
Page 141: ...VI Registrazione 6 ...
Page 153: ...VIII Miscellanea 8 ...
Page 155: ...Appendice 9 ...
Page 161: ...1 I Summary ...
Page 167: ...II Connection with Other Devices 2 ...
Page 171: ...III Basic Method to use 3 ...
Page 176: ...IV DVR Menus 4 ...
Page 193: ...VI Record 6 ...
Page 205: ...VIII Others 8 ...
Page 207: ...Appendix 9 ...
Page 213: ...1 I Resumen ...
Page 219: ...II Conexión con otros dis positivos 2 ...
Page 223: ...III Método básico de utilización 3 ...
Page 228: ...IV DVR Menús 4 ...
Page 245: ...VI GRABACIÓN 6 ...
Page 257: ...VIII Otros 8 ...
Page 259: ...Los apéndices 9 ...


