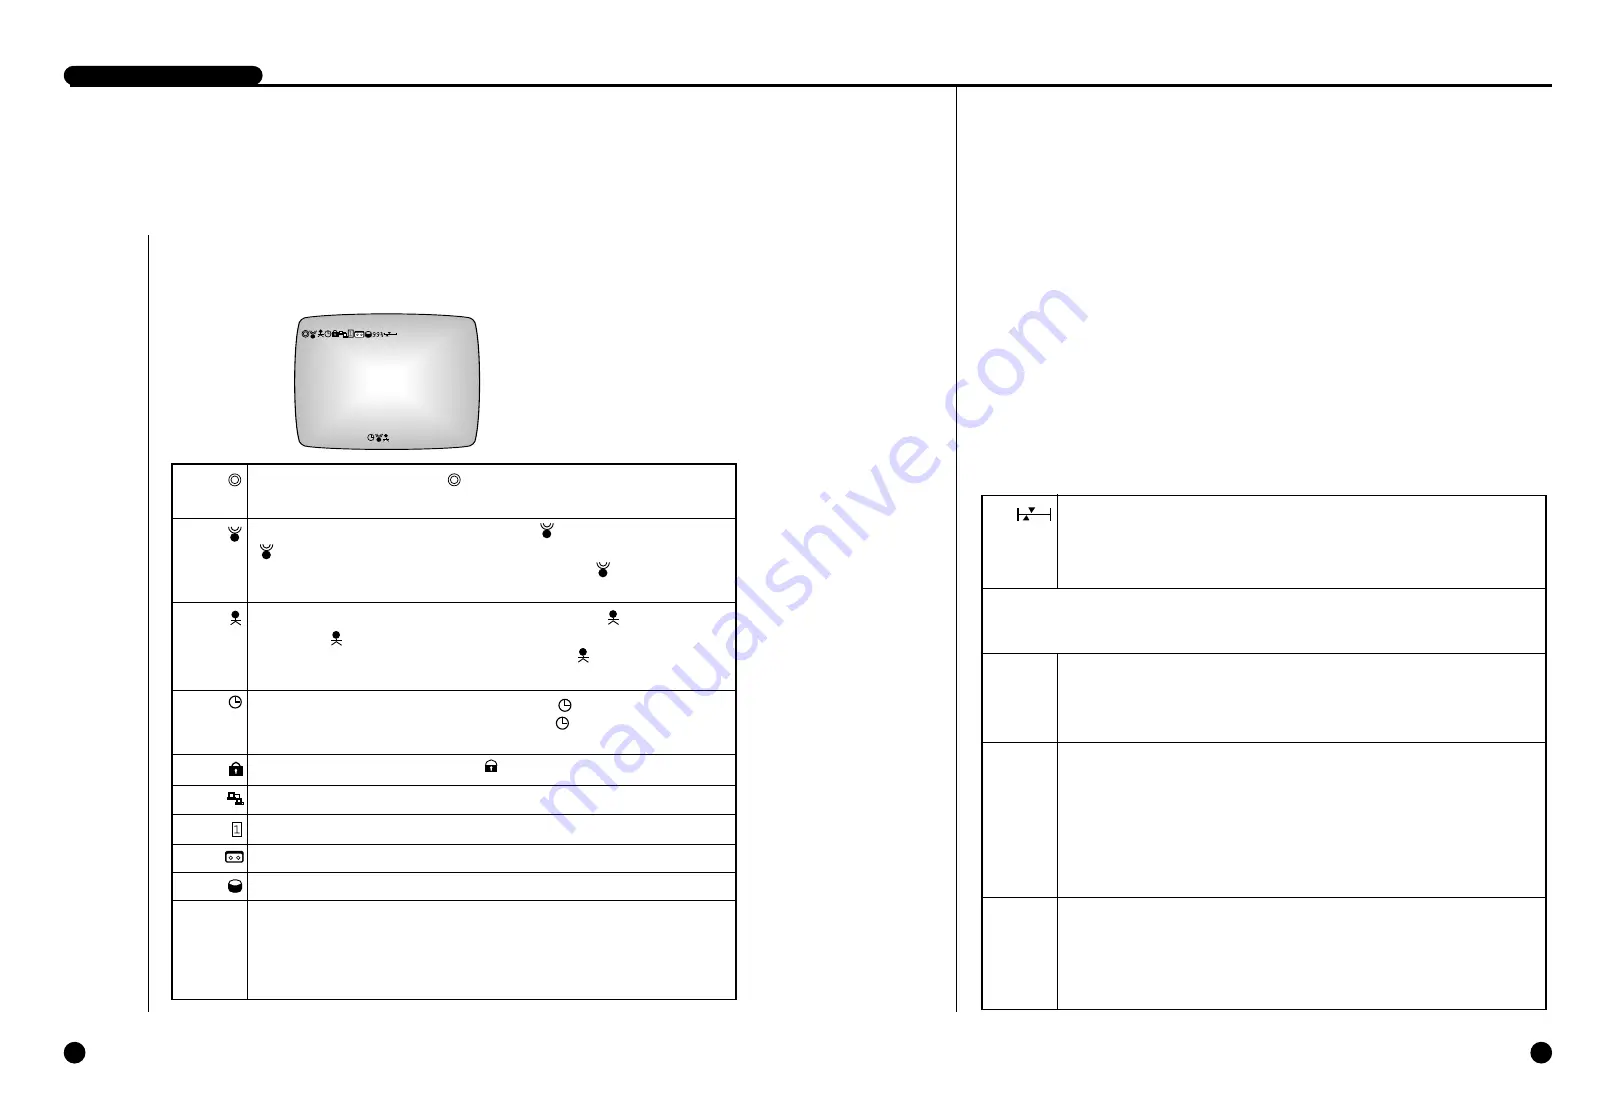
The upper pointer shows the relative location of the recorded data being stored inside
the hard disk and the lower pointer shows the relative location of the data currently
being played back. The following pointer will be hidden in the general live screen and
recording screen.
You can change the above system status display position. The user will mark the position in the
top left and right corner. (Select LEFT or RIGHT in STATUS POSITION of the
CLOCK/DISPLAY MODE SET UP menu. Please refer to Page 4-6 for the details)
It shows the current date and time as configured by the system.
You can change the display position of date and time. You shall designate the position
in the top right or left corner by yourself. (Just choose LEFT or RIGHT in the
CLOCK/DISPLAY MODE SETUP menu. Please refer to Page 4-6 for the details)
If the system is in the playback mode,
❿
icon appears. And if the system is in the
pause state, it changes to this icon
❙❙
. In addition, stored data can be played back at
various speeds; when played in the forward direction at speeds other than the normal
speed, the speed is shown on the right side of the
❿
icon and if it is played in the
reverse direction at speeds other than the normal speed,
➛
icon appears and the right
side of this
➛
icon shows the speed. Possible speeds in the system for forward and
reverse directions are 1/5, 1/2, 1, 2, 5, 10, 20 times normal speed.
It shows the recorded date and time of the data currently being played back.
You can change the recording date and time display position. The user will mark the
position in the bottom left and right corner. (Select LEFT or RIGHT in TIME MARK
POSITION of the RECORD MODE SET UP menu. Please refer to Page 4-8 for the
details.)
2003-06-25 04:30:00
2003-06-24 00:23:44
❿
X2
3-4
3-3
DIGITAL VIDEO RECORDER
2
Basic Screen Viewing
If system is in the recording state icon will blink. However, it does not blink in the
Live Screen state.
If the system is in the recording state due to alarm, icon appears. In this state,
icon continually blinks.
While the data recorded by ALARM RECORD is playing, an icon will appear in
front of the recording date and time of the data.
If the system is in the recording state due to Motion Detection, icon appears.
In this state, icon continually blinks.
While the data recorded by Motion Detection playing, an icon will appear in front
of the recording date and time of the data.
If the system is in the recording state due to the timer, icon appears.
While the data recorded by Timer record playing, an icon will appear in front of
the recording date and time of the data.
If the system in the recording lock state, icon appears.
Appears when the system is connected to the PC's remote monitoring program via LAN.
Indicates whether a HDD is installed or whether the hard drive rack is locked.
Indicates whether a video tape is in the video deck.
Indicates whether the data from the current HDD is being backed up on to a video tape.
Displays the amount of free space remaining on the HDD in percent (%). However,
this will be displayed only if DISK END MODE is set to STOP and not to OVER-
WRITE.
For details, please refer to pages 4-8.
Viewing Full Screen
Here comes the description of all the icons and status in the screen.
99%
2003-06-25 04:30:00
❿
X2
2003-06-24 00:23:44
Summary of Contents for SCR-3000N
Page 4: ...1 I Zusammenfassung D ...
Page 10: ...II Anschluss anderer Geräte 2 D ...
Page 14: ...III Grundlagen der Bedienung 3 D ...
Page 19: ...IV DVR Menüs 4 D ...
Page 36: ...VI Aufnahme 6 D ...
Page 40: ...VII Daten suchen und wiedergeben 7 D ...
Page 49: ...VIII Sonstiges 8 D ...
Page 51: ...Anhänge 9 D ...
Page 57: ...1 I Sommaire ...
Page 63: ...II Brancher d autres appareils 2 ...
Page 67: ...III Méthode de base à suivre 3 ...
Page 72: ...IV DVR Menu 4 ...
Page 89: ...VI Enregistrer 6 ...
Page 101: ...VIII Autre 8 ...
Page 103: ...Appendices 9 ...
Page 109: ...1 I Sommario ...
Page 115: ...II Collegamento con altri dispositivi 2 ...
Page 119: ...III Operazioni principali 3 ...
Page 124: ...IV Menu DVR 4 ...
Page 141: ...VI Registrazione 6 ...
Page 153: ...VIII Miscellanea 8 ...
Page 155: ...Appendice 9 ...
Page 161: ...1 I Summary ...
Page 167: ...II Connection with Other Devices 2 ...
Page 171: ...III Basic Method to use 3 ...
Page 176: ...IV DVR Menus 4 ...
Page 193: ...VI Record 6 ...
Page 205: ...VIII Others 8 ...
Page 207: ...Appendix 9 ...
Page 213: ...1 I Resumen ...
Page 219: ...II Conexión con otros dis positivos 2 ...
Page 223: ...III Método básico de utilización 3 ...
Page 228: ...IV DVR Menús 4 ...
Page 245: ...VI GRABACIÓN 6 ...
Page 257: ...VIII Otros 8 ...
Page 259: ...Los apéndices 9 ...


