5-10
5-9
DIGITAL VIDEO RECORDER
3
TIMER ARCHIVE
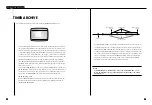
The following illustration shows the initial settings of the TIMER ARCHIVE menu.
The Timer Backup function allows you to set the system to automatically back up the data
that is recorded on the HDD to a video tape while you are away from the system. You can
set the system to back up the desired type of event on the desired day of the week and time
at the desired sampling rate. First set TIMER ARCHIVE to ON. Next, select all event types
you want to back up by setting them to [O]. For example, a backup will not be performed,
even if an alarm event occurs during the set time, unless ALARM EVENT is set to [O]. Set
ARCHIVE SCHEDULE by selecting one from the following: SUN, MON, TUE, WED,
THU, FRI, SAT, MON-FRI, MON-SAT, and DAILY. Enter the backup start and end times
into FROM and TO fields respectively. Finally, set the picture sampling rate to the desired
value between 1/1 to 1/16.
To cancel the TIMER ARCHIVE you have set, press the STOP( ) button for 3 seconds. The
TIMER ARCHIVE will pause for 5 seconds. However, if you do not make any action for 5
seconds, the system will reset to the Timer Archive after 5 seconds have elapsed. To com-
pletely cancel the TIMER ARCHIVE, enter the menu within 5 seconds and set the
TIMER ARCHIVE to OFF.
Because TIMER ARCHIVE is an automatic backup for the data that will be recorded, any
data that has already been recorded will not be backed up. The following illustrates the
timeline of TIMER ARCHIVE.
The TIMER ARCHIVE time is a future time, rather than the current time. If the time you set
is earlier than the current time, it is tomorrow's time or a time in the next week. In the above
illustration, the TIMER ARCHIVE time is set and there are 3 record events. The first event
overlaps with the TIMER ARCHIVE start time. In this case, archiving will start at the start
time of the record event that is overlapping. Archiving will start as an event ends. The third
event is overlapping with the end time of TIMER ARCHIVE. In this case, only the data
between the event start time and archiving end time will be archived when the TIMER
ARCHIVE set time ends, even if the record event is not finished.
TIMER ARCHIVE
TIMER ARCHIVE
OFF
SELECT EVENT
RECORD [X]
ALARM [X]
MOTION [X]
DAY
SUN
FROM
12:00:00
TO
12:00:00
SAMPLING RATE
1/1
MOVE=[ /
❷
/
➛
/
❿
] SELECT=[ ] EXIT=[MENU]
Note
Note
- If MULTIPLEXER in the SYSTEM SETUP menu of the DVR MAIN MENU is set to
WITH, the MOTION event type will be disabled for SELECT EVENT of the TIMER
ARCHIVE menu.
Current Time
Date being archived
RECORD EVENT
TIMER ARCHIVEE
End Time
TIMER ARCHIVE
Start Time
Summary of Contents for SCR-3000N
Page 4: ...1 I Zusammenfassung D ...
Page 10: ...II Anschluss anderer Geräte 2 D ...
Page 14: ...III Grundlagen der Bedienung 3 D ...
Page 19: ...IV DVR Menüs 4 D ...
Page 36: ...VI Aufnahme 6 D ...
Page 40: ...VII Daten suchen und wiedergeben 7 D ...
Page 49: ...VIII Sonstiges 8 D ...
Page 51: ...Anhänge 9 D ...
Page 57: ...1 I Sommaire ...
Page 63: ...II Brancher d autres appareils 2 ...
Page 67: ...III Méthode de base à suivre 3 ...
Page 72: ...IV DVR Menu 4 ...
Page 89: ...VI Enregistrer 6 ...
Page 101: ...VIII Autre 8 ...
Page 103: ...Appendices 9 ...
Page 109: ...1 I Sommario ...
Page 115: ...II Collegamento con altri dispositivi 2 ...
Page 119: ...III Operazioni principali 3 ...
Page 124: ...IV Menu DVR 4 ...
Page 141: ...VI Registrazione 6 ...
Page 153: ...VIII Miscellanea 8 ...
Page 155: ...Appendice 9 ...
Page 161: ...1 I Summary ...
Page 167: ...II Connection with Other Devices 2 ...
Page 171: ...III Basic Method to use 3 ...
Page 176: ...IV DVR Menus 4 ...
Page 193: ...VI Record 6 ...
Page 205: ...VIII Others 8 ...
Page 207: ...Appendix 9 ...
Page 213: ...1 I Resumen ...
Page 219: ...II Conexión con otros dis positivos 2 ...
Page 223: ...III Método básico de utilización 3 ...
Page 228: ...IV DVR Menús 4 ...
Page 245: ...VI GRABACIÓN 6 ...
Page 257: ...VIII Otros 8 ...
Page 259: ...Los apéndices 9 ...


