Precautions
Service Manual
5-21
Samsung Electronics
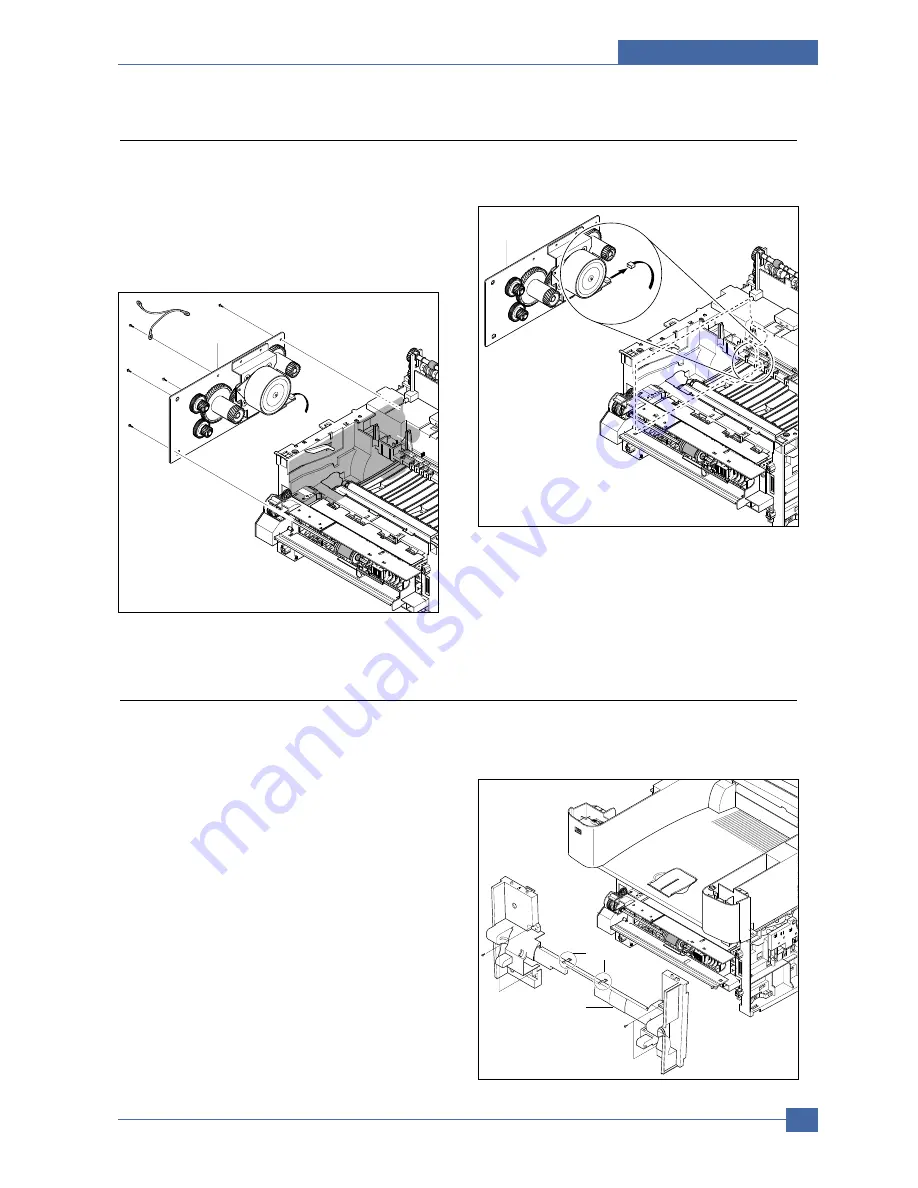
5.16 Drive Ass'y
1. Before you remove the Drive Ass'y, you should
remove:
- Rear Cover (see page 5-2)
- Side Cover (LH) (see page 5-3)
- Shield Controller Ass’y (see page 5-9)
2. Remove the 5 screws securing the Drive Ass'y.
3. Take out the Drive Ass'y, then unplug the connector
from the Motor PBA, as shown below.
Caution. The six screws have numbers stamped. into
the Drive Ass’y base plate. When refitting the
Drive Ass’y tighten the screws the order they
are numbered. Only screw s numbered 1 to 5
are fitted at this stage. Screw 6 is fitted when
the Shield Controller Ass’y is refitted
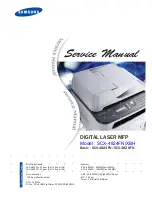
5.17 Cover Mid Front
1. Before you remove the Cover Mid Front, you should
remove:
- Rear Cover (see page 5-2)
- Side Cover (LH, RH) (see page 5-3)
- Middle Cover (see page 5-14)
2. Remove the 4 screws securing the Cover Mid Front
and release 2 clips in the center. This cover is fragile
take care when removing it.
Drive Ass y
Drive Ass y
clips
Cover Mid Front
Summary of Contents for SCX-4520
Page 10: ...Service Manual Reference Information 2 4 Samsung Electronics 2 3 2 A4 2 Pattern ...
Page 11: ...Reference Information Samsung Electronics Service Manual 2 5 2 3 3 A4 IDC 5 Patten ...
Page 14: ...Service Manual Reference Information 2 8 Samsung Electronics MEMO ...
Page 24: ...Service Manual Specifications 3 10 Samsung Electronics MEMO ...
Page 27: ...Summary of Product Service Manual 4 3 Samsung Electronics 4 1 3 Control Panel SCX 4720F ...
Page 28: ...Service Manual Summary of Product 4 4 Samsung Electronics ...
Page 51: ...Summary of Product Service Manual 4 27 Samsung Electronics MEMO ...
Page 163: ...Service Manual Exploded View Parts List 8 28 Samsung Electronics MEMO ...


