English-18
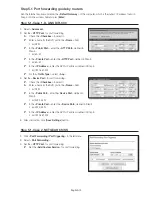
Step 5.1-Case 5. TRENDNET TEW-652BRP
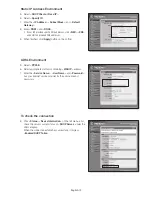
1.
Click <
Access
>-<
Virtual Server
> on the left menu.
2.
Set the <
HTTP Port
> for port forwarding.
2
-1
. Select [
Enable
] for the item <
Enable
>.
2
-2
. Enter a name for the DVR port in the <
Name
> field.
`
ex) DVR1
2
-3
. Select [
TCP
] for the item <
Protocol
>.
2
-4
. In the <
Private Port
> and <
Public Port
> fields, enter the
<
HTTP Port
> defined in Step 3.
`
ex) 80
2
-5
. In the <
LAN Server
>, enter the DVR's IP address defined in Step 3.
`
ex) 192.168.1.200
2
-6
. Click [
ADD
] button.
3.
Set the <
Device Port
> for port forwarding.
3
-1
. Select [
Enable
] for the item <
Enable
>.
3
-2
. Enter a name for the DVR port in the <
Name
> field.
`
ex) DVR2
3
-3
. Select [
TCP
] for the item <
Protocol
>.
3
-4
. In the <
Private Port
> and <
Public Port
> fields, enter the
<
Device Port
> defined in Step 3.
`
ex) 4520,4521,4522,4523,4524
3
-5
. In the <
LAN Server
>, enter the DVR's IP address defined in Step 3.
`
ex) 192.168.1.200
3
-6
. Click [
ADD
] button.
4.
Settings completed.
Step 5.2 Checking port forwarding on your computer
1.
Confirm the router’s <
WAN (Internet) IP
> which has been checked in Step 4.2 again.
2.
Confirm the DVR’s <
HTTP Port
> checked in Step 3.1 again.
3.
Run the Internet Explorer and enter http://<
WAN (Internet) IP
>:<
HTTP Port
> into the address field and press [
Enter
].
4.
DVR's Web Viewer screen appears if port forwarding configuration has been properly set.
5.
If you cannot access to the Web Viewer or accessed but no video is displayed, go to the Step 5.1 and check again.
J
`
If only <HTTP Port> is configured for port forwarding:
Accessing through the web browser is possible but video is not received since the <
Device Port
> for video data
communication is not configured for port forwarding.
If only <Device Port> is configured for port forwarding:
Accessing through the web browser is impossible since the <
HTTP Port
> for the communication is not configured for port
forwarding.
4524
4524
80
80

