background image

6

.5

Using AnyPage Lite

5. You can rotate, invert, or clean the image, using the menu, or the

buttons on the toolbar. See page 6.12. 

6. To analyze the image, click        button on the toolbar. AnyPage Lite

analyzes the open page (or the selected pages or all pages depending

on the button mode.) and marks blocks as texts, pictures, and tables on

this particular image. For details on the button mode, see page 6.11.

If you are not satisfied with the result, edit the blocks using the buttons

on the toolbar. See page 6.13.

N

No

otte

e::  

You can skip this step. When you click         button without
analyzing the image, AnyPage Lite automatically analyzes the image
and then starts recognition.

7. To start recognition, click        button on the toolbar.  

AnyPage Lite recognizes the open page (or selected pages or all pages

depending on the button mode.). During recognition, AnyPage Lite

highlights the recognized part in the Image window. 

The system may display a warning message (for example; Resolution is

too low). This kind of messages helps you check parameters, and can

be disabled if you wish (From the Tools menu, select Options 

Recognition 

Show tips during recognition).

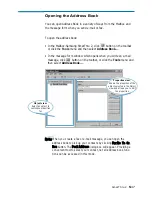
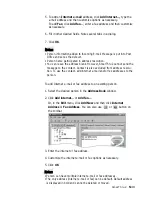
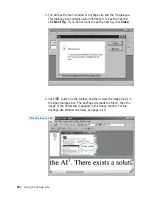
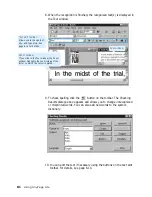
The number in the upper left corner

of the block indicates the sequence

that they will appear in the output

text.

The block type is identified with

color; green (text), brown (picture),

brown (table). To change the color;

select Options from the Tools

menu. In the Options dialogue box,

select the General tab and change

the color.

Summary of Contents for SF-5100P

Page 1: ...Laser Printer Scanner PC Fax User s Guide SF 5100P ...

Page 2: ...ctive holders About user s guides Your machine is packaged with two user guides This user s guide which provides you with information on installing the supplied CD ROM to use your machine as a printer and scanner This guide also provides the basic description on using the supplied multi function application Samsung SmarThru 2 allowing you to scan and edit images scan to copy PC fax send e mail on ...

Page 3: ...ling Bonus Software 1 13 Making Installation Diskettes 1 13 Installing Software from Diskettes 1 14 Uninstalling Samsung Software 1 15 i Printing Printing a Document 2 1 Loading Paper 2 2 Paper Guidelines 2 6 Printer settings 2 9 Canceling a Print Job 2 10 Printing 2 Installing Samsung software 1 Introducing Samsung SmarThru 2 3 1 Running Scan Wizard 3 3 Running SmarThru 2 3 5 Getting Help in the ...

Page 4: ...to E mail Scanning a Document then Sending it by E mail 4 17 Scanning to OCR Scanning for Automatic Text Recognition 4 20 Configuring Automatic Text Recognition 4 23 4 Scan Wizard Working with Image Manager Overview 5 1 Opening the Image Manager Window 5 2 Using Programs Bar in the Image Manager 5 4 Image Manager Toolbar Overview 5 6 Editing Images 5 8 Working with Images In Browse Mode 5 12 Image...

Page 5: ...ing with E mail Messages Creating and Sending E mail Messages 5 38 New Message Toolbars 5 41 Delivering a Mail 5 42 Browsing E mail Messages 5 43 Finding Messages 5 45 Using Address Book Overview 5 46 Opening the Address Book 5 47 Adding Contact Information to Your Address Book 5 48 Organizing Address Book Items 5 50 SmarThru Configuration Opening the SmarThru Configuration Dialog Box 5 51 Configu...

Page 6: ...gnize a Text or Table 6 3 AnyPage Lite Window Overview 6 10 Using AnyPage Lite OCR Application 6 Overview 7 1 Printer problems 7 1 Print quality problems 7 3 Scanning problems 7 5 PC fax problems 7 8 OCR problems 7 9 Index A 1 Troubleshooting 7 Appendix ...

Page 7: ...nner The topics included in this chapter are Samsung SmarThru 2 About Samsung SmarThru 2 Software System Requirements Hardware Requirements Installing the Samsung Software Configuring the Fax Gate on Your PC Configuring the Internet Gate on Your PC Installing Bonus Software Making Installation Diskettes Installing Software from Diskettes Un installing Samsung Software ...

Page 8: ...re SmarThru consists of several components each of which provides a particular function MailBox Work with e mail and fax messages you can create send browse and store messages Image Manager Working with images you can import export store and operate on images Scan Manager Working with docments or images you can scan to Image Manager scan to OCR doftware or to a fax Copy Manager Working with docume...

Page 9: ...120 MB for installation Memory 32 MB CPU Pentium 133 Required software Internet Explorer 4 01 User rights Admininstrative rights should be set for installation on Windows NT and Windows 2000 Recommended Operating system Windows 98 Windows 98 SE Windows 2000 Windows Me Windows NT 4 0 Workstation or Server with Service Pack 3 Disk space 120 MB for installation 100MB for message image database Memory...

Page 10: ... the rear of your machine then connect the other end to the line jack of the internal external PC modem 5 Turn on all the machines N No ot te es s You must use the internal computer modem or an external modem for sending or receiving E mail You can connect to the Internet using an Internet Service Provider ISP or through one of several online services such as the Microsoft Network or America Onlin...

Page 11: ...ick OK 2 When the opening screen appears select the language you want to use 3 Click Install the Samsung software on your PC S AMSUNG SF 47 0 0 Installs Acrobat Reader on your PC See page 1 13 Makes the software diskette See page 1 13 Uninstall the Samsung Software See page 1 15 Installs the Samsung Software on your PC N No ot te e If there is no Internet Explorer 4 0 or above version on your PC S...

Page 12: ...ee types of setup Typical Program will be installed with the most common options and is recommended for most users Compact Only the MFP driver will be installed Custom You may choose the options you want to install Recommended for advanced users SmarThru 2 software to scan and images and work with electronic documents AnyPage Lite software to enable OCR MFP driver to print scan or to send and rece...

Page 13: ... changes to saved N No ot te e If you are using Windows NT the warring message may appear when your computer boots up telling you cannot install the fax driver on your computer Click O OK K and continue the following steps Configuring Fax Gate on your PC 1 After installing the SmarThru software Windows will automatically restart When you see the Samsung SF 5100P Program folder close it by clicking...

Page 14: ...ater or you do not want to have fax service using the SmarThru 2 system press Cancel and go to page 1 9 to configure the internet gate N No ot te e The Windows NT users must click S Sy ys st te em m m mo od de em ms s to open Install New Modem dialog box Follow the instructions on screen to install fax modem on your computer 2 The SmarThru Add New Fax Modem dialog box appears Click Next ...

Page 15: ... ra at ti io on n from the T To oo ol ls s menu when you run the S Sa am ms su un ng g S Sm ma ar rT Th hr ru u 2 2 For details refer to the SmarThru 2 User s Guide 4 Enter your fax number or name in the Fax identifier box and Click Next If you put a check mark in this box the SmarThru system will automatically will receive incoming calls If you want to receive faxes at the SF 5100P clear this box...

Page 16: ...name and password Ask your Internet Service Provider or online service provider about the information on your internet gate configuration 1 The SmarThru Internet Gate Configuration Wizard dialogue box appears Select the way you are connected to the Internet then click Next If you are connected to the Internet over a LAN i e in an office network environment select Connection to Internet over LAN an...

Page 17: ...n your computer are displayed Select one from the list you want to use for Internet connection on the SmarThru system then click OK If no connection is available you cannot use the system Dial Up in the Samsung SmarThru system To modify the Dial Up connection properties click Dialing Properties N No ot te e For details on the Dial Up Configuration using the Windows Dial Up Networking setup wizard ...

Page 18: ...en click Next The e mail address has been assigned to you by your Internet service provider 5 Enter the addresses of your incoming and outgoing mail servers Choose the incoming mail server type then click Next Your Internet service provider must provide you this information ...

Page 19: ...nter the account record name then click Next 8 Click Finish to enable Internet e mail service N No ot te e If you wish you can enable or reconfigure the Internet connection later Open the S Sa am ms su un ng g S Sm ma ar rT Th hr ru u2 2 and select S Sm ma ar rT Th hr ru u C Co on nf fi ig gu ur ra at ti io on n from the T To oo ol ls s menu For details refer to the SmarThru User s Guide ...

Page 20: ...a CD ROM drive you can copy software installation files from the Samsung software CD ROM onto floppy diskettes The diskettes can then be used instead of the CD ROM to install the software To make the installation diskettes for an MFP drive ensure you have several formatted diskettes ready and follow these steps 1 Insert the supplied CD ROM into your CD ROM drive The SmarThru CD ROM is automaticall...

Page 21: ...to insert disk 2 Label each diskette in the order you create it MFP driver disk 1 of 5 etc 6 When the diskettes have finished copying click Close in the Copy to Floppy dialog box Shows the path of the selected component Select the floppy drive you will use Shows the number of disks required to copy the selected component The component to copy Installing Software from Diskettes 1 Insert the first d...

Page 22: ...oot is required after the software is un installed Un installing the MFP Driver 1 Start Windows if not already started 2 From the Start menu select Programs then select Samsung SF 5100P then select Uninstall 3 When your computer confirms your selection click Yes The printer driver and all its components are removed from your computer 4 When un installation is done click OK 5 The message box recomm...

Page 23: ...lear All then OK When the message box confirms your selection click Yes To leave the information put checkmarks on the check boxes to select options you want to leave or click Select All then click OK The backup proceeds When the backup is done click Close Un installing the SmarThru Software 1 Start Windows if not already started 2 From the Start menu select Programs 3 Select Samsung SmarThru then...

Page 24: ...ete the un installation The SmarThru software and all components will be removed 7 When un installing is done click OK The message box recommends restarting your computer 8 Click OK Shut down and restart your computer to complete the un installation process and save your changes ...

Page 25: ...chapter to learn how to select and load print media and how to use the print settings The topics included in this chapter are Printing Printing a Document Loading Paper Paper Guidelines Printer Settings Canceling a Print Job ...

Page 26: ...ter Make sure that you have installed the MFP driver contained on the supplied setup CD ROM See SmarThru 2 software on page 1 1 2 Create or open the document you want to print 3 Choose Print or Print Setup from the File menu Make sure that your printer is selected as the default printer 4 Click Properties or Setup if you want to make any adjustments that are appropriate for printing your document ...

Page 27: ...matic paper feeder can hold a maximum of 150 sheets of plain paper The maximum capacity may be reduced depending on the thickness N No ot te e If you experience feeding problems try printing one at a time from the manual paper feeder See page 2 5 1 Pull the paper tray on the automatic paper feeder all the way up 2 Prepare the print material for loading For paper Flex or fan the paper back and fort...

Page 28: ...ons to load each type of print material Load paper or transparencies with the print side facing you For transparencies Hold the transparencies by the edges and avoid touching the print side Fan the stack of transparencies to prevent feeding failures Be careful not to scratch or leave fingerprints on the print sides Place the print side facing you ...

Page 29: ...E T T E R H E A D 4 Adjust the paper guides to the width of the print material Slide the guides until they lightly touch the stack of print material Do not bend the print material Paper guide N No ot te e If you print a job on a special print media select the correct paper size and type in your application before printing See page 2 8 ...

Page 30: ...paper in the manual paper feeder and adjust the paper guides to the width of the print material Make sure that the paper is as far down as it will go For envelope load it with the flap side facing away from you The stamp area is on the right side The end of the envelope with the stamp area enters the feeder first N No ot te e Do not feed stamped envelopes The stamp is shown for placement only 2 In...

Page 31: ... forms must be printed with non flammable heat resistant inks that do not melt vaporize or release hazardous emissions when subject to the printer s approximately 392 o F 200 o C fusing temperature for 0 1 second Store paper in its ream wrapper until ready to use Place cartons on pallets or shelves not on the floor Do not place heavy objects on top of the paper whether it is packaged or unpackaged...

Page 32: ... make changes to the printer settings This changes the number of copies sequence of the pages and paper orientation If you click Properties Setup or Options in the print dialog box you ll access the printer driver s dialog box It allows you to change additional printer settings Settings changed in the software application will usually override settings made in the printer driver Your printer drive...

Page 33: ...media which is fed into the manual feeder For information on manual feeder see page 2 5 Sets the print media size Set the type of media to be used for a print job If you use thick or high cotton paper set this to Thick Paper If you use thin paper 60g or the air is humid set this to the Thin paper If you use transparency film set this to Transparency paper Menu Option Toner Save Mode Altitude Corre...

Page 34: ...for all documents Changing the printer settings from your application program will change them for one document If you want to change for all documents you print on this printer open the printer Properties dialog box as shown below then change the printer settings N No ot te e Windows NT users should select properties via application s print menu Windows 95 98 users should click Start point to Set...

Page 35: ...g them on the print queue then from the Document menu select Cancel Printing or Pause Printing 3 Press Stop on the control panel of the your machine N No ot te e If you cannot find the printer icon on the taskbar while the printing continues for example when you print several copies of a single page just press Stop on the control panel of the your machine It cancels the print job Printer icon Canc...

Page 36: ...2 11 Printing MEMO ...

Page 37: ...duces you to the Samsung SmarThru 2 Topics included in this chapter are Introducing Samsung SmarThru 2 Running Scan Wizard Running SmarThru 2 Getting Help in SmarThru 2 Program Note To use the Samsung SmarThru 2 you must have installed the SmarThru CD ROM that was shipped with your machine ...

Page 38: ...t convenient and easier to make your faxes look good For details see page 5 35 Using the Message List and Quick Preview pane on the Mailbox window you can view a list of messages and read individual messages at the same time Extensive colouring makes it easier for you to differentiate between different kinds of messages The Folder List contains folders and you can easily switch between them Faxes ...

Page 39: ... Manager lets you create fax messages or e mail messages by passing the scanned image to the SmarThru Mailbox You can also recognize a scanned document and save the text in a file with the help of the supplied OCR software AnyPage Lite Copy Manager allows you to control the copying process With Copy Manager you control the copier feature of your machine Besides just copying a document Copy Manager...

Page 40: ...e desktop window Scan Wizard is an easy to use convenient tool to manage your scan needs To run the Scan Wizard From the desktop window double click the Scan Wizard icon From the Start menu click Programs and select Samsung SmarThru and then Scan Wizard The Scan Wizard window appears Opens the SmarThru 2 window Displays on line help Closes this window ...

Page 41: ...axes For details see page 4 14 Scan to Fax lets you scan documents and then launches Message Form to send just scanned document attached to a new mail For details see page 4 18 Scan to E mail if the scanned document should be automatically passed to the OCR program for text recognition click Scan to OCR For details see page 4 21 Scan to OCR launches Samsung SmarThru 2 program to manage your mails ...

Page 42: ...con From the Start menu click Programs and select Samsung SmarThru and then SmarThru 2 From the taskbar at the bottom right corner of the desktop window right click on the SmarThru mail engine icon and select Mailbox from the pop up menu In the Scan Wizard window click SmarThru The Samsung SmarThru 2 window opens Double click SmarThru Mail Engine icon The SmarThru Mail Engine runs in the backgroun...

Page 43: ...lbox icon on the Samsung SmarThru 2 window For further information on the Mailbox window see page 5 19 To open the Image Manager window Click the Image Manager icon on the Samsung SmarThru 2 window For further information on the Image Manager window see page 5 1 ...

Page 44: ...e help SmarThru Help is accessible from all windows and dialog boxes using the SmarThru program Click Help on the menu bar or in the windows and dialog boxes while using the SmarThru program When you access the SmarThru Help you can further select Contents view Index view or Search view to find the desired item quickly Note that the content of the help is variable depending on your machine ...

Page 45: ...nning Scanning a Document with the Scan Manager Features of the Scan Manager Window Selecting Scan Manager Options Samsung TWAIN for Scan Window Copying Copying a Document Scanning to PC Fax Scan a document and then send it by PC Fax Scanning to E mail Scan a document and then send it by e mail Scanning to OCR Scanning for Automatic Text Recognition Configuring Automatic Text Recognition ...

Page 46: ...l information which can then be saved as a file printed faxed or otherwise manipulated on your computer With Scan Manager in the supplied Samsung SmarThru 2 program you can scan images directly into the image editing application Image Manager The type of documents you can scan include photos drawings magazine pages newspaper articles and any type of single page image You can also scan printed text...

Page 47: ...ype of single page image 1 Place your document photo or graphic into the document feeder of your machine Place it top down with the image side facing down 4 Insert the documents into the ADF until it stops The document is ready for scanning The machine automatically feeds the pages one by one from the bottom of the stack 3 Slide the document guide lightly against the side of the documents Adjust t...

Page 48: ... a computer image To scan a document with Scan Manager use the following steps 1 Load a document as described in User s Guide 2 To run Scan Wizard double click on the Scan Wizard icon on the desktop window For further information refer to Running Scan Wizard on page 3 3 3 When the Scan Wizard window opens select Scan ...

Page 49: ...e information on the scan settings refer to Features of the Scan Manager Window on page 4 6 5 A progress bar informs you of the scan progress When the scan is complete the scanned image is briefly displayed in the preview area Choose appropriate scan settings Preview area ...

Page 50: ...of the Image Manager with a system assigned name For information on working with the images in this browse mode see page 5 12 7 To open the image for editing double click on the image or click on the toolbar The opened image will replace the contents of the current folder For information on editing images with the Image Manager refer to Working with Image Manager on page 5 1 ...

Page 51: ...ge the marquee position If you change the dimensions after selecting one of the predefined sizes this setting automatically changes to Custom Left Top These settings define a position of the top left corner of the scan area Width Height These settings define the size of the scan area Units Lets you select a measurement unit that will be used for specifying scan area dimensions Image Adjust Click t...

Page 52: ...can select the desired driver 1 Open the Image Manager window For details see page 3 5 2 Select Scan Options from the File menu 3 Check the Show TWAIN UI box To use another scanner driver press Select Source button then select the desired driver from the Select Source list 4 Click the OK button N No ot te e You can access the S Sc ca an n O Op pt ti io on ns s menu by right clicking on the title b...

Page 53: ... descriptions for the controls of the Samsung TWAIN for Scan window are provided below Preview area Settings Tabs Each tab Basic Image quality Filters and the About tab contains settings to adjust the scan image Use help for further details on SmarThru ...

Page 54: ...ge the resolution and the color mode used for copying Set the number of copies Scale the resulting image To copy a document using the Samsung Copy Manager There may be serveral ways to load documents for scanning For examples two methods of loading documents are provided If your machine is equipped with different methods please refer to its User s Guide 1 Load a document as shown ...

Page 55: ...Selects the size of the image being copied Check this box if you want the scanned image to be saved into the Incoming folder of the Image Manager database for future reference 2 Open the Scan Wizard window and select Copy For information on opening the Scan Wizard window see page 3 3 ...

Page 56: ... collated Description Choose to print image descriptions above or below images and to turn printing image descriptions off Print Border Check this box to print a border around images Center Image Check this box to center printed images If the image is larger than one page the image will be centered across all the pages it spans Lets you choose one of five printing methods For details see below Bri...

Page 57: ...e printed image to fill the entire page You may select the desired page size using the Fit to Paper drop down list box Multiple Page If your scanner supports successive scanning of per Side multiple images you may use this option to print several images on a single page The images will be successively placed on a page one by one when the page is filled the program will proceed to the next page and...

Page 58: ...t Scan to Fax To open the Scan Wizard window double click the Scan Wizard icon on the desktop window For further details see page 3 3 Scanning to PC Fax N No ot te e To send a fax using the Samsung SmarThru system you must configure the Fax Gate Configuring the Fax Gate was started when you first installed the SmarThru program You can change or configure it later by selecting S Sm ma ar rT Th hr r...

Page 59: ...the Image Manager database 4 Click the Scan button When scanning is completed the scanned document is displayed in the preview area and passed to the Samsung Fax Manager 5 The Samsung Fax Manager Select Mode dialog box appears Select the desired mode to run the fax wizard then click Next If you select Advanced Mode you can further select the time for the fax to be sent and select the fax cover pag...

Page 60: ...lect the desired contact from the Peek Address window To remove a contact from the Recipients list select the desired contact in the Recipient list and then click Remove 7 Enter the subject in the Subject field and your message in the Note field and then click Next Click this icon to switch between international and direct mode International mode allows you to select Country or City code by clicki...

Page 61: ...h files to your fax message You will find that the scanned document is already attached as an image file To include more click Add File and select the desired file You can attach as many files as necessary Just scanned document is already attached N No ot te e The messages are automatically saved in the O Ou ut tg go oi in ng g folder of the Samsung SmarThru 2 Mailbox In the Mailbox window if you ...

Page 62: ...teps Following instructions especially show an example 1 Load a document as shown Scanning to E mail N No ot te e To send e mail using the Samsung SmarThru system you must configure the Internet gate Configuring the Internet gate was started when you first installed the SmarThru program Change or configure later by selecting S Sm ma ar rT Th hr ru u C Co on nf fi ig gu ur ra at ti io on n from the...

Page 63: ...n the desktop window For further details see page 5 3 3 The Samsung Scan Manager for E mail window opens Select the scan settings if necessary For more information on the scan settings see page 6 7 If you check this box the scanned image will be saved into the Incoming folder of the Image Manager database Preview area Choose scan settings ...

Page 64: ...unched 5 Fill in each field For details on the controls of this window see page 3 38 6 When you are ready to send click The message is automatically saved in the Outgoing folder of the Mailbox Samsung SmarThru 2 window For further details about working with e mail messages see page 5 38 You ll find the scanned document is attached as an image file format to the mail ...

Page 65: ...o the acquiring application in your computer Before using the automatic recognition feature you can set the recognition configuration to improve the recognition result See page 4 24 To scan a document to an OCR program 1 Load a document as described in User s Guide 2 Open the Scan Wizard window and select Scan to OCR To open the Scan Wizard window double click the Scan Wizard icon on the desktop w...

Page 66: ...ved image in the window 5 The system asks you to specify the file name and the destination path Enter the file name and select the file type and then specify the destination 3 The Samsung Scan Manager for OCR window opens Select the scan settings if necessary For more information on the scan settings see page 4 7 If you click the checkbox the scanned image will be saved in the Image Manager before...

Page 67: ...ails refer to the documentation of your text editor application N No ot te es s For details on the OCR procedure refer to chapter 6 Using AnyPage Lite If you want to recognize a batch of documents at once see page 6 3 If you want to recognize a table which does not have horizontal or vertical lines you will need to analyze the table manually before the recognition begins to achieve good recognitio...

Page 68: ...matic Recognition Configuration window take the following steps 1 Open the Scan Wizard window For details see page 3 3 2 Right click on the title bar 3 Select OCR Configuration from the pop up menu 4 The Automatic Recognition Configuration dialog box appears Select the proper settings Descriptions are provided on the following page Place the mouse on the title bar to bring up the system menu ...

Page 69: ...detect the layout automatically Select Single Column if your text is formatted as a single column Tables This group of checkboxes lets you define the formatting of tables Keep Pictures If this box is checked any pictures in the text will be in Text kept Text Saving If you select Organized the text files will be saved in Parameters a folder according to today s date inside the base folder Files are...

Page 70: ...4 25 Scan Wizard MEMO ...

Page 71: ...its and manages images and the Mailbox which stores fax and e mail messages This chapter provides information on the following topics Working with Image Manager Image Viewer Mailbox Working with Fax Messages Working with E mail Messages Using Address Book SmarThru Configuration ...

Page 72: ...for images by descriptions dates etc Perform basic editing of images such as copying and pasting parts of an image rotating cropping resampling etc Adjust parameters of an image such as brightness contrast and saturation Convert images to different colour modes Apply different effects such as sharpening embossing posterizing mosaicking etc Send images by PC fax or e mail Pass images to external pr...

Page 73: ...Programs bar You can drag images and drop them onto the Programs bar buttons to have them the processed by the selected application For details see page 5 4 Menu bar and Tool bar See page 5 14 for more information about these buttons Folder area You can create new folders rename folders or delete them using the Folder menu or right clicking on this area The first folder is a special folder named I...

Page 74: ...g functions see Editing Images on page 5 8 5 To quit editing click button on the toolbar or select Browse Mode from the Image menu You will be prompted to save the changes To save the image without quitting the editing mode click button on the toolbar or select Save from the File menu While working in the editing mode you can still use the Programs bar The opened image will replace contents of cur...

Page 75: ...you will see that a small icon changes It indicates that the application is ready to process your request You may also click a Programs bar button to process selected images The Programs bar supports five types of buttons They are described below Drag an image to this button or select an image and click this button to send the image by e mail using Samsung SmarThru Drag an image to this button or ...

Page 76: ...the Programs Search Wizard welcome screen you will see a list of applications known to the wizard that have been fouond in your system 4 Select the desired applications to be added to the Programs bar then click Finish Customizing the Programs Bar 5 When you are done click OK Your Programs bar will be updated accordingly For further details see the on line help Application newly added Defines the ...

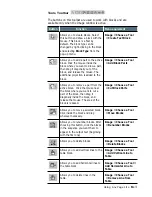
Page 77: ...Cut menu Click this button to copy selected parts from selected images and place their contents on the clipboard The page will be also kept in the source image Similar to Edit Copy menu Click this button to paste images from the clipboard into the current folder as a new image Similar to Edit Paste menu This button opens the New Message window that is used for sending an e mail from the SmarThru s...

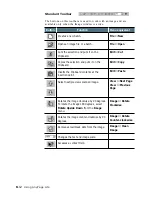
Page 78: ...e clipboard Similar to Edit Copy menu In the Edit mode is used for pasting clipboard contents into the image Similar to Edit Paste menu Quits editing and switches to the Browse mode Similar to Image Browse Mode menu Undoes the last action Similar to Edit Undo menu Redoes the last undone action Similar to Edit Redo menu Rotates the current image or region 90 degrees clockwise Similar to Image Rotat...

Page 79: ...images All commands except for Resize Resample and Crop work with either a whole image or with a selected region The Resize and Resample commands work with the whole image only The Crop command works only if a region is selected Rotate To rotate the image or a selected region Flip Flips the image vertically or horizontally Shear To shear skew the image by an arbitrary angle Crop To cut a part off ...

Page 80: ...ecause this image type is only 1 bit the file size is smaller than grayscale Grayscale Converts the image into a grayscale mode All color information will be removed from the image and the image will be black and white Resolution Changes the color depth of an image Color depth is defined as the number of bits per one pixel of image The more bits that are used to represent one pixel the more colour...

Page 81: ...ions with the exception of Resizing Rotating and Shearing Toolbox contains the buttons to work with regions You can also use the Toolbox menu Selects a rectangular region Click on the image and drag To see a marquee rectangle that defines the region Selects a free hand region Click on the image and drag while holding the mouse button You will see your region contour enclosed into a rectangular mar...

Page 82: ... polygon To create a frame with text fragments To change the text access the text frame properties and enter a new text on the Text tab To create a frame with text fragments The note object differs slightly from the text object while you can set the size of the text frame the note frame size is adjusted automatically according to the entered text To emphasize parts of the image This object does no...

Page 83: ...to a region of an image select the region before invoking the effects Most effects have several parameters that can be changed You can see the result of changing parameters in the preview area of the Effect window For further details on applying effects use the on line help Working with Images In Browse Mode Printing Images To print images from the Browse mode select one or more of the images and ...

Page 84: ...lp Renaming an Image Select the image and choose Rename from the Image menu or right click on the image and select Rename from the pop up menu Moving an Image To a Different Folder To move an image to a different folder simply drag it into the desired folder Deleting Images Select the image and press the Delete key or select Delete from the Edit menu or drag the image onto the Shredder button in t...

Page 85: ... Feeder They are scanned at a time and saved as a multi page image in the Image Manager In the Image Manager select an image you want to use as a new page and drag it onto another image Repeat as necessary The image will be added to the multi page document as the last page Most operations can be performed either with current page of multi page image or with all its page If you want an operation to...

Page 86: ...ferent folder Exporting Images You can export images from the Image Manager for processing in external applications or for other purposes Select Export image from File menu or click the button on the toolbar or select Export from the pop up menu The Export window appears prompting a file name for exporting Samsung Image Manager supports a number of file formats Select the appropriate file format f...

Page 87: ...g File Types with the Image Viewer You can associate different file types with the Image Viewer To open these files in the Image Viewer double click in Windows Explorer The File Format Associations dialog box is used for establishing these associations The dialog box appears when you first bring up the Image Manager Samsung SmarThru 2 window To bring up this dialog box manually take the following ...

Page 88: ... Image Viewer by checking the boxes that appear alongside each type You can also uncheck file types to restore old associations Click Select All to select all file types for association Click Select Unused to select the file types that are not registered to any application Click Unselect All to uncheck all file types 5 When complete click OK to perform associating 2 From the File menu select Assoc...

Page 89: ...ssociated different file types with the Image Viewer you ll find the appearance of the image file as below which is associated with the Image Viewer on the desktop window Double click the image to view it For further details on the Image Viewer use the on line help ...

Page 90: ... documents in the Mailbox The main components of the Mailbox are Mailbox Message Form To prepare modify and send outgoing messages and browse incoming e mail messages New Fax To prepare and send outgoing electronic faxes Address Book A convenient place to store contact information SmarThru Address Book stores both e mail and fax addresses Address Book can be used to look up personal address Config...

Page 91: ...olds any documents that you deleted System folders always exist in the system and their predefined setting cannot be changed You can create any number of folders to organize your message User folder properties and behaviour can be customized to suit your needs For further details refer to the on line help Message List Message List shows a list of messages and provides brief information about e mai...

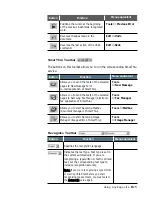
Page 92: ...sage header and in the pop up menu select Hide or in View menu clear Preview Header option Mailbox Toolbar Overview The mailbox toolbar provides you with quick access to the Mailbox components used most often Open the New Message form to prepare a new e mail message Open the New Fax form to create a new fax message Reply to the sender Reply to all persons mentioned in the incoming message Forward ...

Page 93: ...e Samsung Fax Viewer you can browse a fax before sending You can save the fax to disk load the fax from disk print the fax recognize the fax and save the text as an ASCII file or edit the fax with the Fax Viewer With the Fax Cover Editor you can create a cover page for your fax message The Samsung SmarThru system provides pre defined cover pages You can edit the pages with the Fax Cover Editor for...

Page 94: ... SmarThru 2 window click on the toolbar or click the Message menu and select New then Fax From any application print to the Samsung SmarThru Fax printer that is available from the list of printers For details see page 3 31 1 Run the SmarThru 2 and open the Mailbox Samsung SmarThru 2 window For details see page 3 5 2 Click on the toolbar or click the Messages menu and select New and then Fax Click ...

Page 95: ...ax number description The address will appear in the Recipient list To select a contact from the address book click Fax No in front of the field Select the desired contact from the Peek Address window To remove a contact from the recipients list select the desired contact in the Recipient list and then click Remove Click this icon to switch between international and direct mode International mode ...

Page 96: ...u want and then click Next The Cover Page is the title page of a fax sent You can select an existing cover pages with the Browse button or create your own with the New button You can edit the cover pages with the Fax Cover Page Editor to suit your needs When this box is unchecked no cover page will be sent This Select Cover Page window appears in the Advanced mode only For details on editing or cr...

Page 97: ...eters are used for all contacts in a message If your faxes are more than one page you can skip pages at the beginning Specify the page number that you want to begin your fax from here Select this option to send a fax at a time when the price of the phone call will be discounted Set the number of sending attempts if there is an error during transmission or the line was busy Time interval between re...

Page 98: ...you want to resend the entire fax clear the checkbox In case of an error the destination fax can request a resend of the bad fax This parameter together with Number of retries on page determines whether the page will be resent on the remote request Check this option to allow page resending Determines the number of retries when a page is resent Save the specified Fax message options as default Defa...

Page 99: ...he fax before sending click Preview The Preview Fax Viewer window opens For information on the Preview Fax Viewer window see page 5 29 To send immediately click Send 9 In the Attach Files window you can attach files to your fax message If you want to include files click Add File and select the desired file You can attach as many files as necessary ...

Page 100: ... UP view click the View menu and then click N UP View and select the number of rows and columns to be displayed Click icon on the toolbar and select the desired number of rows and columns Click Enter or double click sizes as needed Zoom Allows you to zoom the fax image To zoom fax image use the Zoom list on the toolbar You can set the percent ratio view whole page stretch fax to fit page width or ...

Page 101: ... show a fax This occurs for instance when you preview a fax before sending or preview mail as a fax message Invert colors Inverts fax colour Black becomes white and white becomes black To invert fax colour click the Effects menu then click Invert Colors Or click on the toolbar Rotate Rotates fax image To rotate fax clockwise 90 click the Effects menu and then select Rotate and Right from the subme...

Page 102: ...nting 1 Open the Windows application Create and save the document 2 From the File menu select Print 3 In the Print dialog box select Samsung SmarThru Fax as the current printer in the Printer list and then click OK 4 The Samsung Fax Manager is automatically launched Follow the instructions beginning on page 5 24 Select Samsung SmarThru Fax ...

Page 103: ...ight click the fax engine icon in the right corner of the taskbar on the desktop window and select Answer now from the pop up list The fax engine on the SmarThru system activates and receives the fax automatically To read the message see page 3 34 Setting the Automatic Receiving Mode 1 In the Mailbox Samsung SmarThru 2 window click the Tools menu and select SmarThru Configuration If the Automatic ...

Page 104: ...lls after checkbox 5 If necessary set the additional options then click OK N No ot te e If the PC is off when a fax is received the unit will receive the fax according to the receiving mode set through the fax machine 2 In the SmarThru Configuration window select Fax Gate and click Options Click here to be checked ...

Page 105: ...ick icon to view the message in a separate window Incoming faxes are automatically stored in the Incoming folder of the Mailbox Samsung SmarThru 2 window You can open the fax messages in the Mailbox window at any time See page 5 43 Opens the latest message Closes this notification window Opens the SmarThru 2 ...

Page 106: ...Page Editor To Open the Fax Cover Page Editor The Fax Cover Page Editor appears automatically when you select this option when creating a fax message To open the Fax Cover Page Editor manually follow these steps 1 In the Mailbox Samsung SmarThru 2 window click the Message menu and select New then E mail Fax 2 When New Message window opens click the Options menu and select Fax 3 In Fax dialog box s...

Page 107: ...Page The First Page is a real cover for your fax and the Second Page layout is used for second and further pages You can select a page in a variety of ways Click the View menu then click First Page to select the first page or Second Page to select the second page Click button on the toolbar to select the first page or to select the second page Click to swap page contents ...

Page 108: ...rance of the object on the page You can align objects on a page and relatively to one another You can also control object visibility if one object covers another To align object 1 Select the object to be aligned 2 Click Tools menu and click Align Objects and then select required alignment or use the Formatting toolbar to select the required alignment To control object s visibility 1 Select the obj...

Page 109: ...5 2 Click button on the toolbar or click the Message menu and then select New Message N No ot te e For sending and receiving e mail on your SmarThru system you must enable Internet Gate Service and configure your Internet account See page 5 54 Working with E mail Messages Header Message Text Attachment Field Shows files attached to the message ...

Page 110: ...M Me es ss sa ag ge e F Fo or rm m window area press C Ct tr rl l E E or click V Vi ie ew w menu and then click T Te ex xt t O On nl ly y To Restore the text pane size press C Ct tr rl l E E again To show hide the attachment pane set clear A At tt ta ac ch hm me en nt t option in V Vi ie ew w menu 4 Type the message title in the Subject box and then type your message in the Note box You can define...

Page 111: ...the spelling and then click OK The Select Recipient Name dialog box allows you to enter a name of the address you entered 9 If the addresses are not saved in the Address Book the Resolve Address dialog box appears To resolve the address click OK 10 The mail sends to the destinations s Click here to save the address in the Address Book ...

Page 112: ...tally sign an e mail Encrypt an e mail Specify the time to send Insert signature New Message Toolbars Signature Edit signature New Message Toolbars Options Lets you modify Message options Format current or selected paragraph with a predefined style New Message Toolbars HTML Formatting If your message is in HTML format the toolbar provides quick access to editor functions Bold Set text colour Incre...

Page 113: ...ivery menu and then click Send and Receive All To send e mail from a specified account from the Delivery menu select Send Using and then select the desired account The Send and Receive Mail dialog box reflects Internet mail sending receiving process and allows you to interrupt Abort button if necessary 2 After connecting to the remote server if there is new incoming mail the notification window ap...

Page 114: ...e list Contains brief information about the e mail and fax messages in the selected folder number of newly arrived messages Folder area Contains the list of folders you can place mails in You can create remove and organize the folder with the Folder menu Faxes and e mails can be located in the same folder Trash Incoming and Outgoing folder are the system folders Their properties cannot be changed ...

Page 115: ...the message in a separate window double click the message in the message list 4 The incoming mail message form consists of Toolbar Header pane Text pane Attachment field Toolbar Header pane Text pane Attachment field To open the attachment file double click on the file or right click and then select Open ...

Page 116: ...lect Search 2 Select the folder that you want to search for your message in To select the folder click Browse and select a folder from the tree Select All folders to search for a messages in all folders 3 Specify the fields to search To specify more accurately use the Attributes and Size Time tabs 4 Select logical criteria grouping All conditions match searches for messages which meet all of the f...

Page 117: ...of contacts to send e mail or faxes to a set of people such as business associates or relatives To send e mail to everyone in the group use the group name Creating groups is a con venient way to organize a large address book Share your address book with other users You can export any contact information person or group to a separate file and send it to other people It is easy to import contact inf...

Page 118: ...n the toolbar or click the Tools menu and then select Address Book N No ot te e When you create a fax or e mail message you can open the address book to pick up your contacts by clicking F Fa ax x N No o T To o C Cc c B Bc cc c button The P Pe ee ek k A Ad dd dr re es ss s dialog box will appear Providing a convenient tool to select your contact not all address book func tions can be accessed in t...

Page 119: ...ontact Information to Your Address Book To add contact information to your address book directly do the follow ing 1 Open the Address Book window For details see page 5 47 Use to copy or move the selected content to another location When Select Target window opens select the desired location and click OK Fill in the desired fields in each tab for the address information Click to delete the selecte...

Page 120: ...sage to the contact Contact is also excluded from address resolu tion To use the contact add internet e mail and or fax addresses to the person To add Internet e mail or fax address to an existing person 1 Select the desired person in the Address Book window 2 Click Add internet or Add fax Or in the Edit menu click Add New and then click Internet Address or Fax Address You can also use or button o...

Page 121: ...e new group folder by copying and moving address book items or by creating new items N No ot te e Group can contain other groups persons and aliases Organizing Address Book Items A large address book can be organized in several ways to make it easy to retrieve contacts You can sort names alphabetically in ascending or descending order You can also view items in a Hierarchical or Alphabetical view ...

Page 122: ...ation dialog box To open the SmarThru Configuration dialog box 1 Run SmarThru 2 and open the Mailbox Samsung SmarThru 2 win dow For details see page 3 5 2 From the Tools menu select SmarThru Configuration To access this menu from the pop up menu list right click on the SmarThru mail engine icon on the bottom right corner of the desk top window Select SmarThru Configuration SmarThru Configuration ...

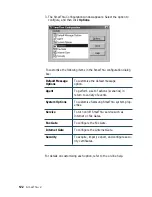
Page 123: ...tion dialog box Default Message To customize the default message Options option Agent To perform a set of actions scenarios in return to variety of events System Options To customize Samsung SmarThru system prop erties Service To turn on off SmarThru service such as Internet or Fax Gates Fax Gate To configure the Fax Gate Internet Gate To configure the Gnternet Gate Security To acquire import expo...

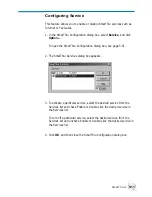
Page 124: ...id not configure the Fax Gate or you want to make changes take the following steps 1 In the SmarThru Configuration dialog box select Fax Gate and click Option To open the SmarThru Configuration dialog box see page 5 51 2 The Fax gate configuration dialog box appears Configure the Fax Gate options as needed To configure your fax modem click Modems For details on configuring the Fax Gate refer to th...

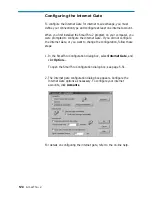
Page 125: ...he Internet Gate If you did not configure the Internet Gate or you want to change the configuration follow these steps 1 In the SmarThru Configuration dialog box select Internet Gate and click Option To open the SmarThru Configuration dialog box see page 5 51 2 The Internet gate configuration dialog box appears Configure the Internet Gate options as necessary To configure your internet accounts cl...

Page 126: ...og box see page 5 51 2 The SmarThru Services dialog box appears 3 To activate a particular service select the desired service from the Services list and check Enable or double click the desired service in the Services list To turn off a particular service select the desired service from the Services list and uncheck Enable or double click the desired service in the Services list 4 Click OK and the...

Page 127: ...er briefly describes the main features of AnyPage Lite For more information and step by step instructions refer to the on line help Overview Running AnyPage Lite How To Recognize a Text or Table AnyPage Lite Window Overview ...

Page 128: ...Lite can load image files with BMP PCX DCX JPEG or TIFF extensions 2 Page layout analysis The system segments and analyzes the image and marks blocks as texts pictures and tables on the image 3 Recognition 4 Checks and edits the recognition results When the recognition is completed you can check the recognized text with a built in spelling check system and edit the text if necessary 5 Save the res...

Page 129: ...scan and recognize the document automatically with the help of the AnyPage Lite system Refer to Scanning to OCR on page 4 21 If you place an image onto the OCR button SmarThru runs AnyPage Lite and loads the image file in the AnyPage Lite window When the AnyPage window opens click button on the toolbar to open and read the file with AnyPage Lite ...

Page 130: ...r for scanning you must export the scanned image saved in the Image Manager to change the file format From the File menu in the Image Manager window select Export Image Select the location to save the file and specify the extension of the file For details on scanning documents with the Scan Manager see page 4 4 2 Run AnyPage Lite For information on starting AnyPage Lite see page 6 2 Choose the fil...

Page 131: ...en the image of the document s appears in the Image window For the AnyPage Lite Window Overview see page 6 10 3 You will see the main window of AnyPage Lite and the Tip dialogue This dialogue box contains useful information To see the next tip click Next Tip If you do not want to see the next tip click Close Click here to open a file Image window ...

Page 132: ... the image and then starts recognition 7 To start recognition click button on the toolbar AnyPage Lite recognizes the open page or selected pages or all pages depending on the button mode During recognition AnyPage Lite highlights the recognized part in the Image window The system may display a warning message for example Resolution is too low This kind of messages helps you check parameters and c...

Page 133: ...ange unrecognized or misprinted words You can also add new words to the system dictionary 10 You can edit the text if necessary using the buttons on the text edit toolbar For details see page 6 14 Text edit toolbar Allows you to change font size and type style See page 4 14 for details Text window Zoom window If you click in the Text window the Zoom window highlights the zoom image of the letter o...

Page 134: ...n the toolbar and select the file to recognize from the Open dialogue box That s all you need to do AnyPage Lite automatically begins analyzing the image locating texts pictures and tables and then recognizes the texts and tables The recognized results will be displayed in the Text window To Analyze Manually then Start Recognize AnyPage Lite can analyze pages with a compound text or table layout I...

Page 135: ...the necessary value from the pop up menu 2 To mark out blocks on the image manually click button on the toolbar and then draw a block with the mouse To draw a block place the mouse pointer in the corner of the block that you want to mark Click the mouse and drag it to the opposite corner The text is enclosed in a frame N No ot te e Borders of the block you mark must not cross borders of the other ...

Page 136: ...can also merge or divide table cells by selecting Merge table cells and Divide table cells from the Edit menu 5 When adding or deleting is finished press the ESC key or click button on the toolbar 6 To start recognition click button on the toolbar 7 Check the recognition results by clicking button and edit the recognized text if necessary For details see page 6 14 8 To save the recognition results...

Page 137: ...ognition Both graphic and text files This type of page is indicated by two overlapping icons yellow and white or blue Pages in the batch are selected in the same way as files in Explorer with the mouse click To view a page double click its icon To add a new image file to the batch click or button on the toolbar In the Open dialogue box select one or more images that will be added to the current ba...

Page 138: ...t least one page is selected in the Batch window the buttons process the selected images You can change the mode of button manually Click the arrow on the right of the button to see the pull down menu One of the menu items is bold This command will be run when you click the button When you select another menu item the corresponding operation is carried out Function Opens the selected image analyze...

Page 139: ...he Clipboard contents at the insertion point Select next previews scanned image Rotates the image clockwise by 90 degrees To rotate the image 180 degrees select Rotate Upside Down from the Image menu Rotates the image counter clockwise by 90 degrees Removes small black dots from the image Changes the text and image scale Accesses a context Help Button Menu equivalent File New File Open Edit Cut Ed...

Page 140: ... of the block then drag it diagonally inside the block and release the mouse The area of the block is reduced Allows you to move a selected block Click inside the block and drag wherever necessary Allows you to renumber blocks After choosing this button click the blocks in the sequence you want them to appear in the output text beginning with the first one Allows you to delete blocks Allows you to...

Page 141: ...the selection as a subscript Shows or hides the Edit of the recognized text indents fonts etc Aligns selected paragraphs left center right justify Decrease indent Move selected paragraphs left Increase indent Move selected paragraphs right Shows or hides non printing characters carriage return paragraph break etc Allows you to find a word a part of a word or several words Positions the cursor at t...

Page 142: ...ager Tools Mailbox Tools Image Manager Recognize Toolbar Function Specifies the recognition language Indicates the text type Text type is set in the system automatically If you are recognizing a typewritten or matrix printed text set the corresponding text type to increase recognition accuracy N No ot te e If you were recognizing a typewritten or matrix printed text before you start recognizing ty...

Page 143: ... chapter gives helpful information for what to do if you encounter a printer error It provides information on the following topics Printer Problems Print Quality Problems Scanning Problems PC Fax Problems OCR Problems ...

Page 144: ...ob is being sent to the correct port for example LPT1 The toner cartridge is not installed properly Remove and reinsert the toner cartridge The printer may be configured incorrectly Check the application to make sure that all print settings are correct The printer driver may be incorrectly installed Uninstall the MFP driver and reinstall the MFP driver Then try printing a test page Refer to Uninst...

Page 145: ...ble specifications may be incorrect Use or replace the cable with an IEEE 1284 rated cable The paper is not fed into the printer The paper keeps jamming There is too much paper in the automatic paper feeder Remove some of the paper from the automatic paper feeder If printing onto transparencies or labels insert them one at a time in the manual feeder The paper setting method may be incorrect If pr...

Page 146: ...on Select the desired spool setting from the available choices If you are using Windows NT the Scheduling setting may be set incorrectly From the Start menu select Settings and Printers Click your printer icon with the right mouse button select Properties click the Scheduling tab Then select the desired scheduling setting from the available choices Printing is too slow Print quality problems Probl...

Page 147: ...blank pages to clean the transfer roller Incorrect fonts True type fonts may be disabled Windows 3 x Use the Fonts dialogue box in the Control Panel to enable True type fonts Faded graphics Toner may be low Remove the toner cartridge and shake it gently to evenly distribute the toner Then replace the toner cartridge Have a spare toner cartridge in preparation for the toner running out Background s...

Page 148: ...ocument properly and push it down until the machine grips the document Your scanner may be currently used for copying or faxing When the current job is completed try again There is not enough memory to save the scan image Exit all applications currently open if not required in order to save memory You cannot scan a document into memory There is no document or the document is loaded improperly Inse...

Page 149: ...vecp 386 LPT1TurnAroundDelay 50 5 Restart your Windows I O error occurs during scanning Check for bad cable and the cable connection If you still have the same message open the System ini file in the Windows directory as described above and increase time as much as required in increments of 10 Scanning has failed Restart your scanner and try again message appears on the screen The selected port is...

Page 150: ... corner of the taskbar in the desktop window and select ScanThru Options from the pop up menu In the ScanThru Options dialogue box select Show TWAIN UI checkbox When scanning with Samsung TWAIN UI the Scan dialogue box is on for multi page scan unless you manually close the dialogue box Set a proper scan area when scanning In general the upper 3 mm on the image is not scanned due to the product sp...

Page 151: ...con in the right corner of the taskbar then select configuration from the pop up menu In the SmarThru configuration dialogue box select services then options and enable fax gate The fax modem setup is not made properly To configure the fax modem right click the SmarThru engine icon in the taskbar and select configuration from the pop up menu In the SmarThru configuration dialogue box select fax ga...

Page 152: ...ion if you are recognising texts which are neither typed on a typewriter nor printed on matrix printer in draft mode In most cases the system analyses text layout successfully But if there are mistakes you can mark blocks manually See page 4 7 You may be trying to load an image file of a format not supported in AnyPage Lite AnyPage Lite can load image files in the following formats BMP PCX DCX JPE...

Page 153: ......

Page 154: ... 5 8 effects 5 12 enlarge 5 8 erase 5 8 flip 5 8 gray scale 5 9 half tone 5 9 reduce 5 8 resample 5 8 resize 5 8 resolution 5 9 rotate 5 8 shear 5 8 e mail browse 5 43 check spell 5 40 create 5 38 deliver 5 42 scan to e mail toolbar 5 41 export image 5 15 F fax see pc fax fax cover create 5 35 use 5 25 fax gate configure 5 53 fax preview 4 17 find 5 13 5 45 H help see smarthru help I image manager...

Page 155: ...ing 2 9 type setting 2 9 POP3 1 6 prescan 3 5 print quality 2 9 7 3 printer cable connection 1 3 driver install 1 4 settings 2 8 problems 7 1 problems OCR 7 9 PC fax 7 8 print quality 7 3 printer 7 1 scanning 7 5 R rename 5 13 resolution 4 7 4 11 S samsung TWAIN 4 8 47 9 scan area 4 7 4 11 scan settings 4 7 scan to copy 4 10 e mail 4 18 image manger 4 4 OCR 4 21 pc fax 4 14 scan manager 4 4 scan w...

Page 156: ...ELECTRONICS P N JC68 00252A Rev 4 00 Internet Home Page http www samsungprinter com ...

Reviews: