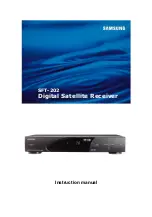
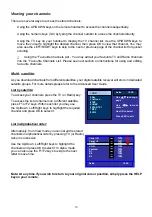
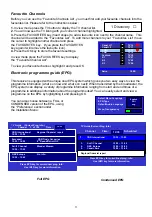
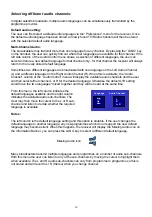
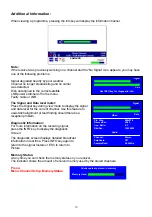
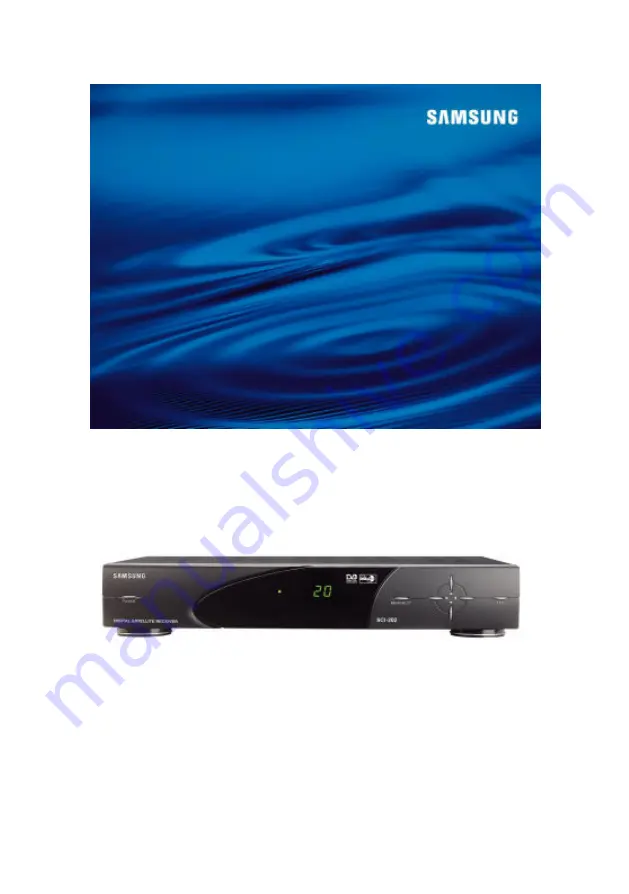
background image

Instruction manual

SFT-202

Digital Satellite Receiver

Summary of Contents for SFT-202

Page 1: ...Instruction manual SFT 202 Digital Satellite Receiver ...

Page 2: ... Programme Guide EPG 11 13 Selecting different audio channels 12 14 Additional Information 13 15 Parental Control 14 16 Parental Lock 14 17 Advanced users guide 16 18 Tuning Modes 17 19 Setup Satellite 28 20 Editing Channels 19 21 Arrange 19 22 Sort Free to Air Channel s 20 23 Deleting Channels 21 24 Installation 22 LNB TV VCR settings Preferences Set local time System Information 25 Reset to fact...

Page 3: ...ts Never expose the unit to water moisture extreme cold or direct sunlight Slots are provided for proper ventilation for the unit do not obstruct them Do not insert or drop small objects into the unit Install the unit in a well ventilated location Never cover the unit or operate the unit near any heat source It is advisable to unplug the unit from the mains TV and the satellite dish when a thunder...

Page 4: ...3 Accessories User Manual 1 Batteries 2 UHF TV cable 1 Remote Control Unit 1 SIGNAL 4 7 1 F2 F1 HELP 0 5 6 9 8 3 2 INFO TV M E N U V O L C H ESC V O L O K M U T E C H R A D I O LANG I T VS A T ...

Page 5: ...nce all connections are made please check again before connecting the equipment to the mains outlet The following shows a typical installation of a satellite receiver If you require further assistance for the installation of your satellite receiver please contact your local distributor ...

Page 6: ...enu E Display Displays channel mode and channel number see below F Channel To change channels or move cursor in menu Display modes The current viewing mode is displayed by your receiver Mode Menu info bar Front panel LED display TV TV icon Channel No Channel Number Radio Radio icon Channel No r Channel No Favourites Heart icon Channel No F Channel No A A B C D F E ...

Page 7: ...h TV UHF output TV SCART Use this connector to connect you TV to the receiver via a SCART cable VCR SCART Use this connector to connect you VCR to the receiver via a SCART cable Video Composite video output for connecting to a monitor etc 0 12V 0 or 12V output for external control switch Audio L R Audio outputs for connecting to an external stereo amplifier S Video Out Additional output for record...

Page 8: ...e F1 may be used to recall the last viewed channel Additional functions will be indicated in menus where applicable Display TV channel list Programme Guide To display the current and next programme information if available Toggle signal meter Display radio channel list SIGNAL 4 7 1 F2 F1 HELP 0 5 6 9 8 3 2 INFO TV MENU VOL CH ESC VOL OK MUTE CH RADIO LANG I TV SAT To edit or display the Favourite ...

Page 9: ...A box and turn the option to on Provided your dish is installed correctly and aligned to the relevant satellite both the Signal and Data bars should display a GREEN bar which denotes the following The first bar shows the actual satellite SIGNAL strength You should see a GREEN bar showing your satellite signal is medium to good If it is RED this normally indicates that either your dish LNB set up i...

Page 10: ... menu Once all the channels are found the Finished message will be displayed at the bottom of the menu indicating that the process has finished Now press the OK key to store the new channels You should now be able to view the first channel found by your receiver The channel number channel information and the clock will be displayed at the top of the screen for a few seconds You may recall this inf...

Page 11: ...ns for using and editing favourite channels Multi satellite As you download channels from different satellites your digital satellite receiver will store in dedicated satellite groups For more details please refer to the Advanced User Guide List by satellite To access your channels press the TV or Radio key To access the list of channels on a different satellite press F1 or F2 keys Within each lis...

Page 12: ...by the broadcaster the EPG system can display a variety of programme information ranging from start and end times of a programme to additional information about the programme itself You can easily select and view a programme on the EPG by highlighting it and pressing OK You can also choose between a FULL or CONDENSED version of the EPG using the Preferences section under the Installation Menu Full...

Page 13: ... display the available audio channels and the user can then select either channel L or R for the desired language Otherwise the default L R setting would have the two languages mixed together and they will be heard at the same time From this menu the left column indicates the default languages available and the right column indicates the available audio sub channels The User may then move the curs...

Page 14: ...ist dish alignment or fault finding should there be a reception problem Diagnostic Information For more information on the receiving signal press the INFO key to display the diagnostic Screen The diagnostic screen displays detailed broadcast information in real time Press INFO key again to return to the signal meters or ESC to return to the Picture Memory Status At any time you can check the memor...

Page 15: ...hannel Set up or Installation menus without entering a PIN Note Once the correct PIN has been entered to temporarily disable a lock this will remain unlocked until the receiver has been switched to standby mode Lock Unlock Channels Highlight this option and press OK to display the Channel Lock menu Use UP DOWN LEFT RIGHT to select the channels you wish to lock press F2 to turn the LOCK tag ON and ...

Page 16: ...r re enter the new PIN or press ESC to abort the PIN change If the PIN is accepted this will now be your new PIN Don t forget your PIN number Please write down your PIN code below and keep in a safe place If you have forgotten your PIN code please call an Authorised Service Agent Factory PIN Code 0 0 0 0 New PIN Code Please keep this section or this manual in a safe place Enter new PIN Confirm Cha...

Page 17: ...th the Signal and Data bar graphs are GREEN you may now select a tuning method If the message No Signal is shown please check that your tuning parameters are correct and amend if necessary Check you LNB settings are correct you can access the LNB set up menu by highlighting the LNB Settings button and press OK see page 22 for LNB set up information If your Manual Tuning Menu tuning and LNB setting...

Page 18: ...nter the channel name and three other parameters Video PID Audio PID PCR PID and Text PID optional These values can either be in Decimal ranging from 0 to 9 or Hexadecimal ranging from 0 to 9 and A to F for each digit After selecting from the Preset List or Manually entering the basic channel parameters Frequency Symbol Rate Polarity and FEC value move the cursor to highlight the Manual button and...

Page 19: ... satellite will be added to the Manual list on the screen Highlight the new satellite in the list and press OK to return to the Channel tuning menu You will find your new satellite displayed in the Satellite box Enter the transponder parameters and check for signal availability Commence downloading your new channels Now any manual channels downloaded under these parameters will be listed under the...

Page 20: ... facility allows you to drag and drop channels to your preferred location Within the Channel Setup menu you will find the Sort Channels option Move the cursor to highlight Arrange in the Channel Setup menu and press OK Use the TV or Radio keys to select the listing you wish to sort Use the UP DOWN LEFT RIGHT keys to move the cursor highlight the channel you wish to move and press OK to select It T...

Page 21: ...mode of operation use the Left Right or OK key Use F1 key to start the sorting progress and ESC to abort The Sort Unscrambled Channels Menu Mode Select either to delete all scrambled channels or move all scrambled channels to the end of the channel list Scope Select sort TV channels only Radio channels only or sort both at the same time Channel Displays the current channel being checked Progress D...

Page 22: ...tion or press any Other key to return to the Delete Channels menu 2 Clear All Channel Info Only use this option if you would like to DELETE ALL CHANNELS stored in your receiver All stored channels in the receiver will be erased at the end of the following procedure From the Main Menu select Channel Setup and Delete You will be prompted with a warning screen Follow the on screen messages to proceed...

Page 23: ... the High Band L O frequency in the High Column e g For a Universal LNB the Low Band L O frequency is 9750 MHz and the High Band L O Frequency is 10600 MHz Tone Your digital receiver is equipped with switch controls 12V 22kHz tone as well as DiSEqC 1 0 DiSEqC With the DiSEqC options switched on you can select between LNBs from A to D Note You may use these controls independently to select differen...

Page 24: ...annel VCR or you are experiencing picture interference use this option to re tune your satellite receiver to a different UHF channel Remember to re tune your TV and VCR to the new channel Enable TV SCART RGB When OFF the TV SCART outputs composite video signal If you have a RGB compatible TV switch this option to ON to enjoy better picture quality Enable TV SCART S Video Select this option only if...

Page 25: ...The time is displayed on the channel information banner and on the EPG so that you will never miss your favourite programme wherever the programmes are transmitted from Offset from GMT Enter the time difference between your local time and GMT in this box Local Time Some broadcasters may not transmit the time together with their programme content In this case you may need to enter the local time of...

Page 26: ...firm this once more Pressing OK at this point will enable the Reset to Factory Default function Pressing any other key will return you back to the installation menu Beyond this point all stored settings including LNB TV VCR configurations parental installation access control and preferences will be lost This final screen confirms the receiver has been reset to factory defaults Warning Are you sure...

Page 27: ...there is power at the mains socket Receiver is ON but no picture or sound Check that your TV is switched on Receiver is on no picture or sound except Channel scrambled menus Check tuning and set up Check Signal and Data levels Dish moved or LNB is faulty Interference on picture sound OK Local TV interference tune the output to another channel or connect to TV via SCART or phonos Interference on pi...

Page 28: ...F type Tuner Loop though Digital tuner with LNB input and loop output Full power loop through supported Frequency Range at LNB input 920 2150MHz Input connector F type female Impedance 75Ω Input sensitivity 30 to 65dBm LNB supply voltages Supply voltage software switchable 13V 18V Current limit 0 to 400mA Software controlled LNB power on off LNB 22kHz Tone switching Amplitude 0 6Vpp 0 2V Frequency...

Page 29: ... NTSC Video Memory 16Mbit Audio Decoder Type MPEG1 Layers I and II Audio Modes Mono Dual Stereo Joint Stereo Output Sample Rates Supported 16kHz 22 05kHz 24kHz 32kHz 44 1kHz 48kHz Data rates supported 8 to 448 Kbps PAL NTSC Encoder Supported Outputs Composite RGB S Video NTSC M PAL B D G H I M N Nc country dependent UHF VHF Modulator Tuning Range UHF CH21 to CH69 or VHF CH3 4 country dependent Pro...

Reviews: