background image

SHD-3000F


_

ENG

그림수정함

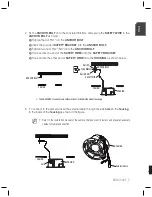
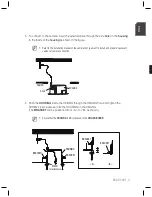
To connect to the camera, insert the external cable through the side 

hole

 on the 

housing


to the inside of the 

housing

 as shown in the figure.

Refer to the installation manual of the camera that you want to install, and prepare necessary 
cables for camera connection.

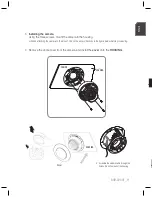
Push the 

hOuSInG

 inside the CEILING through the CEILING hole, and tighten the 

SCREWs (x2) clockwise to fix the HOUSING on the CEILING. 

(The 

braCKeT

 will be positioned from <A> to <B> as shown.)

Ensure that the 

HOUSING

 is firmly secured to the 

CEILING BOARD

.

3.

M

.

M

천장

하우징

어댑터

스냅핏

외부케이블

하우징

CEILING

HOLE

HOUSING

브라켓

브라켓

<A상태>

<B상태>

브라켓

하우징

브라켓

스크류

시계방향으로 회전

BRACKET

SCREW

Turn clockwise

HOUSING

BRACKET

<B>

<A>

BRACKET

BRACKET

Summary of Contents for SHD-3000F

Page 1: ...In ceiling Housing Installation Manual SHD 3000F ...

Page 2: ... _ SHD 3000F Overview 3 What s Included 3 Installation Instructions 4 Installation indoor type 4 Installation outdoor type 8 Product Specifications 12 Table Of Contents ...

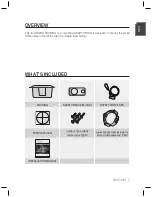
Page 3: ...me camera in built in style on a double layer ceiling What s Included HOUSING SAFETY BRACKET 1EA SAFETY WIRE 1SET WARRANTY usvjr u sv jr sv jr TEMPLATE 1EA outdoor type 3EA indoor type 2EA Lower bracket exclusively for indoor dome cameras 1EA In ceiling Housing Installation Manual SHD 3000F INSTALLATION MANUAL ...

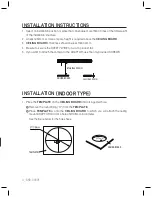
Page 4: ...avoid a product fall If you want to attach the camera to the ADAPTOR use the only provided SCREWS Installation indoor type Place the TEMPLATE on the CEILING BOARD and drill a guided hole Remove the round filling C from the TEMPLATE 2 Place TEMPLATE A onto the CEILING BOARD to which you will attach the ceiling mount ADAPTOR and drill a hole of Ø198mm in diameter See the figure below for the hole sh...

Page 5: ...the HOUSING as shown below To connect to the camera insert the external cable through the side hole on the housing to the inside of the housing as shown in the figure Refer to the installation manual of the camera that you want to install and prepare necessary cables for camera connection 3 M 그 앙카볼트 천장 너트 N1 안전브라켓 앙카볼트 너트 N2 N3 안전와이어 천장 하우징 The ANCHOR BOLTs and nuts are optional and not included i...

Page 6: ...ING is firmly secured to the CEILING BOARD 브라켓 브라켓 A상태 B상태 브라켓 하우징 브라켓 스크류 시계방향으로 회전 Combine the dome camera and the bracket using two screws usvjr svjr usvjr sv j r O R E S E T T F W N A F F R O N T T O P D C 12 V 1 2 3 1 ALAR M OUT 2 ALAR M IN 3 GND V ID E O R E S E T T F W N A F Lower bracket is exclusively for indoor use M Installation indoor type BRACKET SCREW Turn clockwise HOUSING BRACKET B...

Page 7: ... PROTECTIVE TAPE and PRETOECTIVE COVER from the lens 하우징 천장 UNLOCK L O C K UN LO CK L O C K FRONT TOP D C 12 V 1 2 3 1 AL AR M OU T 2 AL AR M IN 3 GN D VID EO RES ET T F W N AF UNLOCK L O C K FRON T D C 1 2 V 1 2 3 1 AL AR M O UT 2 AL AR M IN 3 G ND VID EO RES ET N AF Attach the COVER to the HOUSING 징 하우징 커버 1 ALA RM OU T AR M IN VID EO RE S T M CEILING HOUSING HOUSING Cover ...

Page 8: ...RE to the ANCHOR BOLT as below Tighten the NUT N1 on the ANCHOR BOLT 2 Insert the provided SAFETY BRACKET into the ANCHOR BOLT 3 Tighten two NUTs N2 N3 onto the ANCHOR BOLT 4 Hook and fix one end of the SAFETY WIRE onto the SAFETY BRACKET 5 Hook and fix the other end of SAFETY WIRE onto the HOUSING as shown below 1 The ANCHOR BOLTs and nuts are optional and not included in the product package 앙카볼트...

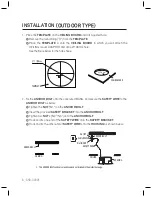
Page 9: ...ecessary cables for camera connection Push the HOUSING inside the CEILING through the CEILING hole and tighten the SCREWs x2 clockwise to fix the HOUSING on the CEILING The BRACKET will be positioned from A to B as shown Ensure that the HOUSING is firmly secured to the CEILING BOARD 3 M M 천장 하우징 어댑터 스냅핏 외부케이블 홀 하우징 CEILING HOLE HOUSING 브라켓 브라켓 A상태 B상태 브라켓 하우징 브라켓 스크류 시계방향으로 회전 BRACKET SCREW Turn c...

Page 10: ... 천장 CA UT ION Be wa re of the Ra ted Vo lta ge an d Po lar ity of the po we r co nn ec tio n CA UTI ON Be war e of the Rat ed Vol tag e and Pol arit y of the pow er con nec tion If waterproofing in the connected cable jacket is poor it may cause leaks Make sure you tape it tight and thoroughly The butyl rubber tape for waterproofing can extend at least twice as long as the original length M Instal...

Page 11: ...AC 24 V DC 12 V RESET VIDEO F W AF T N AC 24 V DC 12 V RESET VIDEO F W AF T N AC 24 V DC 12 V RESET VIDEO F W AF T N AC 24 V DC 12 V RESET VIDEO F W AF T N AC 24 V DC 12 V RESET VIDEO F W AF T N AC 24 V DC 12 V RESET VIDEO F W AF T N Assemble the network cable through the hole on the bottom part of the housing 그 그 HOUSING CEILING 홈 하우징 홈 홈 홈 AC 24 V DC 12 V RESE T VIDEO F W AF T N AC 24 V DC 12 V ...

Page 12: ...12_ SHD 3000F Product Specifications Item Specifications Dimension mm D224 X H106 9 Weight 490g Temperature 10 50 Material PC Color Ivory 84 3 3 224 8 8 106 9 4 2 ...

Page 13: ...SHD 3000F _13 ENG MEMO ...

Page 14: ...60 FAX 82 31 8018 3745 SAMSUNG TECHWIN EUROPE LTD Samsung House 1000 Hillswood Drive Hillswood Business Park Chertsey Surrey UNITED KINGDOM KT16 OPS TEL 44 1932 45 5300 FAX 44 1932 45 5325 SAMSUNG TECHWIN AMERICA Inc 100 Challenger Rd Suite 700 Ridgefield Park NJ 07660 Toll Free 1 877 213 1222 Direct 1 201 325 6920 Fax 1 201 373 0124 www samsungcctvusa com SALES NETWORK PT01 001757A ...

Reviews: