background image

14

Samsung SDS

Digital Door Lock

SHP-A30

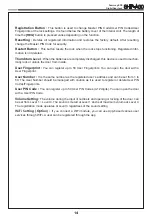
Registration Button : 

This button is used to change Master PIN Code/User PIN Codes/User 

Fingerprints or the lock settings. It is found below the battery cover of the Interior Unit. The length of 

time the 

[REG]

 button is pressed varies depending on the function. 

Resetting : 

Deletes all registered information and restores the factory default. After resetting, 

change the Master PIN Code for security.

Restart Button : 

This button resets the lock when the lock stops functioning. Registered infor-

mation is not deleted. 

Thumbturn Lever


: When the batteries are completely discharged, this device is used to mechan-

ically lock or unlock the door from inside.

User Fingerprint : 

You can register up to 50 User Fingerprints. You can open the door with a 

User Fingerprint.

User Number : 

It is the same number as the registered user’s address and can be set from 1 to 

50. The User Number should be managed with caution as it is used to register or delete User PIN 

Codes/Fingerprints.

User PIN Code : 

You can register up to 50 User PIN Codes (4-12 digits). You can open the door 

with a User PIN Code.

Volume Setting : 

The volume during the input of numbers and opening or locking of the door  can 

be set from Level 1 ~ Level 4. The sound is muted at Level 1 and is at maximum volume at Level 4. 

The registration mode operates at Level 3 regardless of the sound setting.

WiFi Setting (Option) : 

If you connect a WiFi module, you can use App-based various user 

services through WiFi. A user can be registered through the app.

Summary of Contents for SHP-A30

Page 1: ...tion and use the product as intended Before installing this product fully read and understand this user guide Safety precautions must be followed to avoid personal injury or property damage Samsung SDS Digital Door Lock User Guide SHP A30 ...

Page 2: ... mind Introduction Table of Contents Introduction 2 Safety Cautions 3 4 Installation 5 11 Components Tools 5 Door Preparation 6 7 Preparing the parts 8 Installing Lock 9 11 Programming 12 Programming Features 12 13 Definitions 13 14 Basic Lock Operation Overview Lock Activation 15 Status Indicators Changing the Master PIN Code 16 Managing User PIN codes 17 19 Managing User Fingerprints 20 22 Authe...

Page 3: ...y occur when this product is used or from other devices If this radio system has radio interference during operation it may not function properly Much dew condensation may affect the performance of this product It is not recommended to install this product in a rainy humid or salty place e g coastal area or a place exposed to direct sunlight for a long period of time Long term exposure to direct s...

Page 4: ...y not be recognized If your finger is too small or thin the fingerprint recognition rate may decrease If you bend your finger or use only your fingertip with the fingerprint recognition component your fingerprint may not be recognized Place your finger completely on the fingerprint recognition component for best results To increase the fingerprint recognition rate register the fingerprint you woul...

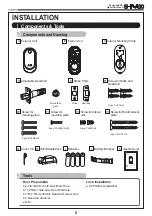
Page 5: ...ke Parts E Screw for Interior unit F4 Batteries I WiFi Module Pack H User Manual K Please review all included documentation and use the product as intended 매뉴얼을 제대로 읽은 후 제품 을 설치하세요 Safety precautions must be followed to avoid personal injury or property damage Samsung SDS Digital Door Lock User Guide SHP A30 Screw for Strike and Dead bolt F1 Spec FH T4x19 Screw for mounting plate F2 Spec BH M5x35 ...

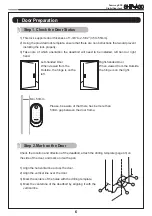
Page 6: ...nd direction of the deadbolt attach the drilling template page 43 on the side of the door and mark on it with a pen 1 Align the horizontal line across the door 2 Align the vertical line over the door 3 Mark the centers of the holes with the drilling template 4 Mark the centerline of the deadbolt by aligning it with the vertical line Right handed Door When viewed from the Outside the hinge is on th...

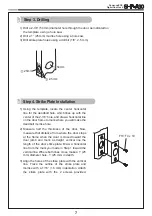
Page 7: ...make the deadbolt mortise hole 2 Measure half the thickness of the door Now measure that distance from where the door stops at the frame when the door is closed toward the door jamb and mark a straight vertical line the length of the door strike plate Draw a horizontal line from the mark you made in Step 1 toward the vertical line Where both lines cross make a 1 25 mm diameter hole 1 25 mm in dept...

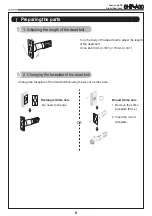
Page 8: ...ead bolt to adjust the length of the dead bolt It can be 60mm 2 3 8 or 70mm 2 3 4 OR Rectangle Strike hole No need to change 2 Changing the faceplate of the dead bolt Change the faceplate of the dead bolt following the size of a strike hole OR Round Strike hole 1 Remove the strike faceplate PULL 2 Insert the round faceplate OR ...

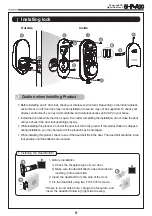
Page 9: ...eck your wireless environment Depending on the indoor wireless environment an IoT door lock may not be installed or its service may not be supported To check your wireless environment you need a smartphone and a wireless access point AP in your house Install the door lock while the door is open Even after completing the installation do not close the door until you check if the door lock operating ...

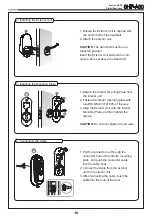
Page 10: ...ws C E F2 C F3 B B 1 Pull the connector out through the connector hole of the interior mounting plate and push the connector cable into the cable hook 2 Connect the cable from the exterior unit to the interior unit 3 After connecting the cable push the cable into the hole of the door 2 Installing the Exterior Unit 1 Ensure the Exterior Unit is aligned with the center hole of the deadbolt 2 Attach ...

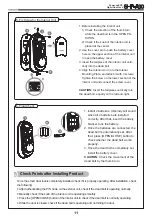
Page 11: ...all 4 batteries A Melody will sound when all 4 batteries are installed correctly After that insert the battery bracket to fix the battery 2 Once the batteries are connected the dead bolt is automatically set After that press OPEN CLOSE button to check whether the dead bolt works properly 3 Once the dead bolt is completely set install the battery cover CAUTION Check the movement of the dead bolt by...

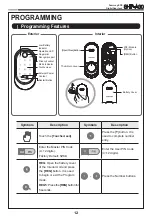
Page 12: ...It is used to complete number entry Enter the Master PIN Code 4 12 digits Factory Default 1234 Enter the User PIN Code 4 12 digits REG Open the battery cover of the Interior Unit and press the REG button It is used to begin or exit the Program mode REG5 Press the REG button for 5 seconds Press the Number buttons Programming Features 5 R Mstr PIN Privacy Lockout Mode Indicator Low Battery Indicator...

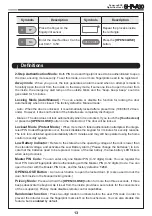
Page 13: ... more than 5 failed authentication attempts with unregis tered PIN Codes Fingerprints occur the lock disables the keypad for 3 minutes for security reasons The lock is re activated again automatically after 3 minutes and may still be operated using the home control or security system Low Battery Indicator Refers to the state when the operating voltage of the lock is lower than the standard voltage...

Page 14: ...ock the door from inside User Fingerprint You can register up to 50 User Fingerprints You can open the door with a User Fingerprint User Number It is the same number as the registered user s address and can be set from 1 to 50 The User Number should be managed with caution as it is used to register or delete User PIN Codes Fingerprints User PIN Code You can register up to 50 User PIN Codes 4 12 di...

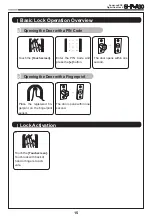
Page 15: ...ti vate Basic Lock Operation Overview Opening the Door with a PIN Code Opening the Door with a Fingerprint The door opens within one second Enter the PIN Code and press the button Touch the Touchscreen Place the registered fin gerprint on the fingerprint sensor The door opens within one second Lock Activation ...

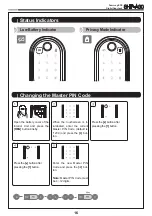
Page 16: ...or Low Battery Indicator Changing the Master PIN Code Open the battery cover of the Interior Unit and press the REG button briefly No 1 50 Deleting User PIN Delete All User PIN Register Fingerprint Delete a Fingerprint Delete All Fingerprint 2 2 2 No 1 50 2 3 3 3 2 No 1 50 3 3 Fingerprint 1 Fingerprint R 2 R No 1 50 Changing Master PIN Adding User PIN When the touchscreen is il luminated enter the...

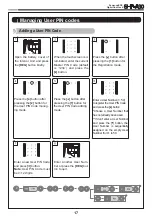
Page 17: ...ser PIN codes Enter a new User PIN Code and press button Note User PIN Code must be 4 12 digits When the touchscreen is il luminated enter the current Master PIN Code default is 1234 and press the button Press the button after pressing the 1 button for the User PIN Code adding mode Enter a User Number 1 50 to register the User PIN Code and press the button Choose a User Number that has not already...

Page 18: ...Press the button after pressing the 2 button for the User PIN Code manag ing mode Enter a User PIN Code and press button Enter a User Number 1 50 to delete the User PIN Code and press the button If you don t enter a User Num ber and press button you can enter the User PIN Code directly to delete it Press the button after pressing the 2 button for the User PIN Code deleting mode Enter another User ...

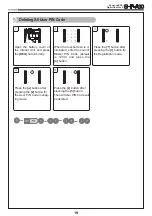
Page 19: ...R No 1 50 Deleting All User PIN Code Open the battery cover of the Interior Unit and press the REG button briefly Press the button after pressing the 2 button for the User PIN Code manag ing mode When the touchscreen is il luminated enter the current Master PIN Code default is 1234 and press the button Press the button after pressing the 3 button Then All User PIN Code will be deleted Press the bu...

Reviews: