background image

21

Packets: Sent = 4, Received = 4, Lost = 0 (0% loss),

Approximate round trip times in milli-seconds:

Minimum = 1ms, Maximum = 3ms, Average = 1ms

-------------------END PING EXAMPLE--------------------------------

Write this IP address down and continue with the steps below. If you get UNKNOWN HOST, you may not

be using the right domain name, may have spelled it wrong, or your TZO Dynamic DNS subscription may

have expired. To check the expiration, use your TZO Key to log into the TZO CONTROL PANEL at

https://controlpanel.tzo.com

Once you log in, you can see the EXPIRATION DATE in the main window. If it

s expired, you can reorder

the TZO service at the TZO website (

http://www.tzo.com

) or by calling Toll Free at 877-433-6865 or

outside the US and Canada at 978-433-6865

3)

Verify the WAN IP address of the router. This WAN IP will be the IP address that your cable or DSL

modem uses to communicate with the rest of the Internet. To do this, log into the router and check the

STATUS page. Write this WAN IP address down. ________________________________

4)

From any PC on the same internal network as the DVR, launch a browser and go to

http://www.mywanIP.com

- Write down the IP address shown

this is your External IP that your

cable/DSL modem hands to the router. In this example, we will use 123.123.123.123 as our IP

The PING of the domain name should match step 3 and 4 above. This means that TZO is working and

pointing at the right IP address, and it could be one of the other issues above. If it does NOT match up,

try rebooting the router. Check again.

Step 1)

The First thing to check is to make sure the DVR works on the inside of the network using the Internal

LAN IP address of 192.168.1.200. Use your Internet Explorer browser or viewing application provided

with your DVR to connect using the above internal LAN IP address. If you cannot connect, review the

setup using the connection guide. Make sure you have set the static IP above on the DVR. Check the

Gateway and Network mask to match the connection guide depending on your network setup.

Success? Did you connect to the DVR from the inside of the network? If yes, continue to step 2

If not, re-review the setup, make sure everything is powered up and ready, repeat step 1 until you

connect

Step 2)

Once you connect from the INSIDE of the network, you need to attempt to connect externally after you

verify that the port forwarding is correct in the router (if you are using a router). You should also check

that you can get to websites such as yahoo.com, cnn.com and other websites to assure your Internet

connection where the DVR is location is up and working properly.

A)

First verify the WAN IP address of the router, this will be the IP address you will use for your tests

externally. Once you can connect using the IP, we will then test that TZO DDNS will work.

B)

From any PC on the same internal network as the DVR, launch a browser and go to

http://www.mywanIP.com

C)

Write down the IP address shown

this is your External IP that your cable/DSL modem hands to the

router. In this example, we will use 123.123.123.123 as our IP

Summary of Contents for SHR-2XXX

Page 1: ...ftware Troubleshooting your DVR if you are having trouble connecting Please Note The product names used in this document are for identification purposes only All trademarks and registered trademarks are the property of their respective owners BEFORE YOU BEGIN SETUP THE ROUTER AND DVR ACCORDING TO THE MANUAL Initial D Link router setup You should SETUP THE D LINK ROUTER for your Internet Connection...

Page 2: ...om as shown below B Enter your choice for a domain name each location DVR must be unique and enter the email address you wish to use Click the CREATE MY FREE TRIAL DOMAIN NAME button and TZO will send your TZO Domain Name and TZO key to the email address you used C Once you have the TZO Key Domain name and Email address used written down or available from your email log into your router by going t...

Page 3: ...Blocking If DSL is being used for a broadband connection to your DVR check with your ISP to make sure that your DSL modem is in bridge mode to assure that there is no NAT server running on the DSL modem itself If this is the case you will have extreme difficulty in port forwarding and getting the DVR to work You can call your ISP and ask if your DSL modem can be configured for Bridge mode and allo...

Page 4: ... for ports 554 557 fill in the blanks as shown in the screenshot below and then click the APPLY button Select Enabled Name DVR Private IP 200 Protocol Both Private Port 554 Public Port 557 Schedule Always This will add in the ports 554 557 as a service in the Virtual Server list Repeat this for the additional ports as shown in the steps below ...

Page 5: ... the blanks as shown in the screenshot below and then click the APPLY button Select Enabled Name DVR2 Private IP 200 Protocol Both Private Port 8000 8159 Public Port 8000 8159 Schedule Always This will add in the service for ports 8000 8159 in the Virtual Server list ...

Page 6: ...nt to remotely administer the router to open ports change port forwarding configure the TZO Dynamic DNS and more If you do not enable remote administration you will have to login to the router locally IMPORTANT If you enable remote management be sure to set a different password other than the default password used in this document You can also change the remote management port to a custom port you...

Page 7: ...should then connect the DVR to the router using a standard RJ 45 ETHERNET cable Once you connect the DVR to the router you need to enter the menu of the DVR by following the exact steps below 1 On the Samsung DVR s you push the MENU button located on the upper right side of the DVR front panel 2 After you push the MENU button the password menu screen comes up as shown below Enter the password defa...

Page 8: ... below this is the Menu Setup screen Use the cursor buttons to scroll down to the NETWORK setup Once you select the NETWORK menu press the RIGHT cursor button 4 You should use the cursor buttons to scroll over to IP SETTINGS and then press the ENTER button ...

Page 9: ... DNS Ding this will make sure your DVR s Network and IP settings are setup to work with your router The important settings are listed below IP ADDRESS 192 168 1 200 Subnet 255 255 255 0 Gateway 192 168 1 1 DNS 192 168 1 1 6 Once you have set the DVR to the IP settings above you need to scroll down to the OK button and press the ENTER button One you are back in the MENU SETUP the main setup menu yo...

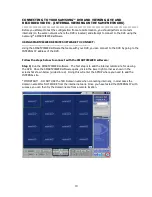
Page 10: ...DVR by going to the INTERNAL IP address of the DVR Follow the steps below to connect with the SMARTVIEWER software Step 1 Run the SMARTVIEWER software The first step is to add the internal remote site for viewing the DVR Once the SMARTVIEWER software opens click in the lower right corner as shown in the screenshot shown below circled in red Doing this will enter the SETUP where you need to add the...

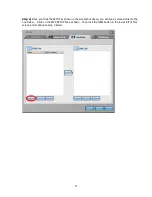
Page 11: ...click the SETUP as shown in the screenshot above you will see a screen similar to the one below Click on the SITE SETUP tab as shown Then click the NEW button in the lower left of this screen and continue to step 3 below ...

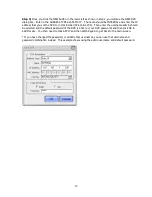
Page 12: ...s tutorial 192 168 1 200 Then enter the username admin should be selected and the default password of the DVR is 4321 or your DVR password and then click OK to add this site You then need to Click APPLY and then CLOSE again to get back to the main screen If you have changed the password or added other usernames you can use that username and password combination instead This example shows using the...

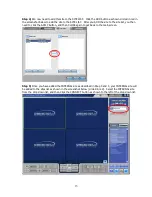
Page 13: ...list you then need to click the APPLY button and then CLOSE again to get back to the main screen Step 5 Once you have added the INTERNAL site as described in Step 3 and 4 your INTERNAL site will be added to the sites list as shown in the screenshot below circled in red Select the INTERNAL site from the drop down list and then Click the CONNECT button as shown to the left of the drop down list ...

Page 14: ... to get the full details see the SMARTVIEWER manual that came with the DVR If you get the error or cannot connect to the DVR and see either live or recorded video check the IP DVR IP and Port settings and status of the DVR and try again Consult the DVR manual for more troubleshooting procedures ...

Page 15: ...ed to add the DOMAIN NAME to the Remote sites list in the SMARTVIEWER software before you can connect Follow the steps below to connect with the SMARTVIEWER software from a remote location Step 1 Run the SMARTVIEWER software The first step is to add the internal remote site for viewing the DVR Once the SMARTVIEWER software opens click in the lower right corner as shown in the screenshot shown belo...

Page 16: ...click the SETUP as shown in the screenshot above you will see a screen similar to the one below Click on the SITE SETUP tab as shown Then click the NEW button in the lower left of this screen and continue to step 3 below ...

Page 17: ...is example we are using YOURDVR TZO COM Enter your domain name here Then enter the username admin should be selected and the default password of the DVR is 4321 or your DVR password and then click OK to add this site You then need to Click APPLY and then CLOSE again to get back to the main screen If you have changed the password or added other usernames you can use that username and password combi...

Page 18: ... click the APPLY button and then CLOSE again to get back to the main screen Step 5 Once you have added the REMOTE site as described in Step 3 and 4 the YOURDVR TZO COM your domain name site will be added to the sites list as shown in the screenshot below circled in red Select your site in this case YOURDVR TZO COM from the drop down list and then Click the CONNECT button as shown to the left of th...

Page 19: ... to get the full details see the SMARTVIEWER manual that came with the DVR If you get the error or cannot connect to the DVR and see either live or recorded video check the IP DVR IP and Port settings and status of the DVR and try again Consult the DVR manual for more troubleshooting procedures ...

Page 20: ...e will not work B The TZO DOMAIN NAME may not be synched up with the IP address of the cable or DSL modem See below steps for troubleshooting TZO C The router could be having problems with the port forwarding Check the port settings and try rebooting the router To Check the TZO Dynamic DNS is working Check the IP that TZO is pointing to You can verify the IP address that TZO is showing in our DNS ...

Page 21: ...r issues above If it does NOT match up try rebooting the router Check again Step 1 The First thing to check is to make sure the DVR works on the inside of the network using the Internal LAN IP address of 192 168 1 200 Use your Internet Explorer browser or viewing application provided with your DVR to connect using the above internal LAN IP address If you cannot connect review the setup using the c...

Page 22: ...4 Reply from 123 123 123 123 bytes 32 time 1ms TTL 64 Ping statistics for 123 123 123 123 Packets Sent 4 Received 4 Lost 0 0 loss Approximate round trip times in milli seconds Minimum 1ms Maximum 3ms Average 1ms If the above IP matches the WAN IP address that you wrote down in step 2C this means TZO DDNS is pointing at the right address and the DDNS isn t the problem You should be able to connect ...

Page 23: ...eout to 0 if you are using DSL If you have connect on demand try disabling that If you see a LAN IP address come back from the ping If your IP shows up as 192 168 X X 172 X X X or 10 X X X If you are Running TZO software This above means the TZO software is may have been set wrong Check the TZO software and make sure the SIGNON options in TZO is set to DEFAULT MODE If you are Using TZO in a router...

Reviews: