3
D)
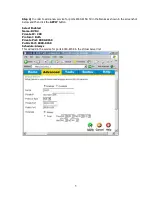
Once you are logged into the router, click the ADVANCED tab at the top. Under the ADVANCED
section, select
DDNS
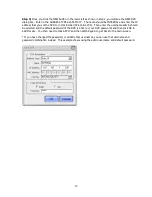
from the left hand menu (blue buttons). As shown in the screenshot below, enable
the TZO Dynamic DNS service, and then input the Domain Name, TZO Key/Password and Email
Address/Username into the router DDNS setup. Click Apply. You now have setup the TZO DDNS
properly.
This domain name is good for 30 days for testing. After 30 days the TZO Dynamic DNS will expire. You
can purchase the TZO standard Dynamic DNS service for this domain name at
http://www.tzo.com/order.html
before it expires. When ordering, use the email address you used when
signing up.
D-LINK
™
PORT FORWARDING AND OTHER ROUTER CONFIGURATION:
-----------------------------------------------------------------------------------------
*IMPORTANT NOTE before you start on PORT FORWARDING and Port Blocking:
* If DSL is being used for a broadband connection to your DVR, check with your ISP to make sure that
your DSL modem is in "bridge mode" to assure that there is no NAT server running on the DSL modem
itself. If this is the case, you will have extreme difficulty in port forwarding and getting the DVR to work.
You can call your ISP and ask if your DSL modem can be configured for Bridge mode and allow your
router to authenticate with the DSL signon routine instead of the DSL Modem.
Step 1)
The first step is to log in to the router. Log into the router by going to
http://192.168.1.1
and
using your username and password to log into the router. (default username and pw is admin/blank)
Step 2)
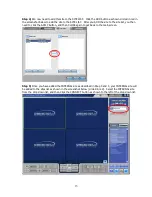
Once you log into the router, Click the
ADVANCED TAB
in the top menu.
We need to add 2 sets of ports (TCP Port 554-557 and UDP 8000-8159) to the Virtual server section in
order to view the DVR remotely. These ports are added to the server list in 2 separate processes as
described below.


