3
Connecting IEEE1394 Device
●
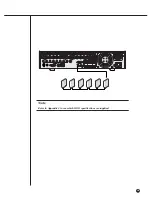
Connect the IEEE1394 hard disk through the back port of SHR-4160N/P.
●
You can connect up to 6 IEEE1394 armored hard disks by the Daisy-Chain
method.
●
After connection, Menu - System - HDD Setup is necessary for recognition and
setup for use.
●
It acts as HOT PLUG to connect or disconnect the IEEE1394 device while the sys-
tem is running.
●
If you press Connect/Disconnect in Menu - System - HDD Setup, HOT PLUG will
be recognized or deleted.
SHR-4160N/P USER’S MANUAL
3-3
Note
Note
See 5-8 System (HDD Setup) of User’s Manual.
Caution
Caution
- Wait until the HOT PLUG connected hard disk is stabilized enough (approx. 2 sec-
onds per each hard disk) and click CONNECT in SHR-4160N/P MENU before use.
- Be sure to click DISCONNECT in SHR-4160N/P MENU to delete IEEE1394 Device
safely. Failure of clicking DISCONNECT may cause improper operation of IEEE1394
Device.
Caution
Caution
The IEEE1394 Device hard disk shall be set to Master.
Summary of Contents for SHR-4160N/P
Page 1: ...16 Channel DVR SHR 4160N P User s Manual ...
Page 7: ......
Page 8: ...Chapter 1 Overview 1 ...
Page 14: ......
Page 15: ...Chapter 2 Installation 2 ...
Page 25: ...2 10 Fixing the fan to the left ...
Page 26: ...Chapter 3 Connecting with Other Equipment 3 ...
Page 27: ...1Connecting Video Audio Monitor 3 1 SHR 4160N P USER S MANUAL ...
Page 30: ...3 4 Note Note Refer to Appendix 2 to see which HDD specifications are supplied ...
Page 33: ...SHR 4160N P USER S MANUAL 3 7 ALARM IN OUT Connection ...
Page 35: ...Chapter 4 Live 4 ...
Page 44: ...Chapter 5 Menu Setup 5 ...
Page 77: ...Chapter 6 PTZ device Control 6 ...
Page 86: ...Chapter 7 Recording 7 ...
Page 91: ...Chapter 8 Search Play 8 ...
Page 101: ...Chapter 9 Backup and Backup Search 9 ...
Page 107: ...Chapter 10 Smart Viewer 10 ...
Page 166: ...Chapter 11 Backup Viewer 11 ...
Page 182: ......
Page 183: ...Appendix 12 ...
Page 188: ...SHR 4160N P USER S MANUAL 3Outline Drawing 12 5 ...


