8
Network
5-28
●
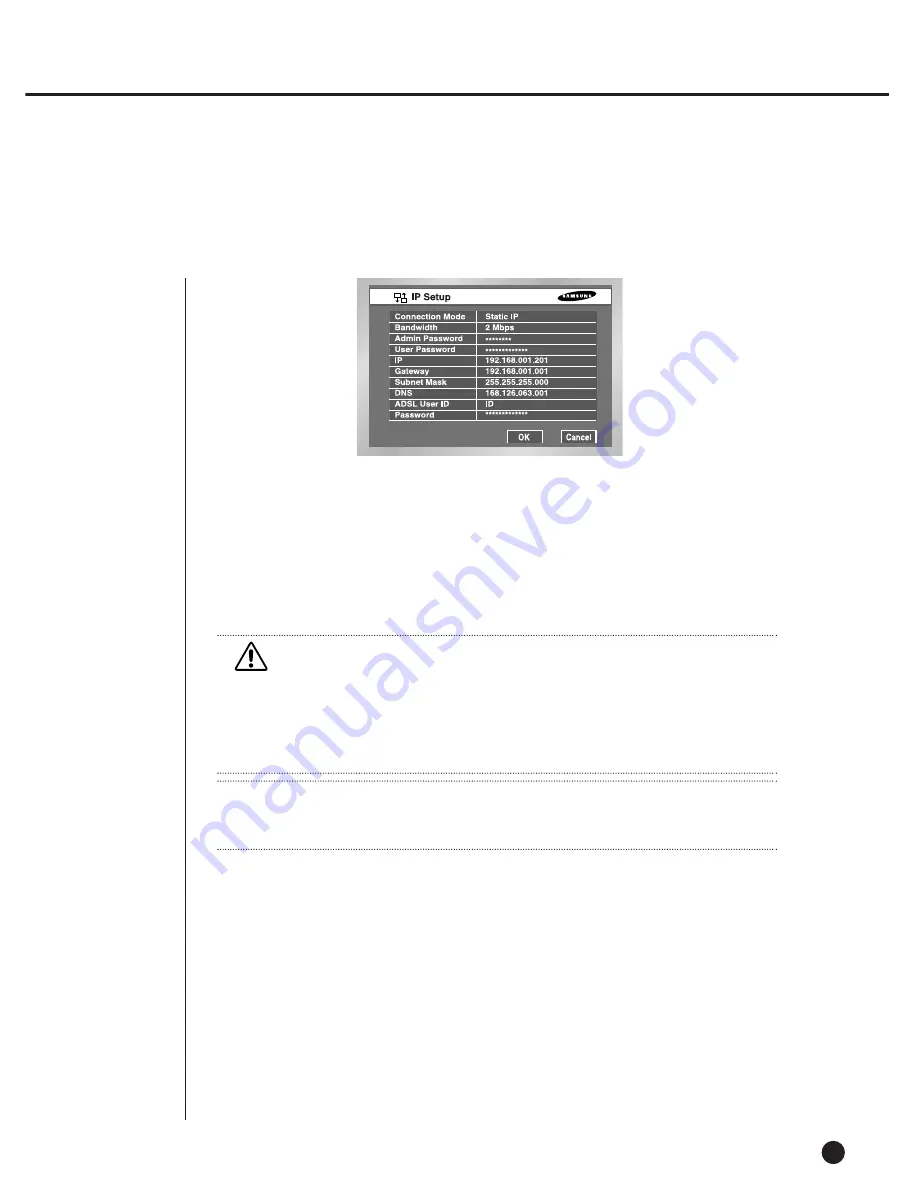
Connection Mode
Designates the kind of the network connected to the main body of SHR-4160N/P.
Static IP : When the main body is connected to the network with Static IP.
Dynamic IP : When the main body is connected to the network with Dynamic IP
supplied by DHCP.
ADSL(PPPoE) : When the main body is connected to the ADSL network with PPPoE.
●
Broadbandwidth
Designate the speed of the network to which the SHR-4160N/P main body is connected.
Unlimited/2Mbps/1Mbps/600Kbps/300Kbps
In the ADSL mode, you may choose either 600Kbps or 300kbps as the bandwidth.
●
Admin Password
The password for the connection between Smart Viewer and the set with the authority
of Admin. The password can be as long as 8 digits.
Press "Enter" and the left number keys from 0 to 9 for setup.
●
User Password
The password for Smart Viewer’s access to the set with the authority of general user.
●
IP
Set up the IP address to connect the SHR-4160N/P main body to the network.
In case of a fixed IP, you must input IP yourself.
In case of a flexible IP or ADSL(PPPoE), the IP allocated from the DHCP server or
ADSL company. If you fail to connect DHCP or ADSL, 000.000.000.000 is displayed.
Then, press "OK" to receive IP. If you repeatedly fail to connect DHCP or ADSL, turn the
SHR-4160N/P main body power off and turn it on again before you retry connecting.
Caution
Caution
When the main body is connected to the network using high speed LAN, set to 1
Mbps or 2 Mbps. When the main body is connected to the network supporting low
bandwidth such as ADSL, set below 600 Kbps. If you set Bandwidth high though the
main body is connected to a slow network, the network load will get heavy therefore
the connection with Smart Viewer or video monitoring may be instable.
Note
Note
In the ADSL connection mode, the protocol type in the Transmission Protocol Setup
page shall be set to TCP/IP.
IP Setup
Summary of Contents for SHR-4160N/P
Page 1: ...16 Channel DVR SHR 4160N P User s Manual ...
Page 7: ......
Page 8: ...Chapter 1 Overview 1 ...
Page 14: ......
Page 15: ...Chapter 2 Installation 2 ...
Page 25: ...2 10 Fixing the fan to the left ...
Page 26: ...Chapter 3 Connecting with Other Equipment 3 ...
Page 27: ...1Connecting Video Audio Monitor 3 1 SHR 4160N P USER S MANUAL ...
Page 30: ...3 4 Note Note Refer to Appendix 2 to see which HDD specifications are supplied ...
Page 33: ...SHR 4160N P USER S MANUAL 3 7 ALARM IN OUT Connection ...
Page 35: ...Chapter 4 Live 4 ...
Page 44: ...Chapter 5 Menu Setup 5 ...
Page 77: ...Chapter 6 PTZ device Control 6 ...
Page 86: ...Chapter 7 Recording 7 ...
Page 91: ...Chapter 8 Search Play 8 ...
Page 101: ...Chapter 9 Backup and Backup Search 9 ...
Page 107: ...Chapter 10 Smart Viewer 10 ...
Page 166: ...Chapter 11 Backup Viewer 11 ...
Page 182: ......
Page 183: ...Appendix 12 ...
Page 188: ...SHR 4160N P USER S MANUAL 3Outline Drawing 12 5 ...


