background image

Summary of Contents for SMH1622S

Page 1: ...per_ o Lh100Yo recyclea paper e the possibilities ENGLISH Thank you for purchasing this Samsung product Please register your product at www samsung com register 1 800 SAMSUNG 726 7864 SMH1611 XAA 03898A EN 02 indd 1 2011 10 13 4 04 51 ...

Page 2: ...aged It is particularly important that the oven door close properly and that there is no damage to the 1 Door bent 2 Hinges and latches broken or loosened 3 Door seals and sealing surface D Only properly qualified service personnel should adjust or repair the oven Do not attempt to adjust or repair the oven yourself IMPORTANT SAFETY SYMBOLS ANDPRECAUTIONS What the icons and signs in this user manu...

Page 3: ... including the back of the oven 15 Do not let the cord hang over edge of table or counter 16 When cleaning surfaces of the door and oven that come together when the door closes use only mild nonabrasive soaps or detergents applied with a sponge or soft cloth Unplug the plug before cleaning 17 To reduce the risk of fire in the oven cavity ao Do not overcook food Carefully attend appliance when pape...

Page 4: ...y damage do not operate the oven and notify your dealer immediately SAVETHESEINSTRUCTI0NS 4 safety informaton Make sure to install your oven in a location with adequate space Remove all foreign substances such as dust or water from the power plug terminals and contact points using a dry cloth on a regular basis Unplug the power plug and clean it with a dry cloth Failing to do so may result in elec...

Page 5: ...ir the oven on your own there is dangerous voltage inside If the oven needs to be repaired contact an authorized service center near you Do not attempt to repair disassemble or modify the appliance yourself Because a high voltage current enters the product chassis during operation opening the chassis can result in electric shock or fire You may be exposed to electromagnetic waves When the oven req...

Page 6: ...en burning themselves Do not place food or heavy objects over the door when opening the door The food or object may fall and this may result in burns or injury Do not abruptly cool the door the inside of the appliance or the dish by pouring water over it during or just after cooking This may result in damage to the appliance The steam or water spray may result in burns or injury Do not try to preh...

Page 7: ...ing Times Power Levels 14 Eco Mode COOKWARE GUIDE _ 15 Microwave safe utensils i CLEANING AND MAINTAINING YOUR MICROWAVE OVEN 19 Cleaning the exterior 19 Cleaning the interior 19 Cleaning the turntable and roller rings 19 Storing and repairing your microwave oven 19 Replacing the cooktop night light 19 Replacing the oven light 20 Cleaning the grease filter 20 Replacing the charcoal filter TROUBLES...

Page 8: ...oduct Please record these numbers in the spaces provided below along with the other requested information Keep this information in a safe place as a permanent record of your purchase to aid in identification in case of theft or loss Also keep a copy of your sales receipt as a proof of purchase if warranty service is needed MODEL NUMBER SERIAL NUMBER DATE PURCHASED PURCHASED FROM Warranty service c...

Page 9: ... See page 11 1 See page 12 1 1 1 2 4 5 6 7 8 9 See page 14 1 See page 14 1 I Power Level O StopiCMear Sec Enter Start I EcoMode I Clock i i LoiOff On Off t See page 13 See page 10 setting up your new microwave oven 9 SMH1611 XAA 03898A EN 02 indd 9 2011 10 13 4 04 54 ...

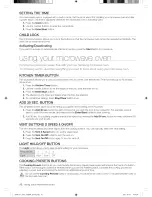
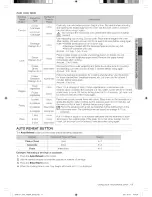
Page 10: ...DD 30 SEC BUTTON This simplified control saves you time letting you quickly start cooking at 100 power 1 Press the Add 30 seco button for each 30 seconds you wish the food to be cooked for For example press it twice to cook it for one minute and then press the Enter Start button to start cooking 2 Add 30 sec to a cooking program already in progress by pressing the Add 30 sec button for every addit...

Page 11: ...4 oz Follow the package instructions for covering and standing Use this button for frozen sandwiches breakfast entrees etc Let oven cool for at least 5 minutes before using again Amount 4 to 8 oz Place 1 to 4 servings of fresh frozen vegetables in a microwave safe ceramic glass or plastic dish and add 2 4 Tbs water Cover with lid or vented plastic wrap to cook Stir before letting stand for 3 to 5 ...

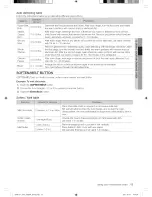
Page 12: ...ton 2 Use the number buttons to enter the weight 3 Press the Enter Start button _ After pressing the Enter Start button the display counts down the defrosting time The oven will beep twice during the defrost cycle At this time open the door and turn the food as needed Remove any thawed portions then return the frozen portions to the oven and press the Enter Start button to resume the defrost cycle...

Page 13: ...ons with narrow strips of aluminum foil Let stand covered for 30 60 minutes in the refrigerator After each stage rearrange or remove any pieces of food that are nearly defrosted Let stand for 10 20 minutes Arrange the rolls in a circle on kitchen paper in the middle of the turntable Turn over halfway through the defrosting time SOFTEN MELT lets you melt chocolate soften cream cheese and melt butte...

Page 14: ...ton 3 Use the number buttons to enter the power level 4 Use the number buttons to enter the second cook time 5 Press the Power Level button 6 Use the number buttons to enter the power level 7 Press the Enter Start button 8 When the cooking time is over four beeps will sound and End is displayed Power Levels The 10 power levels allow you to choose the optimal power level for your cooking needs 10 H...

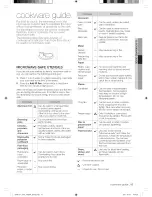
Page 15: ...hese materials Can be used to warm food Overheating may cause the polystyrene to melt May catch fire May cause arcing Glassware Oven to table ware Fine glassware Glass jars Metal Dishes Utensils Freezer bag twist ties Paper Plates cups napkins and kitchen paper Recycled paper Plastic Containers Cling film Freezer bags Wax or grease proof paper Thermometer Straw wicker and wood Z Can be used unless...

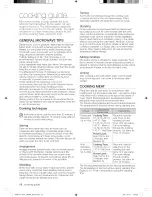
Page 16: ...oking Areas that need shielding include poultry wing tips the ends of poultry legs and corners of square baking dishes Use only small amounts of aluminum foil Larger amounts can damage your oven Turning Turn foods over midway through the cooking cycle to expose all parts to the microwave energy This is especially important with large items such as roasts Standing Foods cooked in the microwave buil...

Page 17: ...o 1 5 Ibs Shrimp Up to 1 5 Ibs Power Level Medium High 7 Cooking Time 4 8 min Ib Power Level Medium High 7 Cooking Time 4 61 2min Ib Power Level Medium High 7 Arrange the steaks on a roasting rack with the meaty portions towards the outside of the rack Cover with wax paper Turn them over halfway through the cooking rocess Cook until the fish flakes easily with a fork Let stand for 3 5 minutes Arra...

Page 18: ...e onion is soft stirring once 2 Add flour salt mustard and pepper mix well Cook at High for 30 to 60 seconds until mixture boils Stir in milk until smooth 3 Stir in red pepper Cook at High for 2 to 3 minutes until mixture boils and thickens slightly stirring twice Stir in cheese until melted 4 Add broccoli and pasta mix well Cover with lid Cook at High for 4 to 6 minutes until heated through stirr...

Page 19: ... lemon juice for extra freshness into a four cup measuring glass Run the microwave at High power for 5 minutes or until the water boils Let water stand in the oven for one or two minutes CLEANING THE TURNTABLE AND ROLLER RINGS Clean the roller rings periodically and wash the turntable as required You can wash the turntable safely in your dishwasher STORING AND REPAIRING YOUR MICROWAVE OVEN If you ...

Page 20: ...the old filter CLEANING THE GREASE FILTER Your microwave oven has two metal reusable grease filters The grease filters should be removed and cleaned at least once a month or as required A To avoid risk of personal injury or property damage _ do not operate the oven hood without the filters in place 1 To remove the filter slide it to the left or right using the tab 2 Soak the grease filter in hot w...

Page 21: ...levels 1 6 cu ft seconds including defrost Power Power Source Power Output Consumption 120 VAC 60 Hz 1000 Watts 1580 Watts Net Shipping ST 44 2 51 8 Ibs Weight B W 43 3 50 8 Ibs Outside 29 7 s W X 16 I H X 15 l s D Dimensions Oven Cavity 19 5 16 W X 9 5 s H X 14 Ys D Dimensions Shipping Dimensions 33 s s W X 19 WIi H X 19 Ws2 D SAMSUNG OVER THE RANGE OTR MICROWAVE OVEN Limited warranty to original...

Page 22: ...BUT NOT LIMITED TO ANY IMPLIED WARRANTIES OF MERCHANTABILITY OR FITNESS FOR A PARTICULAR PURPOSE SHALL APPLY AFTER THE EXPRESS WARRANTY PERIODS STATED ABOVE AND NO OTHER EXPRESS WARRANTY OR GUARANTY GIVEN BY ANY PERSON FIRM OR CORPORATION WITH RESPECT TO THIS PRODUCT SHALL BE BINDING ON SAMSUNG SAMSUNG SHALL NOT BE LIABLE FOR LOSS OF REVENUE OR PROFITS FAILURE TO REALIZE SAVINGS OR OTHER BENEFITS ...

Page 23: ...II II I I SMH1611 XAA 03898AEN 02 indd 23 2011 10 13 4 04 57 I I ...

Page 24: ...g com spsn to view our helpful How to Videos and Live Shows Requires reader to be instaLLed on your smartphone CANADA MEXICO U S A 1 800 SAMSUNG 726 7864 01 800 SAMSUNG 726 7864 1 800 SAMSUNG 726 7864 www samsung com Code No DE68 03898A 02 SMH1611 XAA 03898A EN 02 indd 24 2011 10 13 4 04 58 ...

Page 25: ...cycled Paper ec_clado_ las posibilidades ESPAnOL Graciaspot nauerescog_doeste producto Samsung Pot favor registresu producto er www samsung com register 1 800 SAMSUNG 726 7864 8MH1611 XAA 03898A Mes 02 indd 1 2011 10 13 4 06 47 ...

Page 26: ...haya da_os en 1 la puerta doblada 2 las bisagras y los pestillos rotos o sueltos 3o Las juntas de la puerta y la superficie de sellado Do 61o personal del servicio tecnico adecuadamente calificado debe ajustar o reparar este homo No intente ajustar o reparar este homo usted mismo SiMBOLOS YPRECAUCiONES DE SEGURIDAD iMPORTANTES Significado de iconos y simbolos en este manual dei usuario ADVERTENClA...

Page 27: ...l cable alejado de superficies calientes incluso la parte posterior del homo 15 No permita que el cable cuelgue del borde de una mesa o mesada 16 Cuando limpie las superficies de la puerta y del homo que se ensamblan al cerrar la puerta utilice s61ojabones o detergentes suaves no abrasivos aplicados con una esponja o pare suave Desench elo antes de limpiarlo 17 Para reducir el riesgo de incendio e...

Page 28: ...a puerta o una puerta que no estecorrectamente alineada Si hay algun dano no ponga el homo enfuncionamiento y notifiquede inmediato al distribuidor CONSERVE ESTAS INSTRUCCIONES 4 informaci6n sobre seguridad Asegurese de instalar su homo en un lugar con espacio suficiente Retire todas las sustancias extranas como polvo o agua de los terminales y puntos de contacto del enchufe con un pano seco regul...

Page 29: ...andirse Siempre respete las Precauciones de seguridad cuando utilice su horno Nunca intente reparar el homo contiene voltaje peligroso en el interior Si se debe reparar el homo comuniquese con un centro de servicio tecnico autorizado cercano No intente reparar desarmar ni modificar el electrodomestico Dado que una corriente de alta tension ingresa en el chasis del producto durante su funcionamient...

Page 30: ...o No hacerlopuedeprovocarquemadurasenlos niRos No coloque alimentosni objetos pesados sobre la puerta del homo cuando la abra Losalimentoso elobjeto podriancaersey provocar quemaduraso lesiones No enfr eabruptamente la puerta el interiordel electrodomestico ni el plato vertiendoagua sobre estas partes durante o despues de la coccbn Estopuedeprovocarda_osenel electrodomestico El vaporo elrocio deag...

Page 31: ...da 10 Botones de programas de cocci0n 11 bot0n Auto Reheat Recalentamiento automatico 12 BotOn Auto Defrost Descongelamiento automatico 13 Bot0n Soften Melt Ablandar derretir 14 Tiempos de cocci0n y niveles de potencia del microondas 14 Eco mode Modo Eco GUIA DE RECIPIENTES Y UTENSILIGS DE COCINA 15 Recipientes yutensilios aptos para microondas LIMPIEZA Y MANTENIMIENTO DE SU HORNO DE M IC ROON DAS...

Page 32: ...re los nOmeros en los espacios provistos a continuaci6n junto con la demas informaci6n solicitada Conserve esta informacbn en un hgar seguro como un registro permanente de su compra para ayudarlo en la identificaci6n en caso de robo o perdida Tambien conserve una copia de su recibo como prueba de compra en caso de que sea necesario usar el servicio de garantia NUMERO DE MODELO NOMERO DE SERIE FECH...

Page 33: ...a I p_ gina 12 Consulte la I p_ gina 14 Cooking Presets 1 2 4 5 PowerLevel 0 J 6 9 kitchen Timer Stop Clear Sec Enter Sta_ Consulte la I p_ gina 14 On Off HiiLo Off Consulte la p_ gina 13 I Consulte la p_ gina 10 instalaciOnde su homo de microondas 9 SMH1611 XAA 03898A Mes 02 indd 9 2011 10 13 4 06 49 ...

Page 34: ...empo permitiendole iniciar rapidamente la cocci6n a1100 de potencia 1 Presione el boton Add 30 sec Agregar 30 segundos por cada 30 segundos que desee cocinar los alimentos Por ejemplo presi6nelo dos veces para programar un minuto de cocci6n y luego presione el bot6n Enter Start Ingresar Inicio para comenzar la coccbn 2 Agregue 30 segundos a un programa de cocci6n ya iniciado al presionar el bot6n ...

Page 35: ...e este bot6n para emparedados congelados platos principales del desayuno etc Deje enfriar el homo durante al menos 5 minutos antes de utilizarlo nuevamente Cantidad 4 a 8 oz Coloque 1 a 4 porciones de verduras frescas congeladas en una fuente de plb stico vidrio o cerb mica para microondas y agregue 2 4 cucharadas de agua Cubra con una tapa o envoltorio plb stico con ventilaci6n para cocinar Revue...

Page 36: ...TER START INGRESAR INICIO Despues de oprimir el bot6n ENTER START INGRESAWINIOIO la pantalla cuenta el tiempo de descongelamiento en forma regresiva Elhomo emitira la seBal sonora dos veces durante el ciclo de descongelamiento En ese memento abra la puerta y de vuelta los alimentos seg0n sea necesario Saque las porciones que se hayan descongelado luego coloque las porciones congeladas en el homo y...

Page 37: ...miento BOTON SOFTEN MELT ABLANDAR DERRETIR SOFTEN MELT ABLANDAR DERRETIR le permite derretir chocolate ablandar queso crema y derretir manteca Ejemplo Para derretir chocolate 1 Oprima la tecla SOFI EN MELT ABLANDAR DERRETIR 2 Elija la categoria de alimento 1 2 o 3 presionando un bot6n numerico 3 Oprima la tecla ENTER START INGRESAR INICIO Tabla de Ablandar Derretir i_i_i_i _ i_i_i_i_i _i_i_i _i_i_...

Page 38: ...e coccbn 2 Oprima el bot6n Power Level Nivel de potencia 3 Use los botones numericos para ingresar el nivel de potencia 4 Use los botones numericos para ingresar el segundo tiempo de cocciOn 5 Oprima el bot6n Power Level Nivel de potencia 6 Use los botones numericos para ingresar el nivel de potencia 7 Presione el bot6n ENTER START INGRESAR INICIO 8 Cuando haya transcurrido el tiempo de cocciOn es...

Page 39: ...prenderse fuego teiii i Papel reciclado o _ Pueden provocar un arco el trico ribetes de metal Recipientes de vidrio Vajilla de mesa Cristaleria fina Frascos de vidrio Metal Recipientes utensilios Precintos de alambre de bolsas para freezer Papel Platos vasos servilletas de papel y papel de cocina Papel reciclado Pl_ stico Recipientes Filmtransparente Bolsas para freezer Papel encerado o parafinado...

Page 40: ...ren protecci6n son las puntas de las alas de las aves los extremos de las patasde aves y las esquinas de recipientes parahornear cuadrados Uses61opeque5as cantidades 16 gu a de cocci6n de papel de aluminio Las cantidades mayores pueden da_ar su homo Dar vueita De vuelta los alimentos en la etapa intermedia del ciclo de cocci6n para exponer todas las partes a la energia de microondas Esto es de esp...

Page 41: ...el de potencia Medians alta 7 Acomode los filetesen la asaderacon las porciones mas carnosas hacia la parte exterior de la misma Cubra con papel encerado Delos vuelta a la mitad del proceso de coccbn Codne el pescado hasta que se ueda desmenuzarfb cilmente con un tenedor Deje reposar durante 3 minutos Acomode los filetesen una fuente pars homo introduciendo cualquier pedazo finito debajo del mismo...

Page 42: ...o Cocine a potencia Alta de 2 a 3 minutos hasta que la mezcle hierva y se espese ligeramente revuelva dos veces Incorpore el queso y revuelva hasta que se derrita 4 Agregue los br6colis y los fideos mezcle bien Cubra con una tapa Cocine a potencia Alta de 4 a 6 minutos hasta que se caliente toda la preparaci6n y revuelva una vez Revuelva antes de servir Se obtienen 6 porciones Ensalada tibia de pa...

Page 43: ... obtener una mayor frescura en un vaso medidor de cuatro tazas _ porque un vaso medidor de 4 tazas a potencia Alta durante 5 minutos o hasta que hiervan Deje reposar en el homo durante uno o dos minutos LIMPIEZA DEL ANILLO Y EL PLATO GIRATORIO Limpie los anillos giratorios peri6dicamente y lave el plato giratorio tanto como sea necesario El plato giratorio puede lavarse perfectamente en el lavavaj...

Page 44: ... LOS FILTROSDE GRASA Su horno de microondas cuenta con dos filtros de grasa metalicos reutilizables Los filtros de grasa deben retirarse y limpiarse al menos una vez per rues o cuando sea necesario Z_ Paraevitar el riesgo de lesiones personaleso de daflos ADVERTENCJA materiales no encienda la campanadel homo sin los filtros en su lugar 1 Para retirar el filtro deslicelo hacia la izquierda o derech...

Page 45: ...dzador Controles 10niveles 1 6piescubicos 99 minutos de potencia e incluye 99 segundos descongelamiento Fuente de alimentaciOn Salidade potencia Consumode potencia 1000Vatios 1580Vatios 120VCA 60 Hz ST 44 2 51 8Ibs Pesonetdenvb B W 43 3 50 8 Ibs Dimensiones 29 7 8 Ancho X 16_ 2 Alto X 151 8 Profundidad extemas Dimensiones de la 19 5 _6 Ancho X9 5 Alto X 14 s s Profundidad cavidaddelhomo Dimensione...

Page 46: ...SEAEXPRESA0 T_ CITA INCLUIDA AUNQUE NO EN CARACTERTAXATIVO TODAGARANT AT_ CITADE COMERCIABILIDAD0 APTITUD PARAUN PROPOSITOESPECIAL SE APLICARADESPUESDE LOSPER ODOSDE GARANT A ESTABLECIDOSM_ SARRIBA Y NINGUNAOTRAGARANT A EXPRESA0 GARANT AOTORGADAPORPERSONA COMPANiA 0 CORPORACIONALGUNA CON RESPECTOAL PRESENTE PRODUOTOREVESTIR_ CAR_ OTER VINCULANTEPARASAMSUNG SAMSUNG NO SER I RESPONSABLEPOR PERDIDADE...

Page 47: ...II II I I SMH1611 XAA 03898AMes 02 indd 23 2011 10 13 4 06 53 I I ...

Page 48: ...ESTIONS OR OMMENTS CANADA MEXICO U S A 1 800 SAMSUNG 726 7864 01 800 SAMSUNG 726 7864 1 800 SAMSUNG 726 7864 www samsung com N de cOdigo DE68 03898A 02 SMH1611 XAA 03898A Mes 02 indd 24 2011 10 13 4 06 53 ...

Reviews: