installation & connection
24_
installation & connection
inStaLLation (Snv-1080)
precautions before installation
Ensure you read out the following instructions before installing the camera:
y
Select an installation site (ceiling or wall) that can endure at least 5 times of the camera
weight.
y
Stuck-in or peeled-off cables can cause damage to the product or a fire.
y
For safety purposes, keep anyone else away from the installation site.
And put aside personal belongings from the site, just in case.
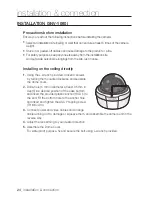
installing on the ceiling directly
1.
Using the L-wrench provided, loosen 3 screws
by turning them counterclockwise and separate
the dome cover.
2.
Drill a hole (5 mm in diameter, at least 35 mm in
depth) in a desired position of the case bottom
and insert the provided plastic anchor (HUD 5) to
the end. Fit the bottom hole to the anchor hole
and insert and tighten the ASS’Y tapping screw
(TH M4×L30).
3.
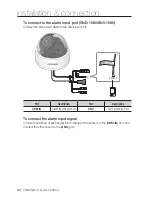
Connect power and video cables and arrange
cable running not to damage or squeeze them, and assemble the camera unit in the
reverse way.
4.
Adjust the lens aiming to your desired direction.
5.
Assemble the Dome Cover.
For waterproof purpose, fix and secure the bolt using L-wrench provided.
Summary of Contents for SNB-1001
Page 1: ...NETWORK CAMERA User Manual SNB 1001 SND 1080 SNV 1080 ...
Page 102: ...appendix Product Overview Unit mm inch SNB 1001 74 3 2 93 114 4 4 50 54 5 2 15 102_ appendix ...
Page 103: ...SND 1080 Ø115 8 4 56 115 8 4 56 42 4 1 67 92 7 3 65 English _103 appendix ...
Page 104: ...appendix SNV 1080 Ø137 0 5 39 Ø100 0 3 94 105 9 4 17 104_ appendix ...


