
sAfety instruCtion
Please carefully read the following safety instruction so as to avoid personal injuries and prevent the equipment and other connection
devices from being damaged.
1.
Please use the power supply enclosed or specified by the manufacturer.
Never operate the equipment by using unspecified power supply.
2.
Never push objects of any kind through openings of NVR so as to avoid electric shock or other accidents.
3.
Do not put the equipment in a dusty location.
4.
Do not place the equipment under the rain or humid environment like the basement.
If the equipment is accidentally in contact with water, please unplug the power cable and immediately contact technical support.
5.
Keep the surface of the equipment clean and dry.
Use a soft damp cloth to clean the outer case of the NVR. (Do not use liquid aerosol cleaners.)
6.
Do not operate if any problems are found.
If there is a strange smell or sound from the NVR, unplug the power cable and contact technical support.
7.
Do not try to remove the NVR cover to avoid electric shock.
8.
Handle with care.
If NVR does not work properly, please contact technical support for repair or replacement.
9.
Install and place the equipment in a well ventilated area. The NVR system includes a HDD, which produces large amount of heat
during operation. As a result, do not block the ventilation vents (on the top, bottom, sides and the back of the NVR).
10.
Do not install near any heat sources such as radiator, stove, and other machinery or devices (including speakers) that produce
large amount of heat.
11.
If the provided plug does not fit your outlet, please technical support for assistance.
12.
Protect the power cord from being walked on or pinched particularly at the plug level and each ends of the cord.
13.
Only use attachments/accessories specified by the manufacturer.
14.
Only use the cart, stand, tripod, bracket, or table specified by the manufacturer, or sold with the system.
When a cart is used, use caution when moving the cart and the device to avoid injury from tip-over.
15.
Unplug the device during lightning storms or when unused for long periods of time.
16.
Refer all servicing to qualified service personnel. Servicing is required when the device has been damaged in any way, such as
power-supply cord or plug is broken, liquid has been spilled or objects have fallen onto the device, exposed to rain or moisture,
does not operate normally, or has been dropped.
standards Approvals
J
`
Any changes or modifications in construction of this device which are not expressly approved by the party responsible for compliance could void
the user's authority to operate the equipment.
M
`
This device complies with part 15 of the FCC Rules. Operation is subject to the following two conditions: (1) This device may not cause harmful
interference, and (2) this device must accept any interference received, including interference that may cause undesired operation.
`
This equipment has been tested and found to comply with the limits for a Class A digital device, pursuant to part 15 of the FCC Rules. These limits
are designed to provide reasonable protection against harmful interference when the equipment is operated in a commercial environment.
This equipment generates, uses, and can radiate radio frequency energy and, if not installed and used in accordance with the instruction manual,
may cause harmful interference to radio communications. Operation of this equipment in a residential area is likely to cause harmful interference
in which case the user will be required to correct the interference at his own expense.
Caution
• Connect the power cord into a grounded outlet.
• The Mains plug is used as a disconnect device and shall stay readily operable at any time.
• Batteries shall not be exposed to excessive heat such as sunshine, fire or the like.
• Risk of Explosion if Battery is replaced by an Incorrect Type. Dispose of Used Batteries According to the Instructions.
English
_3
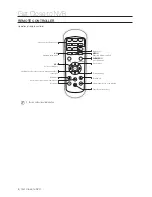
●
o
ver
view of
nvr


