


Summary of Contents for SP-54T8HL
Page 2: ......
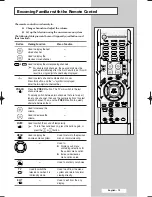
The Samsung SP-54T8HL Owner's Instructions Manual is the essential guide for operating your television. Easily accessible for download on our website, this comprehensive manual provides detailed instructions, ensuring a seamless user experience. Get it now for free at 88.208.23.73:8080 and unlock the full potential of your Samsung SP-54T8HL.
Page 2: ......


