background image

SP-A8000

DLP Projector

Owner’s Instructions

The color and the appearance of the product may differ 

from the illustrations in this manual. The specifications are 

subject to change without prior notice to improve 

performance. 

Summary of Contents for SP-A8000

Page 1: ...LP Projector Owner s Instructions The color and the appearance of the product may differ from the illustrations in this manual The specifications are subject to change without prior notice to improve performance ...

Page 2: ...wer 2 9 Connecting a DVD player Cable Box Satellite Box to HDMI DVI 2 10 Connecting a DVD player Cable Box Satellite Box via Component 2 11 Connecting to VCR Camcorder 2 12 Connecting with a PC and Setting up the PC 2 13 The 3D IR Emitters 2 14 USING Product Features 3 1 Front Upper 3 2 Rear Side 3 3 Remote Control 3 4 LED Indications 3 5 Using the Screen Adjustment Menu OSD On Screen Display 3 6 ...

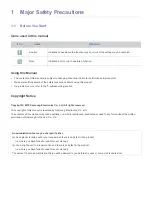
Page 3: ...y not be partially or in whole reproduced distributed or used in any form without the written permission of Samsung Electronics Co Ltd ICON NAME MEANING Caution Indicates cases where the function may not work or the setting may be canceled Note Indicates a hint or tip to operate a function An administration fee may be charged if either a An engineer is called out at your request and there is no de...

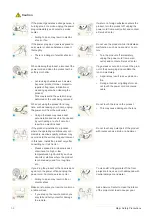
Page 4: ...amage to the product Avoid cleaning the product with a wet cloth or by directly spraying water onto the product If water enters the product it may result in fire electric shock or a problem with the product A white stain may appear on the surface of the projector if water gets on it The appearance and the color may differ depending on the model For cleaning the interior of the projector contact an...

Page 5: ...ances to a single wall outlet Doing otherwise may result in fire due to overheating of the wall outlet Avoid using a damaged power cord or plug or a loose power outlet Doing otherwise may result in electric shock or fire Avoid bending or twisting the power cord excessively and avoid placing heavy objects on the cord Doing otherwise may result in electric shock or fire due to a damaged power cord A...

Page 6: ...stalling the product in a badly ven tilated location such as inside a bookshelf or closet Doing otherwise may result in fire due to internal overheating When installing the product in a cabinet or shelf take care so that the front end of the product is completely supported by the cabinet or shelf Failing to do so may result in the product falling and resulting in damage to the product or injury Ma...

Page 7: ...ic shock or fire Do not let children place objects such as toys or cookies on the product If a child tries to reach for any of these objects the product may fall and cause harm Do not disassemble or attempt to fix or modify the product When the product requires repairs contact a Service Center Do not look directly at the light of the lamp nor project the picture into someone s eyes This is dangero...

Page 8: ...hting storm do not touch the power cord or antenna cable When not using the product for a long time such as leaving your home unplug the power cord from the wall outlet Doing otherwise may cause dust accumulation and result in fire caused by overheating or a short circuit or result in an electric shock Do not touch the lens on the product This may cause damage to the lens If the product is install...

Page 9: ...dous because of high voltage current inside the product Do not use any undesignated battery Be careful not to touch the ventilation hole while the projector is on as hot air comes out The ventilation hole is hot for some time though the projector is turned off Keep you hands or body off the ventilation hole Do not place objects vulnerable to heat near the projector Be careful to keep your body awa...

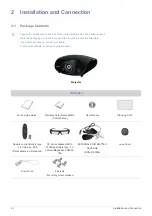
Page 10: ...any items are missing contact your dealer Contact a local dealer to purchase optional items Projector CONTENTS Quick Setup Guide Warranty Card Not available in all locations User Manual Cleaning Cloth Remote control Battery type 1 5V AA size 2EA Not available in all locations 3D Active Glasses SSG 2100AB Battery type 3V Lithium Maganese CR2025 1EA EXTERNAL 3D IR EMITTER PACKAGE SSG 2100ME Lens Cov...

Page 11: ...2 1 A ceiling mount is not included and must be purchased separately Use the included screws to attach the projector to the ceiling mount bracket SOLD SEPARATELY HDMI to DVI Cable HDMI Cable D Sub Cable VIDEO Cable Component Cable ...

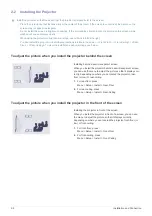
Page 12: ...gs see below To adjust the picture when you install the projector behind the screen To adjust the picture when you install the projector in the front of the screen Installing behind a semi transparent screen When you install the projector behind a semi transparent screen you can use the menu to adjust the picture so that it displays cor rectly depending on where you ve located the projector rear f...

Page 13: ...3 Leveling with Adjustable Feet You may adjust the level of the projector up to 3 degrees Depending on the position of the projector Keystone distortion of the image may occur To level the projector turn the projector s adjustable feet ...

Page 14: ...s specified for the projector you will not be able to adjust the focus correctly For specified projection distances refer to Screen Size and Projection Distance in this manual Zoom Knob You can adjust the size of the image within the zoom range by manipulating the Zoom Knob Focus Ring Focus the picture on the screen using the Focus Ring ...

Page 15: ...Connection 2 5 2 5 Adjusting the Lens Position Moving Dial Move the picture projected on the screen up and down within the lens range by turning the Lens Shift Dial on the bottom side of the projector with your fingers ...

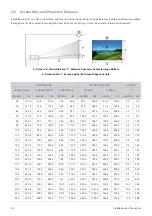
Page 16: ...9 304 6 3 9 10 0 90 228 6 78 4 199 2 44 1 112 1 175 7 446 6 134 9 342 7 4 4 11 2 100 254 0 87 2 221 4 49 0 124 5 195 2 495 9 149 9 380 8 4 9 12 5 110 279 4 95 9 243 5 53 9 137 0 214 8 545 5 164 9 418 9 5 4 13 7 120 304 8 104 6 265 7 58 8 149 4 234 3 595 1 179 9 456 9 5 9 14 9 130 330 2 113 3 287 8 63 7 161 9 253 8 644 7 194 9 495 0 6 4 16 2 140 355 6 122 0 309 9 68 6 174 3 273 3 694 3 209 9 533 1 ...

Page 17: ...nch sized screen 250 635 0 217 9 553 5 122 6 311 3 488 1 1239 7 374 8 951 9 12 2 31 1 300 762 0 261 5 664 1 147 1 373 6 585 7 1487 7 449 7 1142 3 14 7 37 4 SCREEN SIZE THROW DISTANCE OFFSET M DIAGONAL X HORIZONTAL Y VERTICAL Z TELE Z WIDE Y INCHES CM INCHES CM INCHES CM INCHES CM INCHES CM INCHES CM ...

Page 18: ...foreign material around or inside the lamp unit using a proper vacuum device When handling the lamp avoid touching any part of it except for the handles If you handle the lamp incorrectly you can shorten the lamp s lifetime and affect picture quality The projector has been designed so that the projector does not work if the lamp cover is not completely assembled after a lamp replacement If the pro...

Page 19: ...d and open to remove the lamp door 5 Remove the screws from the lamp assembly as shown in the figure 6 As shown in the figure lift up the lamp handles by holding them and pull the lamp 7 Install the new lamp and then reverse the procedure to fix the lamp to the projector and re install the lamp door and cover ...

Page 20: ...00 75Hz 46 875 75 000 49 500 MAC 832 x 624 75Hz 49 726 74 551 57 284 VESA DMT 1024 x 768 60Hz 48 363 60 004 65 000 VESA DMT 1024 x 768 70Hz 56 476 70 069 75 000 VESA GTF 1024 x 768 72Hz 57 672 72 000 78 434 VESA DMT 1024 x 768 75Hz 60 023 75 029 78 750 VESA CVT 1152 x 864 60Hz 53 783 59 959 81 750 VESA GTF 1152 x 864 70Hz 63 000 70 000 96 768 VESA GTF 1152 x 864 72Hz 64 872 72 000 99 643 VESA DMT ...

Page 21: ...VESA DMT 1440 x 900 60Hz 55 935 59 887 106 500 VESA DMT 1440 x 900 75Hz 70 635 74 984 136 750 VESA DMT 1600 x 1200 60Hz 75 000 60 000 162 000 VESA DMT 1680 x 1050 60Hz 65 290 59 954 146 250 VESA CVT 1920 x 1080 60Hz 67 500 60 000 148 500 VESA DMT 1920 x 1200 RB 60Hz 74 038 59 950 154 000 SPECIFICATIONS FORMAT VERTICAL FREQUENCY HZ SCAN BT 601 SMPTE 267M 480i 59 94Hz Interlaced BT 1358 SMPTE 293M 4...

Page 22: ... Progressive 60 000 31 500 25 200 EIA 861 720 x 480 Progressive 59 940 31 469 27 000 EIA 861 720 x 480 Progressive 60 000 31 500 27 027 EIA 861 1280 x 720 Progressive 59 939 44 955 74 175 EIA 861 1280 x 720 Progressive 60 000 45 000 74 250 EIA 861 1920 x 1080 Interlaced 59 939 33 716 74 175 EIA 861 1920 x 1080 Interlaced 60 000 33 750 74 250 EIA 861 720 x 576 Progressive 50 000 31 250 27 000 EIA 8...

Page 23: ...Installation and Connection 2 9 2 9 Connecting the Power Plug the power cord into the power terminal on the rear side of the projector ...

Page 24: ...he HDMI IN 1 DVI or HDMI IN 2 terminal on the back of the projector and the HDMI output terminal of the DVD player Cable Satellite box using a HDMI cable When done plug in the power cords of your projector and DVD player Cable box Satellite box Using the Projector 1 Turn on the projector and the DVD player Cable box Satellite box and then press the HDMI1 button on the projector to select HDMI1 DVI...

Page 25: ...he DVD player Cable Satellite box with the Component cable 2 When done plug in the power cords of your projector and DVD player Cable box Satellite box Using the Projector 1 Turn on the projector and the DVD player Cable box Satellite box and then press the COMP1 button to select Component1 2 Press the COMP2 button to select Component2 if COMPONENT IN 2 is connected If Component Mode is not availa...

Page 26: ...to the VIDEO yellow OUT port of the video equipment using the video cable 2 When finished connecting the devices plug in the power cords of your projector and the VCR or camcorder Using the Projector 1 Turn on the projector and the VCR or camcorder and then press the VIDEO button on the projector to select Video This projector does not support sound A separate audio system is needed for sound ...

Page 27: ...imal resolution for the projector is 1920 x 1080 For other resolutions supported by the projector see the PC Timing Display Mode table in section 2 8 You do not have to change the Color quality setup 3 Press the Advanced button Another property window appears 4 Click the Monitor tab and set the Screen refresh rate For the refresh rate that matches the resolution you ve chosen see the refresh rate ...

Page 28: ...ported by this projector If it does not you may have signal problems 2 13 2 Connecting with a PC Make sure that your projector and PC are turned off and unplugged 1 Connect the PC IN port on the rear side of the projector to the PC video out D sub port of the PC using a PC video cable 2 Plug in the power cords of the projector and the PC This product supports plug and play If you use Windows XP yo...

Page 29: ...cient 3D picture you can connect the external emitter You cannot use the internal and external emitters at the same time 3D Emitter does not switch automatically to External even if an external emitter is connected Manually change the setting to External Refer to 3 6 1 Picture for details The 3D effect may not work properly if there is any obstacle between the 3D emitter and 3D glasses The 3D emit...

Page 30: ... control 3D Emitter does not switch automatically to External even if an external emitter is connected Manually change the setting to External Be sure to install the external IR emitter with the transmitters facing the viewers You cannot use the internal and external emitters at the same time This projector does not support sound A separate audio system is needed for sound 2 14 3 Installing an Ext...

Page 31: ...der 1EA Wire Holders 3EA Anchor 5EA M4 x L25 Screws Screws 5 EA M4 x L25 1 Make holes in the ceiling matched to the screw holes in the emitter holder 2 Insert the anchors into the holes in the ceiling Tap with a hammer until the anchors are flush with the ceiling 3 Fasten the screws to fix the emitter holder to the holes in the ceiling 4 Insert the external emitter into the emitter holder Insert a...

Page 32: ...lation structure are optimized to minimize fan noise and beam leakage 4 Various Input Ports Abundant input terminals are available such as two HDMI supporting HDCP terminals and two Component terminals enhancing connectivity with peripheral devices 5 User adjustments This unit allows adjustment of each input port The unit has a reference pattern you can use for positioning and adjustment For your ...

Page 33: ...w 3D images through 3D glasses Lens Position Moving Dial You can adjust screen images up and down within the lens range Refer to Adjusting the Lens Position Moving Dial Lens Remote Control Signal Receiver Adjustable Feet You can adjust the screen position by moving the adjustable feet up and down Zoom Knob Use to enlarge or reduce image size POWER button Use to turn the projector on or off SOURCE ...

Page 34: ...put port COMPONENT IN 1 COMPONENT IN 2 ports Remote Control Signal Receiver 3D SYNC OUT connects to an external emitter Power Input port RS232C port SERVICE port AUDIO OUT port VIDEO IN port AUDIO IN L AUDIO R port HDMI IN 1 DVI HDMI IN 2 port ...

Page 35: ...HDMI1 DVI Mode 3D Button Used to switch 2D 3D HDMI2 Button Used to switch to HDMI2 Mode PC Button Used to switch to PC Mode COMP2 Button Used to switch to COMPONENT2 Mode MENU Button Used to display the Menu Screen RETURN Button Returns to the previous menu Move ENTER Buttons Used to move to or select each menu item EXIT Button Used to make Menu Screen disap pear INFO Button Used to view informati...

Page 36: ...3 4 Using Installing Batteries in the Remote Control 1 Lift the cover at the back of the remote control upward as shown in the figure 2 Insert two AA size batteries 3 Close the cover ...

Page 37: ...e projector is not operating normally Refer to Action 1 on the next page The lamp cover protecting the lamp unit is not closed properly Refer to Action 2 on the next page The temperature inside the projector has risen beyond the control limit Power is turned off automatically Refer to Action 3 on the next page A problem has occurred when operating the IC in the product Refer to Action 4 A problem ...

Page 38: ...rature inside of the projector becomes too high Refer to the Installation Related Warnings in the front of this manual and adjust the installation of your projector accordingly Cool down your projec tor sufficiently and then operate it again If the same problem occurs con tinually contact a Samsung service center Action 4 The DDP IC or color wheel has failed to operate Disconnect and reconnect the...

Page 39: ...utton to access the sub menu Directions for navigating and selecting items in a menu are at the bottom of each menu screen 3 6 1 Picture MENU SUB MENU Picture 3D Mode Contrast Brightness Sharpness Color Tint G R Gamma Dynamic Black Color Tempera ture Save Auto Adjustment Screen Advanced Set ting Picture Options Picture Reset Setup Menu Language No Signal Power Off Install Lamp Mode Background Test...

Page 40: ...ipe Displays the images for the left and right eye alternately in rows Line by Line Displays the images for the left and right eye alternately in columns Checker Board Displays the images for the left and right eye alternately in pixels Frame Sequential Displays the images for the left and right eye alternately in frames Compatible 3D modes for each input source and resolution Compatible with all ...

Page 41: ...upported for HDMI PC mode The resolution for HDMI PC mode is optimized to 1920 x 1080 input An input resolution other than 1920 x 1080 may not be displayed properly in 3D display or full screen mode Standard HDMI 3D Formats The 3D formats listed below are recommended by the HDMI association and must be supported The projector automatically switches to 3D mode if it inputs one of the source signal ...

Page 42: ...best setting for watching a film Video The best setting for watching a Projector program Graphic The best setting when you have a PC connected Dynamic Black Adjusts the brightness and contrast of the screen by adjusting the tightening thread in the optical sys tem Off You can view the screen where the brightness is emphasized by opening the tightening thread fully Auto You can view a more dynamic ...

Page 43: ...of the entire screen according to your taste Make optimal display settings for movies Off Shows the picture in the original color Monochrome Shows the picture in black and white by filtering out all color signals Red Shows the picture in red by filtering out the green and blue color signals Green Shows the picture in green by filtering out the red and blue color signals Blue Shows the picture in b...

Page 44: ...or Video Component 480i 576i Motion Judder Canceller Removes drag from fast scenes with a lot of movement to provide a clearer picture Off Standard Smooth Demo If Motion Judder Canceller is Demo you can compare the difference between on and off modes Black Level If the picture seems too dark you can set a brighter black level The Black Level function can only be selected in Video HDMI1 DVI and HDM...

Page 45: ...e Rear Floor Horizontally Reversed Image Rear Ceiling Vertically Reversed Image Lamp Mode Using this function you can set the image brightness by adjusting the amount of light generated by the lamp Theater This mode is optimized for screens smaller than 100 inches This mode decreases the lamp brightness and power consumption to extend the lamp lifetime and reduce noise and power consumption Bright...

Page 46: ...S Japan and Canada in 1986 SMPTE_C Standardized for Video Equipment by the Society of Motion Picture and Television Engineers EBU Regulations and standards for European Broadcasting Production and Technology standardized by the European Broadcasting Union General Menu Transparency You can set the transparency of the menu Bright Dark Menu Display Time You can set the display time of the menu 5 sec ...

Page 47: ...he future Please visit http www sam sung com or contact the Samsung call center at 1 800 SAMSUNG 726 7864 to receive information about downloading upgrades To upgrade you download the upgrade to your PC copy the upgrade to a USB flash drive and then attach the USB flash drive to the USB port on the projector When software is upgraded video and audio settings you have made will return to their defa...

Page 48: ...n normally if there is any other 3D products or electronic devices operating nearby If the 3D function operates abnormally due to interference move all other electronic devices and wireless telecommunication devices as far away as possible from the glasses The screen may seem to flicker slightly if you watch 3D pictures under three wave length light poor light conditions e g a flickering fluoresce...

Page 49: ... device is not connected properly it can not be selected Menu and Remote Control Remote control does not work Be sure that the proper external source is selected Check whether your remote control is aimed at the correct angle and is within its effective operating range Remove any obstacles between your remote control and the product The remote control may work abnormally or degrade in sensi tivity...

Page 50: ...ng LED is lit Refer to the LED Indications section Lines appear on screen On screen noise may occur when using your PC Adjust the frequency refresh rate of the screen No external device screen is displayed Check the operating status for the external device and check whether the adjustable menu items such as Brightness and Contrast have been changed correctly in the Mode com mand screen of the Proj...

Page 51: ...lity nor the lifespan of the product MODEL SP A8000 Panel Size 0 95 inches DLP Resolution 1920 1080p Projection lens 16 9 Power Power Consumption Max 410W Standby under 1W Voltage 110 220V ac 10 50 60 Hz 3Hz Lamp Power Consumption 300 W UHP Life Time 2 000 Hours Eco Dimension W x D x H 431 3 x 468 5 x 198 8 mm 17 0 x 18 4 x 7 8 inches Weight 9 8 Kg 21 6 lbs Key Features Brightness 1 000 ANSI lumen...

Page 52: ...l Cmd2 1 Byte The second value of the code defined in the command list Hexadecimal Cmd3 1 Byte The third value of the code defined in the command list Hexadecimal Value 1 Byte Input parameter for the command Default 0 Hexadecimal CS 1 Byte Checksum the 2 s complement of the sum of all the values except for the CS value 2 Response Packet Structure 3 Bytes 1 Success 2 Fail When the received packet f...

Page 53: ... Component1 0x02 0 Component2 1 Video Video 0x04 0 PC PC 0x05 0 Picture Mode Vivid 0x0B 0X00 0x00 0 Dynamic 1 Standard 2 Movie1 3 Movie2 4 User1 5 User2 6 User3 7 Size 16 9 0x0B 0x00 0 Zoom1 1 Zoom2 2 Wide Fit 3 Anamorphic 4 4 3 5 Dynamic Black Off 0x14 0 Auto 1 Manual RIGHT 2 LEFT 3 Setup Install Front Floor 0x0C 0x00 0x00 0 Front Ceiling 1 Rear Floor 2 Rear Ceiling 3 Lamp Mode Theater 0x01 0x00 ...

Page 54: ...http www samsung com EL SALVADOR 800 6225 http www samsung com GUATEMALA 1 800 299 0013 http www samsung com HONDURAS 800 7919267 http www samsung com JAMAICA 1 800 234 7267 http www samsung com NICARAGUA 00 1800 5077267 http www samsung com PANAMA 800 7267 http www samsung com PERU 0 800 777 08 http www samsung com PUERTO RICO 1 800 682 3180 http www samsung com REP DOMINICA 1 800 751 2676 http w...

Page 55: ... NETHERLANDS 0900 SAMSUNG 0900 7267864 0 10 Min http www samsung com NORWAY 815 56 480 http www samsung com POLAND 0 801 1SAMSUNG 172678 022 607 93 33 http www samsung com PORTUGAL 80820 SAMSUNG 726 7864 http www samsung com RUMANIA 1 08010 SAMSUNG 72678 doar din reţeaua Romtelecom tarif local 2 021 206 01 10 din orice reţea tarif normal http www samsung com SERBIA 0700 Samsung 0700 726 7864 http ...

Page 56: ...ung com hk_en INDIA 3030 8282 1800 110011 1800 3000 8282 1800 266 8282 http www samsung com INDONESIA 0800 112 8888 021 5699 7777 http www samsung com JAPAN 0120 327 527 http www samsung com MALAYSIA 1800 88 9999 http www samsung com PHILIPPINES 1 800 10 SAMSUNG 726 7864 1 800 3 SAMSUNG 726 7864 1 800 8 SAMSUNG 726 7864 02 5805777 http www samsung com SINGAPORE 1800 SAMSUNG 726 7864 http www samsu...

Page 57: ...n 5 3 TURKEY 444 77 11 http www samsung com U A E 800 SAMSUNG 726 7864 http www samsung com AFRICA NIGERIA 0800 SAMSUNG 726 7864 http www samsung com SOUTH AFRICA 0860 SAMSUNG 726 7864 http www samsung com MIDDLE EAST ...

Page 58: ... local government office for details of where and how they can take these items for environmentally safe recycling Business users should contact their supplier and check the terms and conditions of the purchase contract This product and its electronic accessories should not be mixed with other commercial wastes for disposal Applicable in the European Union and other European countries with separat...

Reviews: