background image

SP-M205W SP-M225W SP-M255W

LCD Projector

Owner’s Instructions

The color and the appearance of the product may differ 

from the illustrations in this manual. The specifications are 

subject to change without prior notice to improve 

performance. 

Summary of Contents for SP-M205W

Page 1: ...P M255W LCD Projector Owner s Instructions The color and the appearance of the product may differ from the illustrations in this manual The specifications are subject to change without prior notice to improve performance ...

Page 2: ... HDMI DVI cable 2 11 Connecting an HDMI Compatible Device 2 12 Connecting an AV device using a D Sub cable 2 13 Connecting an AV device with Component output 2 14 Connecting using a Video cable 2 15 Connecting an External Speaker 2 16 Connecting to a Network 2 17 Kensington Lock slot 2 18 USING Product Features 3 1 Front Upper 3 2 Remote Control 3 3 LED Indications 3 4 Using the Screen Adjustment ...

Page 3: ...MORE INFORMATION Specifications 6 1 RS232C Command Table 6 2 Contact SAMSUNG WORLDWIDE 6 3 Correct Disposal Europe only 6 4 ...

Page 4: ...this manual may not be partially or in whole reproduced distributed or used in any form without the written permission of Samsung Electronics Co Ltd ICON NAME MEANING Caution Indicates cases where the function may not work or the setting may be canceled Note Indicates a hint or tip to operate a function An administration fee may be charged if either a An engineer is called out at your request and ...

Page 5: ... scratches or damage to the product Avoid cleaning the product with a wet cloth or by directly spraying water onto the product If water enters the product it may result in fire electric shock or a problem with the product A white stain may appear on the surface of the projector if water gets on it The appearance and the color may differ depending on the model For cleaning the interior of the proje...

Page 6: ...wer outlet Otherwise it may result in electric shock or fire Avoid bending or twisting the power cord excessively and avoid placing heavy objects on the cord Otherwise it may result in electric shock or fire due to a damaged power cord Avoid plugging in or unplugging the power supply with wet hands Otherwise it may result in electric shock To move the product turn the power off and unplug the powe...

Page 7: ... completely supported by the cabinet or shelf Failing to do so may result in the product falling and resulting in damage to the product or injury Make sure to use a cabinet or shelf suitable to the size of the product When installing the product on a console or shelf make sure that the front of the product does not protrude out of the con sole or shelf Otherwise this may cause the product to fall ...

Page 8: ...id using or placing inflammable spray or objects near the product This may result in an explosion or fire When you remove batteries from the remote be careful that they are not swal lowed by children Keep batteries out of the reach of children If swallowed see a doctor immediately Avoid placing a liquid container such as a vase flowerpot beverage cosmetics or drugs or a metal object over the produ...

Page 9: ...tations where the product is continuously used for a long time etc Do not touch any outer part of the product with tools such as a knife or a hammer If you drop the product or the case is dam aged turn the power off and unplug the power cord Contact a service center Failing to do so may result in fire or electric shock To clean dirt or stains on the front projec tion lens use spray or a wet cloth ...

Page 10: ...rojector lamp The lamp is hot Children and those who have sensitive skin should be more careful Take care not to lose the lens cover of the product The lens could get damaged The lens cover protects the lens and should be used when the projector is turned off To hide the screen while the projector is turned on use the BLANK feature ...

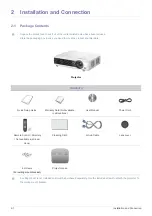
Page 11: ...he product at a later date Projector A ceiling mount is not included and must be purchased separately Use the included screws to attach the projector to the ceiling mount bracket CONTENTS Quick Setup Guide Warranty Card Not available in all locations User Manual Power Cord Remote Control 2 Battery Not available in all loca tions Cleaning Cloth D Sub Cable Lens cover 4 Screws For ceiling mount brac...

Page 12: ...gs see below To adjust the picture when you install the projector behind the screen To adjust the picture when you install the projector in the front of the screen Installing behind a semi transparent screen When you install the projector behind a semi transparent screen you can use the menu to adjust the picture so that it displays cor rectly depending on where you ve located the projector rear f...

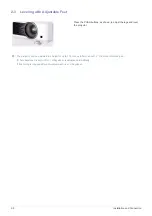
Page 13: ... adjusted to a height of up to 1 18 inches 30mm about 12 from the reference point If Auto Keystone is set to On V Keystone is adjusted automatically If fine tuning is required after auto adjustment use V Keystone Press the PUSH buttons as shown to adjust the legs and level the projector ...

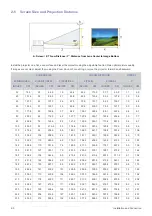
Page 14: ...If you do not install your projector at the projection distance specified in the Screen Size and Projection Distance table in Section 2 5 you will not be able to adjust the focus correctly Zoom Knob You can adjust the size of the image within the zoom range by manipulating the Zoom Knob Focus Ring Focus the picture on the screen using the Focus Ring ...

Page 15: ...0 7 7 90 228 6 76 193 9 48 121 2 135 8 345 1 113 2 287 5 3 4 8 7 100 254 0 85 215 4 53 134 6 150 9 383 4 125 8 319 5 3 8 9 6 110 279 4 93 236 9 58 148 1 166 0 421 7 138 4 351 4 4 2 10 6 120 304 8 102 258 5 64 161 5 181 1 460 1 150 9 383 4 4 5 11 5 130 330 2 110 280 0 69 175 0 196 2 498 4 163 5 415 3 4 9 12 5 140 355 6 119 301 5 74 188 5 211 3 536 8 176 1 447 3 5 3 13 5 150 381 0 127 323 1 79 201 9...

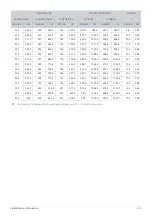
Page 16: ...89 3 170 430 8 483 0 1226 9 402 5 1022 4 12 1 30 8 330 838 2 280 710 8 175 444 2 498 1 1265 2 415 1 1054 3 12 5 31 8 340 863 6 288 732 3 180 457 7 513 2 1303 5 427 7 1086 3 12 9 32 7 350 889 0 297 753 9 185 471 2 528 3 1341 9 440 3 1118 2 13 2 33 7 360 914 4 305 775 4 191 484 6 543 4 1380 2 452 8 1150 2 13 6 34 7 370 939 8 314 796 9 196 498 1 558 5 1418 6 465 4 1182 1 14 0 35 6 380 965 2 322 818 5...

Page 17: ...dling the lamp avoid touching any part of it except for the handles If you handle the lamp incorrectly you can shorten the lamp s lifetime and affect picture quality When you change the lamp put the projector on a flat surface The projector has been designed so that the projector does not work if the lamp cover is not completely assembled after a lamp replacement If the projector does not work pro...

Page 18: ...of the projector and then disconnect the power cord after the projector has cooled sufficiently 2 Open the filter cover 3 Replace or clean the filter When cleaning the filter use a small vacuum cleaner designed for computers and small electronics products or wash it under running water After washing the filter under running water make sure to dry it completely The moisture may cause the filter to ...

Page 19: ...2 6 Installation and Connection Air outtake vent Air intake vent ...

Page 20: ...Connection 2 7 2 7 Rear Side ICON NAME Kensington Lock slot PC IN port VIDEO IN port AUDIO IN L AUDIO R port HDMI DVI IN port Remote Control Signal Receiver Power Input port AUDIO OUT port RS232C port LAN Port USB Port ...

Page 21: ...600 75Hz 46 875 75 000 49 500 MAC 832 x 624 75Hz 49 726 74 551 57 284 VESA 1024 x 768 60Hz 48 363 60 004 65 000 VESA 1024 x 768 70Hz 56 476 70 069 75 000 VESA 1024 x 768 72Hz 57 672 72 000 78 434 VESA 1024 x 768 75Hz 60 023 75 029 78 750 VESA 1152 x 864 60Hz 53 783 59 959 81 750 VESA 1152 x 864 70Hz 63 000 70 000 96 768 VESA 1152 x 864 72Hz 64 872 72 000 99 643 VESA 1152 x 864 75Hz 67 500 75 000 1...

Page 22: ...ESA DMT 1680 x 1050 RB 60Hz 64 674 59 883 119 000 VESA DMT 1680 x 1050 60Hz 65 290 59 954 146 250 VESA CVT 1920 x 1080 RB 60Hz 66 587 59 934 138 500 VESA DMT 1920 x 1200 RB 60Hz 74 038 59 950 154 000 FORMAT RESOLUTION SCAN BT 601 SMPTE 267M 480i 59 94Hz Interlaced BT 1358 SMPTE 293M 480p 59 94Hz Progressive BT 601 576i 50Hz Interlaced BT 1358 576p 50Hz Progressive SMPTE 296M 720p 59 94Hz 60Hz Prog...

Page 23: ... x 720 Progressive 45 000 60 000 74 250 EIA 861 Format5 1920 x 1080 Interlaced 33 716 59 939 74 175 EIA 861 Format16 1920 X 1080 Progressive 60 000 67 500 148 500 EIA 861 Format5 1920 x 1080 Interlaced 33 750 60 000 74 250 EIA 861 Format17 18 720 x 576 Progressive 31 250 50 000 27 000 EIA 861 Format19 1280 x 720 Progressive 37 500 50 000 74 250 EIA 861 Format20 1920 x 1080 Interlaced 28 125 50 000...

Page 24: ...Installation and Connection 2 9 2 9 Connecting the Power 1 Plug the power cord into the power terminal on the rear side of the projector ...

Page 25: ... then set the Screen resolution The optimal resolution for the projector is 1280 800 For other resolutions supported by the projector see the PC Timing Display Mode table in section 2 8 You do not have to change the Color quality setup 3 Press the Advanced button Another property window appears 4 Click the Monitor tab and set the Screen refresh rate For the refresh rate that matches the resolution...

Page 26: ...Windows version When connecting the projector to a PC make sure that the PC setup complies with the display settings supported by this projector If it does not you may have signal problems 2 10 2 Connecting with a PC Make sure that your PC and projector are turned off 1 Connect the PC IN port on the rear side of the projector to the PC video out D sub port of the PC using a PC video cable 2 Plug i...

Page 27: ...I DVI cable Not supplied If you are connecting to the HDMI terminal of your PC use an HDMI HDMI cable Not supplied For the supported resolutions and refresh rates see PC Timing D Sub HDMI in Section 2 8 Supported Display Modes 2 11 2 Configuring the Audio Settings for Your PC When the projector is connected to the PC via an HDMI cable you can change the audio settings as follows 1 In Category View...

Page 28: ... Audio Devices and select the Audio tab On Windows 7 Go to Control Panel Sound and select the Playback tab 2 Specify the default device for sound playback You can select the PC speakers or projector speaker The aforementioned information may slightly differ from some PCs or versions of Windows ...

Page 29: ...MI HDMI cable If you are connecting to the HDMI output terminal on the digital output device use an HDMI HDMI cable For supported input signal formats resolutions and frequencies see AV Timing HDMI in Section 2 8 Supported Display Modes 2 If you connected using a HDMI DVI cable connect the AUDIO IN L AUDIO R terminal on the projector to the Audio out terminal on your digital output device using an...

Page 30: ...erminal at the back of the projector to the D Sub terminal of your AV device using a D Sub cable For supported input signal formats resolutions and frequencies see AV Timing D Sub in Section 2 8 Supported Display Modes 2 Connect the AUDIO IN L AUDIO R terminal at the back of the projector to the Audio out terminal of your AV device using an audio cable Not supplied ...

Page 31: ... terminal on your AV device using a D Sub to Component cable Not supplied This cable has a D Sub connector on one end and three RCA jacks on the other For supported input signal formats resolutions and frequencies see AV Timing D Sub in Section 2 8 Supported Display Modes 2 Connect the AUDIO IN L AUDIO R terminal on the back of the projector and the Audio out terminal on your AV device using an au...

Page 32: ...d off 1 Connect the AV device to the VIDEO IN port using a VIDEO cable not supplied For supported input signal formats see AV Timing VIDEO in section 2 8 Supported Display Modes 2 Connect the AUDIO IN L AUDIO R terminal on the back of the projector and the Audio out terminal on your AV device using an audio cable Not supplied ...

Page 33: ...dio cable Not supplied suitable for your external speaker 2 Connect the AUDIO OUT terminal of the projector to the external speaker using an audio cable When using an external speaker the internal speaker does not operate but you can adjust the volume of the external speaker using the Volume button or the remote control of the projector The AUDIO OUT terminal can output all audio signals ...

Page 34: ...ess IP router 3 Connect a LAN cable between the LAN port on the back of the projector and the wired or wireless IP router 4 Turn the projector on and press the MENU button 5 Select Setup Network IP Setting Automatic 6 The projector automatically acquires the IP address Subnet mask and Gateway To use the network function Network must be set to On If the IP address allotment from the DHCP server fai...

Page 35: ...nual 5 Select IP Address and press the button Use the buttons to navigate between each IP Address entry field and the buttons to enter values 6 When done entering all the values for IP Address press the button and then repeat the steps for Subnet mask and Gateway 7 When all values have been filled in press the MENU or RETURN button to exit the setup menu To use the network function Network must be...

Page 36: ... User Manual supplied with the locking device for more information Locking the product 1 Loop the Kensington lock cable around an immovable part of desk or heavy object as directed in the Kensington lock user manual 2 Insert the locking part of the locking device into the Kensington lock hole in the projector 3 Insert the Kensington lock key into the locking mechanism and turn it in the locking di...

Page 37: ...ices such as D Sub 15P Video HDMI DVI PC signal supported etc 4 Audio Output Equipped with an internal 7W mono speaker 5 User adjustments Allows adjustment of each input port Equipped with an internal Test Pattern that can be used to install and adjust the projector Compact size lightweight and portable 6 Convenient Network Function The projector can be monitored and controlled from a PC using the...

Page 38: ...n Use to move or to select an item within a menu Use to adjust the volume MENU button Use to display the Menu Screen SOURCE button Use to select the external device signal POWER button Use to turn the projector on or off Zoom Knob Use to enlarge or reduce image size Focus Ring Use for Focus Adjustment Lens Remote Control Signal Receiver Hole for attaching lens cap string ...

Page 39: ... the sound is muted to hear sound again VOL Button Use to control the volume PAGE Button Use to move to the previous or next page one page at a time MENU Button Use to display the Menu Screen SOURCE Button Switch the external input signal MEDIA P Button Go directly to Media Play mode Display the menu items while in Media Play mode USB SAFELY REMOVE Button Use to remove a USB device safely HELP But...

Page 40: ...ay fall and hurt yourself or damage the remote You can use the remote control up to a distance of about 32 8 feet 10 m from the product Installing Batteries in the Remote Control 1 Lift the cover at the back of the remote control upward as shown in the figure 2 Insert two AAA size batteries 3 Close the cover ...

Page 41: ...projector Operates for about 3 seconds The cooling fan inside the projector is not operating normally Refer to Action 1 in Clearing Indicator Problems below The lamp cover protecting the lamp unit is not closed properly Refer to Action 2 in Clearing Indicator Problems below The projector has changed to Cooling mode because its internal temperature has increased beyond the maintenance limit Refer t...

Page 42: ... changes to the Cooling mode before turning off automatically In Cooling mode the fan speed is increased and the projector s lamp is changed to ECO mode Check whether the ventilation hole of the projector is blocked Check the air filter and clean if blocked Check whether the surrounding temperature of the projector is higher than the standard temperature range of the projector Cool the projector s...

Page 43: ... 1 Input 3 5 2 Picture MENU SUB MENU Input Source List Edit Name Picture Mode Size Position Digital NR Black Level Overscan Film Mode PC Zoom Setup Install Lamp Mode Auto Keystone V Keystone Background Test Pattern Video Type Caption Network Reset Option Language Menu Option Sound Filter Check Time Auto Power On Sleep Timer Melody Security Panel Lock Information MENU DESCRIPTION Source List You ca...

Page 44: ...sed to adjust color lighter or darker Color is disabled when the input signal is PC Timing D Sub HDMI or Media Play Tint Used to obtain more natural color by enhancing the amount of green or red in images Tint is disabled when the input signal is PC Timing D Sub HDMI AV Timing VIDEO s PAL and SECAM signal or Media Play modes Color Tone The tone of the color can be changed Factory defaults Cool2 Co...

Page 45: ...tion or images appear on the edge of the picture Disabled in AV and Media Play modes Overscan is supported only when the input signal is an AV Timing D Sub or AV Timing HDMI signal If Overscan is turned off unnecessary extra parts at the edges of an image may be shown In this case turn Overscan on Film Mode Using this function you can set the display mode so that it is optimized for playing movies...

Page 46: ...and power consumption may increase Auto Keystone If video scenes are distorted or tilted you can compensate for this by setting the Auto Keystone function to On so that the V Keystone function automatically starts Off On V Keystone If video scenes are distorted or tilted you can compensate for this using the vertical Keystone func tion The sound output of your projector is temporarily stopped whil...

Page 47: ...n the external analog signal from the Video input contains subtitles Caption Off On Mode Caption Text Channel 1 2 Field 1 2 Activated only in AV Mode Depending on the external signal a change to the channel or Field settings may be required Each Channel and Field contains different information Field 2 carries additional information to supplement information contained in Field 1 e g If English subt...

Page 48: ...enter the server PC s IP address To use the network function Network must be set to On If the network connection fails enter the IP address of the server PC under Server IP Setting Reset Using this function you can reset various settings to the factory default settings Factory Default Changes the settings to the factory defaults Reset Filter Time Resets the filter time Media Play The following fun...

Page 49: ...sing the Power button Off On Sleep Timer With Sleep Timer on if there is no input signal for the specified time the projector turns off auto matically There must be no button input from the remote control or the top of the projector for the specified time Off 10 min 20 min 30 min This function does not work in Media Play mode Melody Set so that a melody plays when the Projector is turned on or off...

Page 50: ...le for use To use the Web Browser your PC must meet the following minimum system requirement RAM More than 10MB Hard Disk capacity More than 10MB Display resolution More than 640 x 480 Supported OS Microsoft Windows XP Windows Vista Web browser Microsoft Internet Explorer 6 or later version Netscape Navigator 9 or later version Mozilla FireFox 3 0 x or later version Google Chrome 1 Connecting Ente...

Page 51: ...Windows Vista 1 Installing the Samsung Projector Manager Click Samsung Projector Manager on the CD supplied Install according to the instructions displayed on the PC screen 2 Running the Samsung Projector Manager When the installation of Samsung Projector Manager and the network setup for the projector have been completed the Samsung Projector Manager will be available for use Click Start Samsung ...

Page 52: ...or rename a registered projector right click and then select Delete and or Rename respectively If a projector is not displayed on the Projector List after registration check if the network connection and the network settings are properly configured See section 2 17 Connecting to a Network and section 3 5 3 Setup Network for information and instructions To save or load the registered projector s in...

Page 53: ...ot operating normally Refer to Action 5 in Clearing Indicator Problems Error The lamp has reached the end of its life The lamp needs to be replaced Error The cooling fan 1 is not operating normally Refer to Action 1 in Clearing Indicator Problems Error The cooling fan 2 is not operating normally Error The cooling fan 3 is not operating normally Error The cooling fan 4 is not operating normally Err...

Page 54: ...r needs to be cleaned ICONS STATUS STATE ACTION Temperature status The projector s internal temperature is normal standby mode None It s normal Temperature status The projector s internal temperature is normal low None It s normal Temperature status The projector s internal temperature is normal medium None It s normal Temperature status The projector s internal temperature is normal little bit hi...

Page 55: ...ojector to connect to and then right click to select WebControl If the Web browser connection fails check whether the network connection see section 2 17 Connecting to a Network and network settings see 3 5 3 Setup Network are correctly configured Operating one projector using both Samsung Projector Manager and the Web browser at the same time may cause a slowdown in PC operation or an error Using...

Page 56: ...awaiting execution Running Repetitive schedule is running To save or load the registered schedule select File Export Config If you want to operate a Schedule loaded by Import Config load the projector s information in advance Other settings The Tools selection in the Menu Bar contains two menu items Configure Monitoring Items and Options Configure Monitoring Items Configure Monitoring Item lets yo...

Page 57: ...o the kind of media you want to view using the buttons press the button 3 Move to Internal Memory or USB using the buttons and then press the button Selecting a File 4 Move to the file or folder you want to view or open using the buttons and then press the button For Document Music and Movie folders a number appears next to each folder indicating the number of document music or movie files in the ...

Page 58: ...external power please connect the USB storage device to its external power source Use the USB cable provided with the USB device when connecting to the projector For more information on purchasing cable and external devices contact the respective manufacturer We do not guarantee Media Play will operate if a malfunction occurs in any external device caused by your using a cable that does not comply...

Page 59: ...n you are viewing a document Select the file you want using the buttons on the projector or remote control If you press the MEDIA P button when viewing a document the following menu appears The Documents screen MENU ITEM DESCRIPTION View View a document Copy If an external memory device USB memory device is connected files on the external memory device can be copied to the projector s internal mem...

Page 60: ...l Fit Display a document at its original size Fit to Width Display a document to fit the screen width Fit to Height Display a document to fit the screen height Rotate Rotate a document by a specified angle Select the angle you want using the buttons and then press the button 0 90 180 270 Supported in PDF format only Encoding To view a text TXT file without any character corruption you must select ...

Page 61: ...e dissimilar 2 The position of page breaks in a MS Word document might be changed In this case the document might be shown incompletely according to the Layout properties for Picture or Shapes or Object in MS word Please refer to the manual of MS Word for more information on the Layout properties This product does not support some functions found in original files For example the animation functio...

Page 62: ... of presentation The Photo Thumbnails screen MENU ITEM DESCRIPTION Start Slideshow Start a slideshow Play Mode All Photos Play photos in order of file name Photo in Folder Play photos in a specific folder in order of file name Shuffle All Photos Play photos found in a specific memory device randomly Shuffle Photo in Folder Play photos in a specific folder randomly Repeat One Photo Play only one sp...

Page 63: ...lay Mode All photos Plays all available image files Photo in Folder Plays all image files in a selected folder Shuffle all photos Randomly plays all available image files in a USB storage device Shuffle photo in Folder Randomly plays all image files in a selected folder Repeat one photo Displays an image file repeatedly Rotate Rotate a photo by a specified angle Select the angle you want using the...

Page 64: ...c that is being played Music Setting Define background music for a slideshow Set as Custom Logo Sets the selected image as the projector logo To use this option press MENU and go to setup Check that Background is set to Custom Logo The recommended resolution for a picture to be set as the user logo is 600x300 MENU ITEM DESCRIPTION ...

Page 65: ...nu appears The Music List screen MENU ITEM DESCRIPTION Play Music Plays music files Play Mode All musics Play music in file name order Music in Folder Play music in a specific folder in file name order Shuffle all musics Play music in a specific memory device randomly Shuffle music in Folder Play music in a specific folder randomly Repeat one music Play only one specific music file repeatedly Copy...

Page 66: ...nge the language in Language under Option MENU ITEM DESCRIPTION Play Mode All music Plays all available music files Music in Folder Plays all music files in a selected folder Shuffle all music Randomly plays all available music files Shuffle music in Folder Randomly plays all music files in a selected folder Repeat one music Plays a selected music file repeatedly ...

Page 67: ...Select the file you want using the buttons on the projector or remote control The Movie File screen MENU ITEM DESCRIPTION Play Movie Plays video files Play Mode All Movies Play video files in order of file name Movie in Folder Play video files in a specific folder in order of file name Shuffle All Movies Play video files in a specific memory device randomly Shuffle Movie in Folder Play video files...

Page 68: ...tting Subtitle Setting Switch the subtitle function On or Off Language Select the subtitle language Background Change the subtitle background settings On Off Position Change the subtitle location settings Down Up Reset The video must have external subtitles in order to view them with the Caption feature turned on See the table for supported subtitle file types Refer to 4 7 Supported File Formats S...

Page 69: ...4 6 Media Play Function 4 6 Settings Use the buttons to move to and access the Setting menus listed below ...

Page 70: ...registration code for the projector when you use the VOD Video on Demand service provided by DivX DivX VOD ABOUT DIVX VIDEO DivX is a digital video format created by DivX Inc This is an official DivX Certified device that plays DivX video Visit www divx com for more information and software tools to convert your files into DivX video DivX Certified to play DivX video up to 320x240 May play DivX vi...

Page 71: ...uct Information and see if the software version has been updated successfully Before Software Upgrade 1 Prepare a USB memory device 2 Download the latest firmware version from the Samsung Electronics website onto your PC 3 Connect the USB memory device to the PC 4 Copy the downloaded software to the USB memory device To upgrade software 1 Connect the USB memory device to the projector 2 Open the m...

Page 72: ...hite Crop function is not supported resolution larger than1024x768 Music MP3 sample rate 8 320Khz WMA sample rate 8 384Khz REMARKS MAXIMUM ITEM FILE EXTENSION CODEC AUDIO CODEC RESOLUTION BIT RATE ETC Movie AVI Divx 3 11 Resolution 720 X 480 Supported Format ASF WMV Frame sec 30 MP3 Divx 4 x MP4 Mbps 2 AC3 Divx 5 1 MPEG MPG ADPCM Divx 6 0 MULAW ALAW MPEG 4 SP AAC MPEG 4 ASP HE_AAC AAC Windows Medi...

Page 73: ...4 7 Media Play Function NAME FILE EXTENSION FORMAT SAMI smi HTML SubRip srt string based SubViewer sub string based Micro DVD sub or txt string based ...

Page 74: ...t can not be selected Menu and Remote Control Remote control does not work Be sure that the proper external source is selected Check the battery in the remote If there is something wrong with it replace it with a new battery of the recommended size Be sure to aim the remote at sensor on the back of the unit and at a distance of no more than approximately 32 8 feet 10 m Remove any obstacles between...

Page 75: ...it Refer to the LED Indications section Lines appear on screen On screen noise may occur when using your PC Adjust the frequency refresh rate of the screen No external device screen is displayed Check the operating status for the external device and check whether the adjustable menu items such as Brightness and Contrast have been changed correctly in the Mode com mand screen of the Projector menu ...

Page 76: ... and projector are correct 2 If IP Setting for the projector is set to Automatic check whether the PC and projector share the same network If it is not the same network configure the IP of the server PC using the Server IP Setting option 3 Check if the projector s network access is blocked by the PC s Windows firewall 4 If Samsung Projector Manager connection s failure persists remove and retry in...

Page 77: ... com Name of a folder or a file and document con tents are distorted This can happen when the language of the folder or file differs from the language you selected as the display language for the product Change to the proper language in Option Language on the Screen Adjustment menu by pressing MENU button A file can not be opened Files that have a format not supported by the product or that have s...

Page 78: ...0 Hours Dimension 279 x 229 x 79 mm 10 98 x 9 02 x 3 11 inches Weight 2 7 Kg 6 0 lbs Key Features Brightness 2 000 ANSI 2 200 ANSI 2 500 ANSI Contrast 2000 1 Only in Dynamic of picture mode Projection Range 1 m 14 m 39 37 inches 551 18 inches Keystone Auto Vertical 20 Manual Vertical 20 Network Wired LAN Port RJ45 10 Mbps Zoom Adjustment Manual Focus Adjustment Manual Screen Size Diagonal Diagonal...

Page 79: ...o not operate When shipping a product the conditions for identifying bad pixels and the number of bad pixels that a LCD panel is allowed to contain are strictly managed in accordance with the relevant specified standards by the LCD panel manufacturer and our company Though a screen may have some dead pixels this does not affect the overall screen quality and the lifetime of the product ...

Page 80: ...l Cmd2 1 Byte The second value of the code defined in the command list Hexadecimal Cmd3 1 Byte The third value of the code defined in the command list Hexadecimal Value 1 Byte Input parameter for the command Default 0 Hexadecimal CS 1 Byte Checksum the 2 s complement of the sum of all the values except for the CS value 2 Response Packet Structure 3 Bytes 1 Success 2 Fail When the received packet f...

Page 81: ...el 2 Direct Power Off 3 Volume Direct 0x01 0x00 0x00 0 100 Continuous Up 0x01 0 Down 0x02 0 Mute On 0x02 0x00 0x00 0 Off 1 Blank On 0x03 0x00 0x00 0 Off 1 Still On 0x04 0x00 0x00 0 Off 1 Power On Protection 0 9 Key pad 0x05 0x00 0x00 0 9 Input Source List AV AV 0x0A 0x00 0x01 0 PC PC 0x03 0 HDMI HDMI 0x04 0 Media Play Media Play 0x05 0 ...

Page 82: ...0 100 Brightness 0 100 0X03 0x00 0 100 Sharpness 0 100 0X04 0x00 0 100 Color 0 100 0X05 0x00 0 100 Tint G R G50 R50 0x06 0x00 0 100 Color Tone Cool2 0x0A 0x00 1 Cool1 2 Warm1 3 Warm2 4 WB R offset 0x0B 0x00 0 100 G offset 0x01 0 100 B offset 0x02 0 100 R gain 0x03 0 100 G gain 0x04 0 100 B gain 0x05 0 100 CONTROL ITEM CMD1 CMD2 CMD3 VALUE ...

Page 83: ...al NR Off 0x10 0x00 0 On 1 Black Level 0 IRE NOR MAL 0x11 0x00 0 7 5 IRE LOW 1 Overscan Off 0x12 0x00 0 On 1 Film Mode Off 0x13 0x00 0 Auto 1 PC Auto adjust ment 0x14 0x00 0 Coarse UP 0x15 0x00 0 DOWN 1 fine Up 0x16 0x00 0 DOWN 1 Reset Display OSD 0x17 0x00 0 OK 1 Cancel 2 Direct Reset 3 Zoom x1 0x18 0x00 0 x2 1 x4 2 x8 3 LEFT 0x19 0x00 0 RIGHT 1 Up 2 Down 3 CONTROL ITEM CMD1 CMD2 CMD3 VALUE ...

Page 84: ...t 2 Keystone V Keystone 50 50 0x02 0x00 0 100 Auto Key stone Off 0x02 0 On 1 Background Logo 0x03 0x00 0 Blue 1 Black 2 Custom Logo 3 Test Pattern Crosshatch 0x04 0x00 0 Screen size 1 Pattern Off 2 Video Type Auto 0x05 0x00 0 RGB PC 1 RGB AV 2 YPbPr AV 3 PC 4 AV 5 Reset Factory Default Display OSD 0x06 0x00 0 Ok 1 Cancel 2 Direct Fac tory Default 3 Reset Filter Time Display OSD 0x01 0 Ok 1 Cancel ...

Page 85: ...aption 0x01 0 Text 1 Channel 1 0x02 0 2 1 Field 1 0x03 0 2 1 Network Network Off 0x0E 0x01 0x00 0 On 1 IP Setting Automatic 0x02 0x00 0 Manual 1 IP Address 0x03 0x00 0 255 0x01 0 255 0x02 0 255 0x03 0 255 Subnet Mask 0x04 0x00 0 255 0x01 0 255 0x02 0 255 0x03 0 255 Gateway 0x05 0x00 0 255 0x01 0 255 0x02 0 255 0x03 0 255 Server IP Setting Server IP 0x06 0x00 0 255 0x01 0 255 0x02 0 255 0x03 0 255 ...

Page 86: ... Italiano 5 Svenska 6 Português 7 Русский 8 中国语 9 한국어 10 Türkçe 11 ไทย 12 Menu Option Position LEFT 0x01 0x00 0 RIGHT 1 UP 2 DOWN 3 Transpar ency High 0x02 0x00 0 Medium 1 Low 2 Opaque 3 Display Time 5 sec 0x03 0x00 0 10 sec 1 30 sec 2 60 sec 3 90 sec 4 120 sec 5 Stay On 6 CONTROL ITEM CMD1 CMD2 CMD3 VALUE ...

Page 87: ... 0x04 0 Down 1 10KHz Up 0x05 0 Down 1 Filter Check Time Off 0x05 0x00 0 100 1 200 2 400 3 800 4 Auto Power ON Off 0x06 0x00 0 On 1 Sleep Timer Off 0x07 0x00 0 10 min 1 20 min 2 30 min 3 Information 0x08 0x00 0 Panel Lock Off 0x0A 0x00 0 On 1 Melody Off 0x0B 0x00 0 Low 1 Medium 2 High 3 CONTROL ITEM CMD1 CMD2 CMD3 VALUE ...

Page 88: ...5 http www samsung com GUATEMALA 1 800 299 0013 http www samsung com HONDURAS 800 27919267 http www samsung com JAMAICA 1 800 234 7267 http www samsung com NICARAGUA 00 1800 5077267 http www samsung com PANAMA 800 7267 http www samsung com PERU 0 800 777 08 http www samsung com PUERTO RICO 1 800 682 3180 http www samsung com TRINIDAD TOBAGO 1 800 SAMSUNG 726 7864 http www samsung com VENEZUELA 0 8...

Page 89: ...sung com RUMANIA 08010 SAMSUNG 08010 7267864 doar din reţeaua Romtelecom tarif local 021 206 01 10 din orice reţea tarif normal http www samsung com SERBIA 0700 Samsung 0700 726 7864 http www samsung com SLOVAKIA 0800 SAMSUNG 0800 726 786 http www samsung com sk SPAIN 902 1 SAMSUNG 902 172 678 http www samsung com SWEDEN 0771 726 7864 SAMSUNG http www samsung com SWITZERLAND 0848 SAMSUNG 7267864 C...

Page 90: ...2 1800 3000 8282 http www samsung com INDONESIA 0800 112 8888 021 5699 7777 http www samsung com JAPAN 0120 327 527 http www samsung com MALAYSIA 1800 88 9999 http www samsung com PHILIPPINES 1 800 10 SAMSUNG 726 7864 1 800 3 SAMSUNG 726 7864 1 800 8 SAMSUNG 726 7864 02 5805777 http www samsung com SINGAPORE 1800 SAMSUNG 726 7864 http www samsung com THAILAND 1800 29 3232 02 689 3232 http www sams...

Page 91: ...n SAUDI ARABIA 9200 21230 http www samsung com U A E 800 SAMSUNG 726 7864 http www samsung com AFRICA NIGERIA 0800 SAMSUNG 726 7864 http www samsung com SOUTH AFRICA 0860 SAMSUNG 726 7864 http www samsung com MIDDLE EAST ...

Page 92: ... local government office for details of where and how they can take these items for environmentally safe recycling Business users should contact their supplier and check the terms and conditions of the purchase contract This product and its electronic accessories should not be mixed with other commercial wastes for disposal Applicable in the European Union and other European countries with separat...

Reviews: