background image

30

English

Product Specifications

Classification

Details

Model name

SPF-87H

SPF-107H

Panel

Type

8” TFT LCD

10” TFT LCD

Resolution

800 x 480

1024 x 600

Supported format

JPEG

Progressive or CMYK type pictures are not supported.


·

It can only recognize up to 4,000 photos.


·

 Only a photo with a resolution less than 8000 (Horizontal) *8000 


·

(Vertical) pixel can be played.

Internal memory

1 GB

USB

Host (USB 2.0) / Device (USB 2.0)

Power  

supply

Rating

External DC power supply device (12 V)

Power consumption

General : 5.3 W 
Power off : Under 1 W

General : 5.9 W 
Power off : Under 1 W

General

Size 
(Width x height x depth)

236.0 x 159.4 x 23.0 mm
9.3 x 6.3 x 0.9 inch

280.0 x 188.0 x 23.0 mm
11.0 x 7.4 x 0.9 inch

Weight

500 g (1.1 lbs)

600 g (1.3 lbs)

This device is a Class B digital apparatus.

The product design may differ according to the model, and specifications 
are subject to change without prior notice for product performance 
enhancement.

Note

Summary of Contents for SPF-107H - Touch of Color Digital Photo...

Page 1: ...ame User Manual SPF 87H SPF 107H Thank you for purchasing a Samsung digital photo frame Safety precautions is to protect safety of a user and to prevent property damage Read it carefully and use the p...

Page 2: ...Monitor with a USB Purchasing an additional memory is not needed with its massive built in internal memory of 1GB Memory space can be used more efficiently because when saving the photos they are aut...

Page 3: ...electing a storage device 15 Copying photos 16 Deleting photos 18 Clock Display Using as a clock display 19 Mini Monitor Using as a PC screen Mini Monitor 20 Installing the Frame Manager Program 20 Co...

Page 4: ...in place Failing to do so may cause fire Do not use a damaged power plug cord or outlet as this may cause electric shock or fire Do not touch the power plug with wet hands as this may cause electric...

Page 5: ...ing the plug out by the cord may cause it to be damaged Failing to do so may cause fire or the product may not turn on normally Installation Warning Disconnect the power plug when there is thunder or...

Page 6: ...his may cause electric shock or fire If water or any foreign substance enters the product make sure to turn the product off disconnect the power plug from the outlet and contact a service center Never...

Page 7: ...satisfy general conditions make sure to contact one of our service engineers about the installation as the product may encounter serious quality problems due to its environment This refers to location...

Page 8: ...SPF 107H User Manual If no buttons are pressed for 10 minutes or longer the screen saver mode is automatically activated except in View Mode Note USB cable connection USB memory device connection Powe...

Page 9: ...al or vertical direction according to your preference as shown in the pictures below USB port Do not apply excessive force or turn the stand in the wrong direction during setup This may cause damage t...

Page 10: ...n Clock Set and Startup Mode can be set up conveniently with Quick Setup Quick Setup will also be activated when the product is turned off and on again after selecting Support Reset under the Settings...

Page 11: ...isk 4 Copy the photo files you want from the PC to the recognized disk The recognized removable disk will be displayed with the model name SPF 87H or SPF 107H In My Computer open the corresponding mod...

Page 12: ...rame and copied to the frame memory p 16 If the above USB connection mode selection screen doesn t appear when reconnecting after disconnection run Activate USB Communication in General under the Sett...

Page 13: ...electing and deselecting alternately Press button to deselect all the selected photos 4 Press the button to select Slideshow and then press the button Slideshow will play only the selected photos Phot...

Page 14: ...select a desired item and then press the button The photo on the screen will be rotated to a selected angle Photos only can be rotated when View Mode is in one of the following Photo Only Photo Clock...

Page 15: ...d then press the button A photo list will appear for the selected storage device If an external memory is connected primarily the photos saved on the connected external memory will be immediately play...

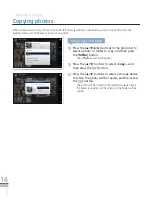
Page 16: ...t Copy and then press the button 3 Press the buttons to select a storage device to which the photo will be copied and then press the button The photo will be copied to the selected storage device If a...

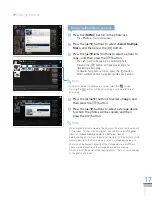
Page 17: ...nal size for Frame memory copy in Settings p 25 Before copying photos from the external memory SD memory card USB memory device to the frame memory select a storage device p 15 Photos can t be copied...

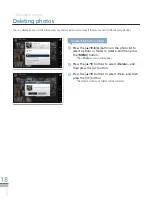
Page 18: ...ill appear 2 Press the buttons to select Delete and then press the button 3 Press the buttons to select Yes and then press the button The selected photo or folder will be deleted Photo Size Date File...

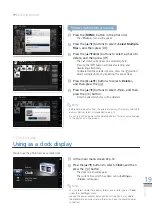
Page 19: ...buttons to select Clock and then press the button The clock screen will appear The current time which has been set in Settings Clock will appear You can select a date time display format and a clock t...

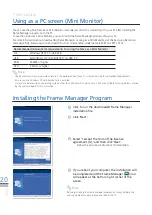
Page 20: ...then click Next Follow the on screen instructions for installation 4 If you reboot your computer the installation will be completed and the Frame Manager icon will appear at the bottom right corner o...

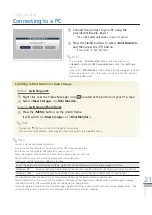
Page 21: ...screen may go blank Ensure you use the provided USB cable to connect to your PC Move the program used with the Mini Monitor to a primary monitor after use The Mini Monitor may not function properly w...

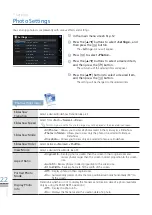
Page 22: ...de Select a desired View Mode p 23 Aspect Ratio Original Fit Displays photos smaller than the screen in their original sizes and resizes photos larger than the screen in direct proportion to the scree...

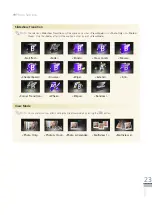
Page 23: ...to Only Photo Clock Photo Calendar Multiview 1 Multiview 2 The selected Slideshow Transition will be applied only when View Mode is in Photo Only or Photo Clock Only the Fade effect will be applied in...

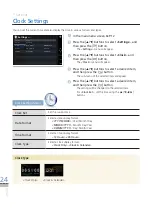
Page 24: ...ted item For Clock Set set the time using the buttons Clock Settings Menu Clock Set Set the current time Date Format Select a date display format YYYY MM DD Year Month Day MM DD YYYY Month Day Year DD...

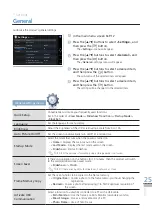
Page 25: ...e Displays the main menu on the screen Last Mode Displays the last mode used on the screen Slideshow Starts a Slideshow Screen Saver If there s no operation on the buttons for 10 minutes then the prod...

Page 26: ...ware Upgrade software p 29 Reset Set the menu options configured by the user to the default settings except for the time and language settings Product Guide View information on the buttons selecting s...

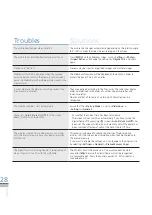
Page 27: ...the internal memory is damaged Try again after formatting the internal memory I ve connected an external memory device USB memory device or SD memory card but it doesn t work SPF 87H can be used by co...

Page 28: ...aracters can be recognized The Slideshow doesn t start automatically Ensure that the Startup Mode is set to Slideshow in Settings General I have set Auto Picture On Off but the screen doesn t switch o...

Page 29: ...move to an external memory where current software is saved and then press the button Upgrade will start Appendix Software Upgrade You can download and install the latest software from Samsung Electro...

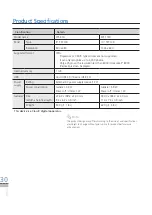
Page 30: ...nternal memory 1 GB USB Host USB 2 0 Device USB 2 0 Power supply Rating External DC power supply device 12 V Power consumption General 5 3 W Power off Under 1 W General 5 9 W Power off Under 1 W Gener...

Reviews: