background image

32_


Operating the cleaner

Operating the cleaner

USING THE ROBOTIC VACUUM CLEANER

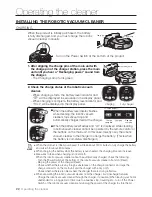
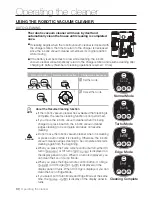
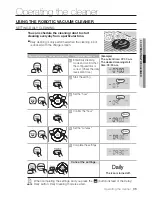
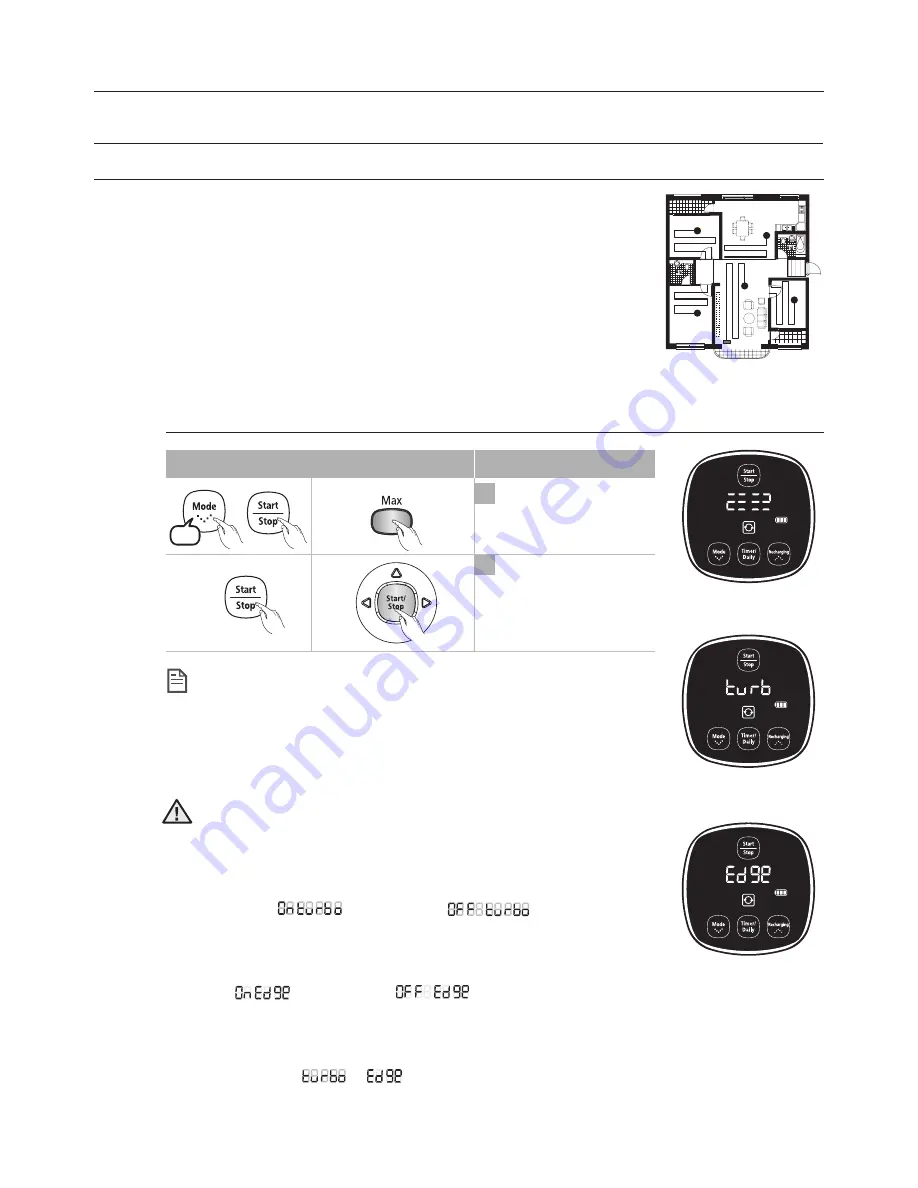
MAx CLEANING

CAUTION


Do not move the robotic vacuum cleaner while it is cleaning 

or press a button while cleaning. Otherwise, the robotic 

vacuum cleaner judges cleaning to be complete and starts 

cleaning again from the beginning.

●  

When you press the Turbo remote control button, either On 

turbo (

) or Off turbo (

) is displayed on 

the display panel in turns. When On turbo is displayed, you 

can clean the floor in Turbo Mode.

●  

When you press the Edge remote control button, On Edge 

(

) or Off Edge (

) is displayed on the 

display panel in turns. When On Edge is displayed, you can 

clean the floor in Edge Mode.

●  

If you select both Turbo Mode and Edge Mode at the same 

time, the (

→ 

) is display on the display panel in 

turns. 

About the Resume Cleaning function


If the robotic vacuum cleaner judges cleaning to be 

complete, resume cleaning is not performed.


If you move the robotic vacuum cleaner while it is being 

charged or press a button, robotic vacuum cleaner judges 

cleaning to be complete (cleaning is not resumed).

NOTE

Normal Mode

Edge Mode

Turbo Mode

The robotic vacuum cleaner automatically moves and 

cleans until the battery runs out and the battery level 

flashes only one level.

  If cleaning begins when the robotic vacuum cleaner is docked 

with the charger station, the time to return to the charger is 
decreased since the robotic vacuum cleaner remembers its 
original position while moving.

  If the battery level becomes low while cleaning, the robotic 

vacuum cleaner automatically returns to the charger station and resumes cleaning after 
charging the battery. (Number of resumed cleaning operations: Once)

Cancel the mode.

2

1

Set the mode.

Main unit button

Remote control button

Configuration Sequence

3times

Summary of Contents for sr8894

Page 1: ...Robotic Vacuum Cleaner User Manual Before operating this unit please read the instructions carefully For indoor use only English imagine the possibilities Thank you for purchasing a Samsung product ...

Page 2: ...ge exists OTHER SYMBOLS USED NOTE Explains terms to help users understand how use the product properly SAFETY INFORMATION Before operating the appliance please read this manual thoroughly and retain it for your reference Because these following operating instructions cover various models the characteristics of your vacuum cleaner may differ slightly from those described in this manual WARNING WARN...

Page 3: ...oor surfaces This appliance can be used by children aged from 8 years and above and persons with reduced physical sensory or mental capabilities or lack of experience and knowledge if they have been given supervision or instruction concerning use of the appliance in a safe way and understand the hazards involved Children shall not play with the appliance Cleaning and user maintenance shall not be ...

Page 4: ...er in case the unit accidentally turns on Do not put any objects into openings Do not use with any openings blocked keep openings free of dust lint hair and anything that may reduce air flow Do not pick up toxic materials chlorine bleach ammonia drain cleaner etc Do not pick up anything that is burning or causing a smoke such as cigarettes matches or hot ashes Do not use to pick up flammable or co...

Page 5: ...y 24 Setting the time 25 Installing the virtual guard option 27 Using the robotic vacuum cleaner 27 Attaching a mop option 28 Starting stopping cleaning 29 Recharging 30 Auto cleaning 31 Spot cleaning 32 Max cleaning 33 Manual cleaning 34 Scheduled cleaning 35 Setting daily cleaning Maintain tools and filter 36 36 Using additional functions 36 Cleaning the robotic vacuum cleaner 36 Please keep the...

Page 6: ...is may result in fire or electric shock Do not use multiple plugs in a single socket Do not leave the cord lying exposed on the floor This may result in fire or electric shock Do not pull the power plug by the cord or touch the plug with wet hands This may result in fire or electric shock Make sure to remove any dust or water from the power plug Failing to do so may result in a malfunction or elec...

Page 7: ...h as bathrooms or wash rooms and narrow and highly situated locations such as tables or shelves Critical damage abnormal operation and breakage may occur when used in these locations Open all doors to clean all rooms When a door is closed the robotic vacuum cleaner will not be able to enter that room However make sure to close the doors to the main entrance the veranda and the bathroom and any oth...

Page 8: ...t step or sit on the robotic vacuum Children may fall and injure themselves or critical damage may occur to the product When a child or pet is left alone make sure to turn off the Power Switch of the robotic vacuum cleaner Robotic vacuum cleaner may attract their attention When the rotating wheel or brush catches fingers feet clothing or hair this may result in injury If a child or pet is in the w...

Page 9: ...o the product Liquids may spread through the wheels resulting in contamination WARNING Objects in front of the charger will prevent the robotic vacuum cleaner from auto charging itself Clear the area CAUTION There should be no obstacles 0 5 m to the left and right and within 1 m of the front WARNING Make sure that there is no trace of liquids on the charger station Failing to do so may result in f...

Page 10: ...ted from the robotic vacuum cleaner immediately turn off the Power Switch and call the customer care center WARNING Do not use the robotic vacuum cleaner on a table or other high locations This may result in damage when the unit accidentally drops CAUTION Robotic vacuum cleaner may bump into furniture such as chair legs table legs thin and long furniture etc while operating For a quicker and clean...

Page 11: ...ion CAUTION The cleaning robot cannot move over carpets after the mop is attached option To clean a carpet remove the mop and mop plate first CAUTION Cleaning and maintenance When cleaning the product do not spray water directly onto the exterior or wipe it with a volatile material such as benzene thinner or alcohol This may result in critical damage to the product CAUTION The unit must not be dis...

Page 12: ...ARNING WARNING When removing foreign substances always use the cleaning brush after turning the Power Switch off Failing to do so may result in sudden operation of the unit and cause an injury or critical damage to the product WARNING Edge cleaning side brush Contact the Samsung Electronics customer care center to replace the battery Failing to use original batteries will result in product failure...

Page 13: ...o minimize the bumping impact and the Bumper Sensor also helps it lower the bumping impact And it cleans the corners by reaching to them as close as possible 7 Scheduled Cleaning Mode At the specified time the cleaning robot cleans the floor 8 Daily Cleaning Mode The cleaning robot cleans the floor everyday at the specified time 4 MonTue Wed Thu Fri Sat Sun 8 7 6 5 3 1 Convenient VIRTUAL GUARD Fun...

Page 14: ... does crash into an obstacle the 2 bumper sensors absorb the impact Edge Cleaning Side ROTATING Brush The edge cleaning side rotating brush cleans dust from the edges Auto Charging When the battery is low the robotic vacuum cleaner is automatically guided to the charger to enable it to perform a quick auto charge Anti Falling safety device The 3 Cliff sensors detect downward steps such as stairs o...

Page 15: ...Assembling the cleaner Components Main Body Others Components Charger Station Remote Control Remote Control Cradle Cleaning Brush Spare Filter VIRTUALGUARD User Manual CD ROM 2 Battery option Microfiber Mop option Mop Plate option Spare Power Brush option ...

Page 16: ...y Panel Camera Obstacle Sensor Bumper Sensor VIRTUAL GUARD Sensor Remote Control Sensor Remote Control Sensor Dust Bin Dust Bin Eject Button Dust Outlet Driving Wheel Battery Cover Power Brush Power Brush Cover Power Switch Driving Wheel Cliff Sensor Cliff Sensor Charge Pin Side Brush Cliff Sensor Charge Pin Roller Obstacle Sensor ...

Page 17: ...ng the locking tab Install the batteries into the VIRTUAL GUARD as shown by the figure below If the batteries are installed with the incorrect polarity the VIRTUAL GUARD will not work After inserting the tip of the cover into the slot push the other end to close it until it clicks into place 1 2 3 Specification Type D LR20 batteries VIRTUAL GUARD OPTION Distance Detection Sensor Main Body Detectio...

Page 18: ...h the wrong polarity the remote control will not work After inserting the tip of the cover into the slot push the other end to close it until it clicks into place 1 2 3 Specification AAA type batteries Batteries are not installed in the remote control when purchasing the product Install the batteries type AAA before use Installing the Remote Control Batteries moving backwards is not supported Powe...

Page 19: ...ng robot returns to the charger station to charge its battery 6 Cleaning Mode Display Each time the Cleaning Mode button is pressed the corresponding cleaning mode is displayed a Auto Mode This icon turns on when Auto cleaning mode is selected b Spot Mode This icon turns on when Spot cleaning mode is selected c Max Mode This icon turns on when Max cleaning mode is selected d Manual Mode This icon ...

Page 20: ...the bottom of the cleaning robot Installing the robotic vacuum cleaner CAUTION If the Power Switch is turned off the robotic vacuum cleaner will not be charged even if it is docked with the charger station To use the robotic vacuum cleaner you must turn the Power Switch on If you turn the Power Switch off all settings will be reset 1 Turn over the main unit and turn the Power Switch on If the icon...

Page 21: ...le to charge automatically If the robotic vacuum cleaner is separated from the charger the battery is automatically discharged 2 There should be no obstacles 0 5m to the left and right and within 1 m of the front 1 Install the charger on a flat surface 3 Install the charger in a location where it can be easily accessed by the robotic vacuum cleaner 4 Arrange the power cord along the wall 5 When th...

Page 22: ... the Power Switch at the bottom of the robotic vacuum cleaner off and on Reset Re plug the power of the charger Reset Check whether there are any foreign substances on the charge connector and wipe the charge connector on the main unit and the charger with a dry cloth Check whether there are objects near the charger that are strong reflectors When separating the robotic vacuum cleaner from the cha...

Page 23: ...semble or modify the battery Charge it in a location with good ventilation Do not expose the battery to fire and do not heat it Do not connect any metallic objects to the or terminals of the battery Keep it indoors 0 40 Before you discard product dispose of batteries in an environmentally safe manner Do not discard this batteries with your regular household trash Follow all local regulations when ...

Page 24: ...Cleaning functions properly setting the time is necessary You can only set the time using the remote control You can only set the time using the remote control Suppose current time is 07 00 Remote Control Configuration Sequence Press the button instead of the Time Set button while setting the time to exit Time Set mode When a Scheduled Cleaning is set you cannot change the time setting Blinks Blin...

Page 25: ...2 5M at minimum and may differ depending on surroundings and movement status of the robot Forming a Fence virtual wall VIRTUAL GUARD creates an invisible barrier that the robotic vacuum cleaner cannot cross E g in front of pots furniture the front door and so on 1 Turn the Fence virtual wall mode on using the Power button The mode lamp flashes red 2 Install the VIRTUAL GUARD in front of the area y...

Page 26: ...cross the virtual fence of the VIRTUAL GUARD or run against an obstacle because the remote control signal has a higher priority than the VIRTUAL GUARD signal When using the robotic vacuum cleaner in a small location or at a close distance it may malfunction due to interference of the infrared signals Install the VIRTUAL GUARD away from the charger as auto charging may be interrupted if the VIRTUAL...

Page 27: ...etely it may separate while cleaning 3 Place the mop plate to which the mop is attached on the floor and push it down Parts to install the mop plate Mop plate fixing holes Mop attachment line Attach the mop making sure it is level with the mop attachment line CAUTION Since the cleaning robot cannot move over carpets after attaching a mop remove the mop and mop plate from the cleaning robot before ...

Page 28: ...the robotic vacuum is operating press the button to cancel the operation and select a function Using the remote control Turning the power on or off Starting Remote control Press the Auto Spot Max Manual or button Main unit Select Auto Spot Max Manual mode by using the button and then pressing the button When cleaning begins the robotic vacuum cleaner starts to move Pressing the button without sele...

Page 29: ...ss the button to cancel the operation and press the Recharging button Troubleshooting when the robotic vacuum cleaner does not return to the charger Check the installation of the charger When the charger is in a location where the charger cannot guide the robotic vacuum cleaner to the charger When the charger is more than 5m away from robotic vacuum cleaner It may require a longer time for the rob...

Page 30: ...mplete and starts cleaning again from the beginning When you press the Turbo remote control button either On turbo or Off turbo is displayed on the display panel in turns When On turbo is displayed you can clean the floor in Turbo Mode When you press the Edge remote control button On Edge or Off Edge is displayed on the display panel in turns When On Edge is displayed you can clean the floor in Ed...

Page 31: ...aner is docked with the charger station spot cleaning is not supported NOTE About 1 5m About 1 5m Cancel the mode 2 1 Set the mode Main unit button Remote control button Configuration Sequence 2times Cleaning Complete Normal Mode Edge Mode Turbo Mode When you press the Turbo remote control button either On turbo or Off turbo is displayed on the display panel in turns When On turbo is displayed you...

Page 32: ... the Resume Cleaning function If the robotic vacuum cleaner judges cleaning to be complete resume cleaning is not performed If you move the robotic vacuum cleaner while it is being charged or press a button robotic vacuum cleaner judges cleaning to be complete cleaning is not resumed NOTE Normal Mode Edge Mode Turbo Mode The robotic vacuum cleaner automatically moves and cleans until the battery r...

Page 33: ...ner is docked with the charger station manual cleaning is not supported NOTE Normal Mode Edge Mode Turbo Mode CAUTION When you press the Turbo remote control button either On turbo or Off turbo is displayed on the display panel in turns When On turbo is displayed you can clean the floor in Turbo Mode When you press the Edge remote control button On Edge or Off Edge is displayed on the display pane...

Page 34: ...urned off Enter Scheduled Cleaning mode and confirm that the configured time is correct 1 Start the settings 2 Set the hour 3 Confirm the hour 4 Set the minutes 5 Complete the settings 6 Main unit button Remote control button Configuration Sequence Example The current time 07 00 a m The desired cleaning start time 09 30 a m Decrease Increase Decrease Increase Blinks Blinks Blinks Blinks NOTE When ...

Page 35: ...irm that the configured time is correct Check the daily reservation time 1 Start the setting 2 Set the hour 3 Confirm the hour 4 Set the minutes 5 Complete the settings 6 Main unit button Remote control button Configuration Sequence Example The current time 07 00 a m The desired cleaning start time 09 30 a m MonTue Wed Thu Fri Sat Sun The icon is turned off Decrease Increase Decrease Increase Blin...

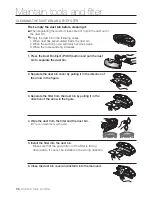
Page 36: ... When the Power Switch is damaged please contact the service agent so that it does not cause any accidents Do not use any means or mechanical devices not installed by the manufacturer that could accelerate the deformation of the robotic vacuum cleaner Always turn off the power switch at the bottom of the main unit before cleaning the robotic vacuum The robotic vacuum cleaner could operate suddenly...

Page 37: ...of the vacuum cleaner to the dust outlet it will vacuum the dust directly from the dust bin Cleaning the sensor window and the camera Display Panel Front Sensor window Camera You must turn off the Power Switch at the bottom of the main unit before cleaning the robotic vacuum Never spray water thinner benzene etc directly onto the main unit of robotic vacuum cleaner Lightly wipe the sensor window o...

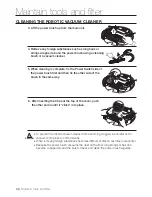
Page 38: ... filter 2 Separate the dust bin cover by pulling it in the direction of the arrow in the figure 1 Press the Dust Bin Eject PUSH button and pull the dust bin to separate the dust bin 3 Separate the filter from the dust bin by pulling it in the direction of the arrow in the figure First empty the dust bin before cleaning it When separating the dust bin take care not to spill the dust out of the dust...

Page 39: ...xing the brush cover to separate it 1 Separate the dust bin by pressing the Dust Bin Eject PUSH button You must turn off the Power Switch at the bottom of the main unit before cleaning the robotic vacuum CAUTION Because the dust in the dust bin may come out separate the dust bin first before cleaning the power brush Structure of the Dust Bin Dust Bin Eject PUSH Button Dust Outlet Dust Bin Filter D...

Page 40: ...eign substances becomes difficult contact a customer care center Because the power brush vacuums the dust on the floor long strings or hair can become wrapped around the brush Check and clean the power brush regularly 3 Lift the power brush up from the main unit 4 Remove any foreign substances such as long hairs or strings wrapped around the power brush using a cleaning brush or a vacuum cleaner 5...

Page 41: ...unit before cleaning the robotic vacuum 3 Turning the side rotating brush repeat the procedures in Step 2 4 If hair or string is wrapped between the main unit and the side rotating brush undo the screw of the side rotating brush using a driver to remove it When reassembling the brush check the L mark on the edge cleaning side rotating brush and the L mark on the main unit and then reassemble the s...

Page 42: ... Dry the mop completely in a well ventilated location before using it 1 When cleaning the driving wheel place a soft cloth on the floor and flip the main unit placing it down carefully You must turn off the Power Switch at the bottom of the main unit before cleaning the robotic If the robotic vacuum cleaner suddenly starts to zigzag there may be foreign substances stuck on the driving wheel Since ...

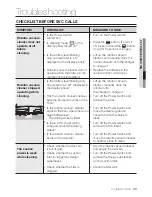
Page 43: ... in the display panel Lift up the robotic vacuum cleaner manually dock the robotic onto the charger to charge it Has the robotic vacuum cleaner become hooked on wires on the floor Turn off the Power Switch and remove the wires Is the robotic vacuum cleaner stuck to the floor where there is a height difference The driving wheel is lifted Turn off the Power Switch and move the cleaning robotic vacuu...

Page 44: ...acuum cleaner can charge automatically Robotic vacuum cleaner passes through the VIRTUAL GUARD Option Are the batteries of the VIRTUAL GUARD worn out Replace the batteries 2 type D LR20 batteries Is the Mode lamp turned off Check if the VIRTUAL GUARD is turned off and then set the VIRTUAL GUARD to a desired mode The battery usage time of the VIRTUAL GUARD is too short Option Check the batteries wh...

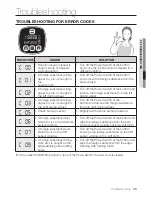
Page 45: ...s caught in the right driving wheel Turn off the Power Switch at the bottom and remove the foreign substance from the right driving wheel Check bumper sensor Slightly pull the stuck bumper outward A foreign substance dust stain etc is on the Obstacle sensor window Turn off the Power Switch at the bottom and wipe the foreign substance from the front and rear sensor windows using a soft cloth A fore...

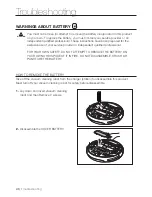
Page 46: ...he exclusive use of your service provider or independent qualified professional FOR YOUR OWN SAFETY DO NOT ATTEMPT TO REMOVE THE BATTERY ON YOUR OWN OR DISPOSE OF IT IN FIRE DO NOT DISASSEMBLE CRUSH OR PUNCTURE THE BATTERY How to remove the battery Take off the vacuum cleaning robot from the charger station for disassemble this product Must turn off your vacuum cleaning robot for safety before dis...

Page 47: ...Troubleshooting _47 Troubleshooting 05 Troubleshooting 3 Disassemble the ASSY BATTERY 4 Keep finger pushing connector and then disassemble ...

Page 48: ...r Pb indicate that the battery contains mercury cadmium or lead above the reference levels in EC Directive 2006 66 The battery incorporated in this product is not user replaceable For information on its replacement please contact your service provider Do not attempt to remove the battery or dispose it in a fire Do not disassemble crush or puncture the battery If you intend to discard the product t...

Page 49: ...Product specification _49 06 Product specification Product specification Charger Station Main Body 93 mm Height 355 mm Length 355 mm Width 275 mm Width 161 mm Length 122 mm Height ...

Page 50: ...nsumption 50 W Main unit power consumption 40 W Battery specifications 14 4V 2 000 mAh Cleaning Specifications Dust bin capacity About 0 6 ℓ Charging type Auto Charging Manual Charging Cleaning mode Auto Spot Max Manual Scheduled Setting Daily Cleaning Charging time About 120 minutes Cleaning time on the basis of hard floor About 90 minutes Cleaning method Ceiling shape recognition Main unit butto...

Page 51: ... but not limited to procurement of substitute goods or services loss of use data or profits or business interruption however caused and on any theory of liability whether in contract strict liability or tort including negligence or otherwise arising in any way out of the use of this software even if advised of the possibility of such damage Copyright c 2006 2008 2009 2010 Edward Rosten All rights ...

Page 52: ......
Reviews: