50_
main menu
main menu
Monitor
You can configure information to be displayed and its format for Spot Out monitor.
Setting the Monitor
Using the mouse may help make setup easier.
1.
Use the up/down buttons (
) in <
Device
> window to
move to <
Monitor
>, and press [
ENTER
] button.
2.
Select <
Monitor
>.
3.
Use direction buttons (
◄ ►
) to move to a desired item,
and set the value.
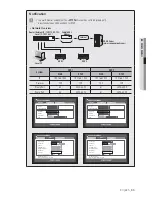
• Event Display : Sets the dwell time of the event channel
display on the monitor when an event occurs.
If selected <
Continuous
>, it displays the channel until you
press [
ALARM
] button to release it.
• Display : Displays only checked items on the monitor
screen.
• VGA/HDMI : Set your preferred screen resolution to <
VGA
> or <
HDMI
>.
• HDMI Resolution Auto Detection : If you set it to <
ON
>, then the HDMI screen resolution is automatically
detected.
If a HDMI monitor is not connected, the resolution is set to VGA/HDMI.
If <
VGA
> or <
HDMI
> is not supported by the monitor, it may not be able to display anything.
• Screen mode : Set screen mode.
• Sharpness : Set the clarity for the video screen.
4.
When the monitor setup is done, press <
OK
>.
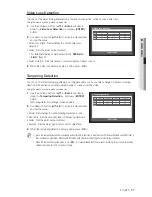
Screen Setup
Some monitors may not display information (camera name, icon, time information, etc.) about the DVR,
depending on the condition. Then, you can change the display position of the data.
1.
In the <
Device
> window, press the up/down (
) button to move to <
Monitor
> and press the [
ENTER
]
button.
2.
Select the <
Monitor
> item.
3.
Select <
Display Position Setup
> in the bottom.
You will move to the <
Display Position Setup
> window.
4.
Use the four direction buttons or the number buttons on
the front panel or the remote control to adjust the data
position.
Monitor
Monitor
Spot Out
Event Display
OFF
Display
Date
Time
CH Name
Icon
VGA/HDMI
1280X1024
HDMI Resolution Auto Detection
ON
Screen mode
Clear screen
Sharpness
Level3 (High)
Mode
OK
Cancel
Display Position Setup
CAM 03
2014-01-01 01:10:25
Display Position Setup
OK
Cancel
30
30
30
30

