background image

setting up


_15

setting up your side-by-side 

refrigerator

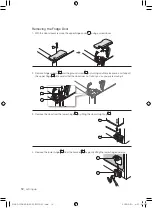
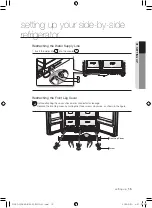
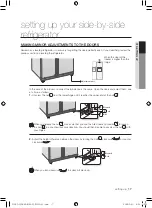
Reattaching the Water Supply Line

1. Insert the water line 

1

 into the coupler 

2

.

Reattaching the Front Leg Cover

Before attaching the cover, check water connector for leakage.
Replace the front leg cover by turning the three screws clockwise, as shown in the figure.

01 
s

E

tting

 u

P

front Leg Cover

screw

2
1

DA99-01584A(HM-P)-EN(0.4).indd   15

2009.9.30   4:31:53 PM

Summary of Contents for SRS583HDP

Page 1: ...al imagine the possibilities Thank you for purchasing a Samsung product To receive a more complete service please register your product at www samsung com register English DA99 01584A HM P EN 0 4 indd 1 2009 9 30 4 31 14 PM ...

Page 2: ...control the temperature of drawer EASY OPENNING Optional Doors can be opened easily and smoothly with this Easy Handle for the customer satisfaction BLACK CLEAR LED DISPLAY Optional With luxurious black window you can look and feel neat clear design SOFT TOUCH TYPE HOME BAR Optional With soft touch type Home Bar just push and catch to open or close with latch and damping system EASILY MOVABLE TRAY...

Page 3: ...alified individual R600a or R134a can be used as a refrigerant Check the compressor label on the rear of the appliance and the rating label inside the fridge to see which refrigerant is used for the refrigerator In case of R600a refrigerant this gas is natural gas with high environmental compatibility that is however also combustible When transporting and installing the appliance care should be ta...

Page 4: ...age rating that matched the rating plate This provides the best performance and also prevents overloading house wiring circuits which could cause a fire hazard from overheated wires Never unplug your refrigerator by pulling on the power cord Always grip plug firmly and pull straight out from the outlet Damage to the cord may cause a short circuit fire and or electric shock Make sure that the power...

Page 5: ... to be used for a long period of time pull out the power plug Deterioration in the insulation may cause fire Do not store articles on the top of the appliance When you open or close the door the articles may fall and cause personal injury and or material damage Caution signs This product is intended only for the storage of food in a domestic environment Manufacturer s recommended storage times sho...

Page 6: ...ch refrigerant is used for your refrigerator When this product contains flammable gas Refrigerant R600a contact your local authority in regard to safe disposal of this product Cyclopentane is used as a insulation blowing gas The gases in insulation material require special disposal procedure Please contact your local authorities in regard to the environmentally safe disposal of this product Ensure...

Page 7: ... the power is off But should the power failure last more than 24hours remove all frozen food If the key is provided with refrigerator the keys should be kept out of the reach of children and not in the vicinity of the appliance The appliance might not operate consistently possibility of defrosting of contents or temperature becoming too warm in the frozen food compartment when sited for an extende...

Page 8: ...ting the SAMSUNG side by side refrigerator 23 23 Setting up the refrigerator 24 Operating the refrigerator 25 Using the digital display 26 Controlling the temperature 27 Using the ice and cold water dispenser 28 Shelves and bins 29 Storing food 31 Using the CoolSelect Zone Drawer Optional 33 Removing the freezer accessories 34 Removing the refrigerator accessories 35 Cleaning the refrigerator 37 C...

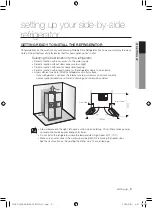
Page 9: ...ly level flooring Select a location with enough space for the refrigerator doors to open easily Allow sufficient space to install the refrigerator on a flat surface If your refrigerator is not level the internal cooling system may not work correctly Overall space required in use Refer to drawing and dimension as below Allow clearance to the right left back and top when installing This will help re...

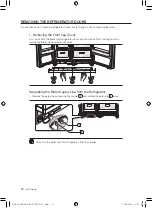
Page 10: ...en both the freezer and refrigerator doors and then take off the front leg cover by turning the three screws counter clockwise 1 2 Separating the Water Supply Line from the Refrigerator 1 Remove the water line by pressing the coupler 1 and pulling the water line 2 away Do not cut the water line Gently separate it from the coupler DA99 01584A HM P EN 0 4 indd 10 2009 9 30 4 31 33 PM ...

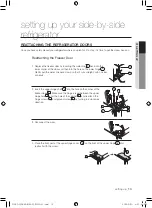
Page 11: ...Freezer door closed remove the upper hinge cover 1 using a screwdriver and then disconnect the wires by gently pulling them apart 2 7 6 Be careful not to pinch the water tubing and wire harness on the door 2 Remove hinge screws 3 and the ground screw 4 by turning counter clockwise and take off the upper hinge 5 Be careful that the door does not fall on you as you are removing it 3 Next remove the ...

Page 12: ...inge cover 1 using a screwdriver 2 Remove hinge screws 2 and the ground screw 3 by turning counter clockwise and take off the upper hinge 4 Be careful that the door does not fall on you as you are removing it 4 2 3 1 4 Remove the lower hinge 7 from the bracket 8 by gently lifting the lower hinge upwards DA99 01584A HM P EN 0 4 indd 12 2009 9 30 4 31 42 PM ...

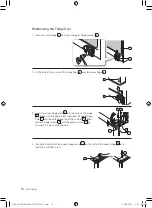
Page 13: ...the lower hinge 2 Gently pull the water line back down so that it runs straight with no kinks or bends 2 Insert the upper hinge shaft 3 into the hole on the corner of the freezer door 4 Make sure the hinge is level between the upper hinge hole 5 and the hole of the cabinet 6 and reattach the hinge screws 7 and ground screw 8 by turning in a clockwise direction 3 Reconnect the wires 4 Place the fro...

Page 14: ...t 5 into the hole on the hinge 6 Make sure the hinge is level between the upper hinge hole 7 and the hole on the top of the cabinet 8 Then reattach hinge screws 9 and the ground screw 10 by turning it in a clock wise direction 4 Place the front part of the upper hinge cover 11 on the front of the upper hinge 12 and reattach it with the screw 1 2 3 4 12 11 DA99 01584A HM P EN 0 4 indd 14 2009 9 30 ...

Page 15: ...water line 1 into the coupler 2 Reattaching the Front Leg Cover Before attaching the cover check water connector for leakage Replace the front leg cover by turning the three screws clockwise as shown in the figure 01 SETTING UP Front Leg Cover Screw 2 1 DA99 01584A HM P EN 0 4 indd 15 2009 9 30 4 31 53 PM ...

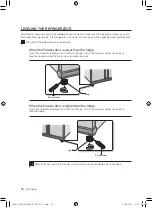
Page 16: ...tor is also adjustable When the Freezer door is lower than the fridge Insert a flat blade screwdriver into a notch on the Leg turn it clockwise or counter clockwise to level the freezer turning the three screws counter clockwise When the Freezer door is higher than the fridge Insert a flat blade screwdriver into a notch on the Leg turn it clockwise or counter clockwise to level the fridge Refer to...

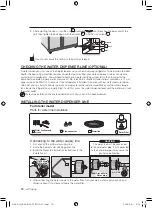
Page 17: ...ble to unscrew the nut 1 with your fingers 2 Adjust the height difference between the doors by turning the bolt 2 clockwise or counter clockwise When you turn clockwise the door will move up 3 2 1 Wrench Bolt Nut 3 2 Wrench Bolt setting up your side by side refrigerator MaKing Minor aDJustMEnts to tHE Doors Remember a leveling refrigerator is necessary for getting the doors perfectly even If you n...

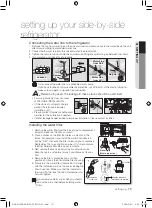
Page 18: ...with low water pressure below 138 Kpa you can install a booster pump to compensate for the low pressure Make sure the water storage tank inside the refrigerator is properly filled To do this press the water dispenser lever until the water runs from the water outlet Water Line installation Kits are included with unit You can find it in freezer drawer instaLLing tHE watEr DisPEnsEr LinE For Interior...

Page 19: ...ler Remove cap Water Line from unit Water Line from Kit No gap Loosen a Installing the water filter 1 Remove the water filter from the box and put a replacement indicator sticker on the filter as shown 2 Place a sticker on the filter that dates six months in the future For example if you install the water filter in March put the SEP sticker on the filter to remind you to replace in September That ...

Page 20: ...urifier lock clip WARRANTY INFORMATION This water line installation is not covered by the refrigerator or ice maker manufacturer s warranty Follow these instructions carefully to minimise the risk of expensive water damage Note If the coupler does not fit on the current tap go the nearest authorised service dealer and purchase the right couplers fittings COUPLER A TAP COUPLER SIDE OF PURIFIER WATE...

Page 21: ... line is secure make sure whether the water line is not excessively bent pinched or squashed CLIP A WATER LINE Connect the water line to the refrigerator Remove the compressor cover of the refrigerator Connect the water line to the valve as shown in the figure When connected check if there is any leakage If any repeat the connection Reattach the compressor cover of the refrigerator WATER LINE INST...

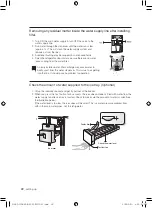
Page 22: ...rt from the water dispenser This is due to air getting into the line It should pose no problem to operation Check the amount of water supplied to the ice tray Optional 1 Lift up the icemaker bucket and gently pull out of the freezer 2 When you press the Test button for 3 seconds the ice cube container is filled with water from the water supply tap after ice tray is twisted Check to make sure the a...

Page 23: ...center 1 Place the refrigerator in an appropriate location with reasonable clearance between the wall and the refrigerator Refer to installation instructions in this manual 2 Once the refrigerator is plugged in make sure the interior light comes on when you open the doors 3 Set the temperature control to the coldest temperature and wait for an hour The freezer should get slightly chilled and the m...

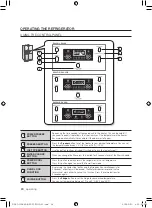
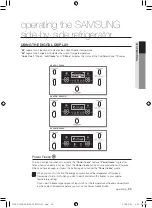
Page 24: ... 3 seconds to reset the filter schedule POWER COOL BUTTON Press this button to quickly return the refrigerator to the set temperature Press this button again to cancel the Power Cool mode CHILD LOCK FUNCTION By pressing the Power Cool button and the Fridge button simultaneously for 3 seconds all buttons will be locked The Water dispenser lever and the Ice lever will not work either To cancel this ...

Page 25: ... Power freeze feature Power freeze is great for times when you need a lot of ice Press the Power freeze button and ice production will increase When you have enough just press the button again to cancel the Power freeze mode When you use this function the energy consumption of the refrigerator will increase Remember to turn it off when you don t need it and return the freezer to your original temp...

Page 26: ...f ice or no ice that is currently chosen ControLLing tHE tEMPEraturE Controlling the Freezer temperature The freezer temperature can be set between 14 C 8 F and 25ºC 14 F to suit your particular needs Press the Freezer button repeatedly until the desired temperature is shown in the temperature display Keep in mind that foods like ice cream may melt at 16ºC 4 F The temperature display will move seq...

Page 27: ...ine with the dispenser to prevent the water from splashing out Do not put your fingers hands or any other unsuitable objects in the chute or ice maker bucket It may result in personal injury or material damage Never put finger or any other objects in the dispenser opening It may cause injury Use only the ice maker provided with the refrigerator The water supply to this refrigerator must only be in...

Page 28: ...nt Leg Cover sHELVEs anD Bins Freezer Vegetable Fruit Drawers Dairy Bin Z Shelf Optional Water Filter Optional Lamp Cover Glass Shelf CoolSelect Zone Drawer Optional Wine Shelf Optional Moving Shelf Optional Fridge Door Bins Egg Tray Beverage Station Optional DA99 01584A HM P EN 0 4 indd 28 2009 9 30 4 32 45 PM ...

Page 29: ... ice stored food should be wrapped securely and as airtight as possible To get more space you can remove top freezer drawers since it does not affect thermal and mechanical characteristics A declared storage volume of frozen food storage compartment is calculated with these drawers removed In case the model has Cool Select Zone do not insert a shelf to this rail or the shelf can collide with bever...

Page 30: ...handle large bulky items such as gallons of milk or other large bottles and containers Beverage Station OPTIONAL Bottles should be stored tightly together so that they do not tip and fall out when the refrigerator door is opened If you plan to go away for a significant time empty the refrigerator and turn it off Wipe the excess moisture from the inside of the appliance and leave the doors open Thi...

Page 31: ...rs 6hours 10hours 12hours WEIGHT 363g 0 8Ib 590g 1 3Ib 771g 1 7Ib 1000g 2 2Ib Thaw Button When thaw is selected warm and cold air is alternately blown into the CoolSelect Zone Drawer Depending on the weight of the frozen food you can select a 4 hrs 6 hrs 10 hrs and 12 hrs thawing time When thaw ends food is in a half frozen state making it easy to cut for cooking In addition when thaw ends the Coo...

Page 32: ... Drawer is kept at 32 F 0 C regardless of the overall temperature setting of the refrigerator This feature also helps keep meat or fish fresh for longer 3 When Cool is selected the temperature in the CoolSelect Zone Drawer will be the same as the overall temperature setting of the refrigerator The drawer digital panel shows the same temperature as that of the refrigerator display panel Since the C...

Page 33: ... up 3 Remove the Plastic drawer by pulling it out and slightly lifting it up 4 Remove the Icemaker bucket by lifting up and pulling it out 5 Remove the front leg Cover by opening both the freezer and refrigerator doors and removing the three screws Once the screws are free detach the cover To reattach the front leg cover place it back in its original position and tighten the three screws Do not us...

Page 34: ...up a little bit while pulling it forward and take it out of the refrigerator 3 Remove the Gallon Door Bin by holding the bin with both hands and gently lifting it up 4 The Z Shelf is attached to the cabinet wall Remove the wine shelf by sliding it up and gently lifting the shelf out of the tabs Be careful not to assemble the Z shelf with being switched top and bottom left and right Before removing...

Page 35: ...r should be polished once or twice a year Do not use Benzene Thinner or Clorox for cleaning They may damage the surface of the appliance and can create a risk of fire Cleaning the Soft touch type Home Bar Use a damp cloth to clean the ice and water dispenser Then wipe dry with a clean soft cloth Use soft touch type Home Bar as follow In the case of opening the Home Bar it will be opened automatica...

Page 36: ...up to 8 hours in a well ventilated area For best results repeat this process once or twice a year Cleaning behind the Refrigerator To keep cords and exposed parts free of dust and dirt accumulation vacuum behind the appliance once or twice a year Do not remove the back cover There can be a risk of electric shock If the cartridge dries in a confined or humid area there may be an odor to the cartrid...

Page 37: ...t major retail outlets Use replacement bulb size E17 Maximum 30 Watts for the Fridge compartment and size E26 Maximum 40 Watts for the Freezer compartment Changing the Interior Lights in the Refrigerator UPPER LIGHT The number of bulb is differ from the model 1 Push the lamp cover in on both sides to disengage the clips 2 After changing the bulb reattach the light cover LOWER OPTIONAL 1 Remove the...

Page 38: ...u with the freshest cleanest water from your fridge 1 Remove the water filter from the box and put a month indicator sticker on the filter as shown 2 Place a sticker on the filter that dates six months in the future For example if you are replacing the water filter in March put the SEP September sticker on the filter to remind you to replace in September Normally filter life is about every 6 month...

Page 39: ...enser This is due to air getting into the line It should pose no problem to operation Ordering replacement filters To order more water filter cartridges contact your authorized Samsung dealer using tHE Doors The refrigerator doors are equipped with a door opening and closing feature that ensures that the doors close all the way and are securely sealed After opening beyond a certain point the door ...

Page 40: ...nt corners of the refrigerator to prevent condensation Is the refrigerator door ajar Condensation can occur when you leave the door open for a long time Ice is not dispensing Did you wait for 12 hours after installation of the water supply line before making ice Is the water line connected and the shut off valve open Did you manually stop the ice making function Make sure Ice Type is set to Cubed ...

Page 41: ...circuit diagram RSH K J RSH F D DA99 01584A HM P EN 0 4 indd 41 2009 9 30 4 34 13 PM ...

Page 42: ...circuit diagram RSH B N RSH1Z DA99 01584A HM P EN 0 4 indd 42 2009 9 30 4 34 44 PM ...

Page 43: ...circuit diagram RSH1V S RSH1P U DA99 01584A HM P EN 0 4 indd 43 2009 9 30 4 35 21 PM ...

Page 44: ...rm to the environment or human health from uncontrolled waste disposal please separate this from other types of wastes and recycle it responsibly to pro mote the sustainable reuse of material resources Household users should contact either the retailer where they purchased this prod uct or their local government office for details of where and how they can take this item for environmentally safe r...

Reviews: