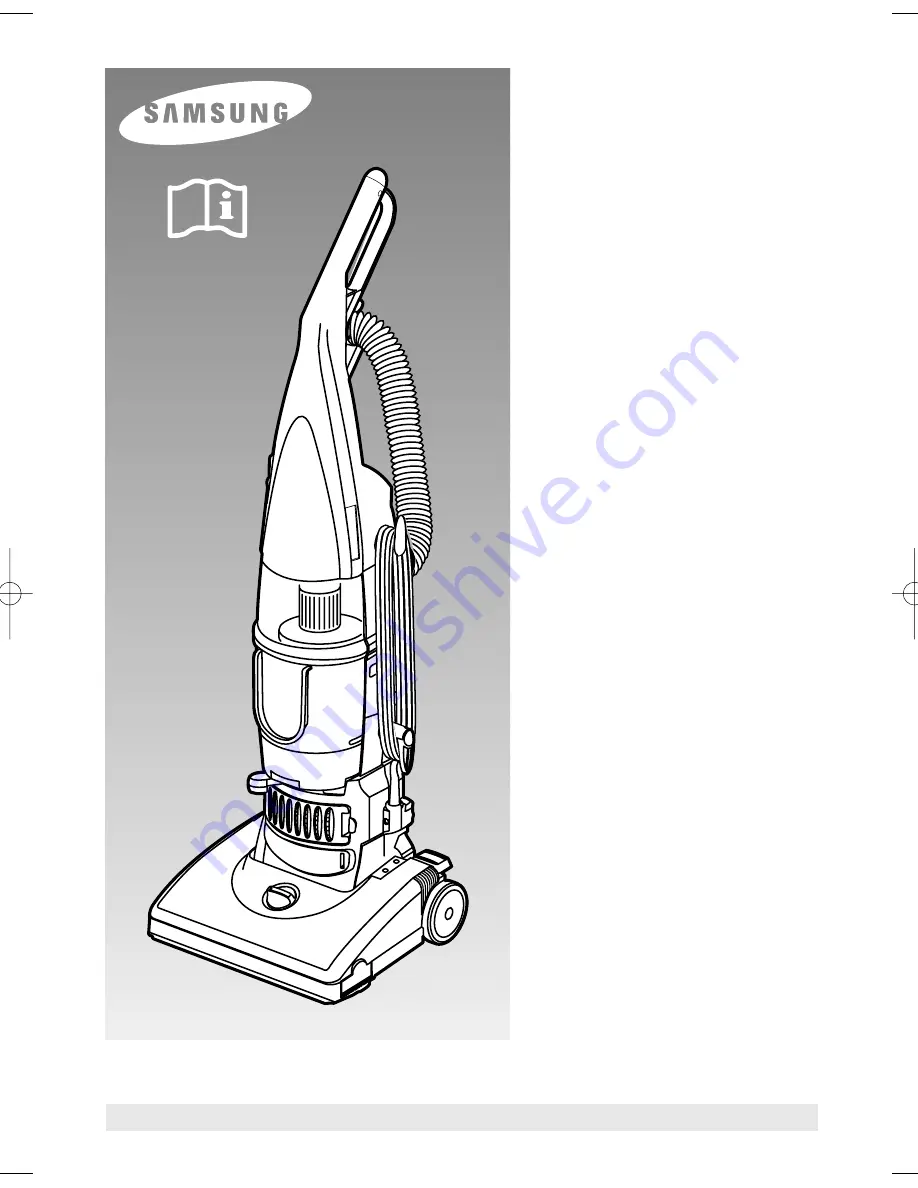
background image

Vacuum

Cleaner

SU-2900 Series

FOR HOUSEHOLD USE ONLY

Operating

Instructions

Read these instructions before operating the vacuum cleaner

The design and specification may be different depending on the models.

IMPORTANT SAFETY INSTRUCTIONS................................1

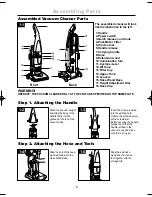
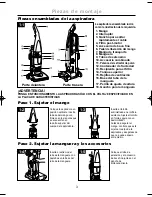
ASSEMBLING PARTS .............................................................2

ASSEMBLED VACUUM CLEANER PARTS ........2

ATTACHING THE HANDLE ..........................2

ATTACHING THE HOSE AND TOOLS.......2

O P E R A T I O N ........................................................................3
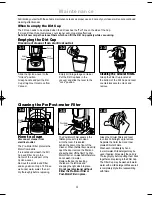
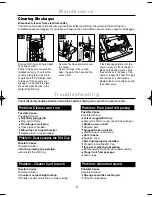
M A I N T E N A N C E ..................................................................4
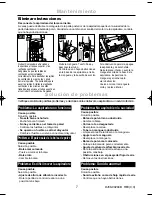
T R O U B L E S H O O T I N G .....................................................6

Register your product at www.samsung.com/global/register

DJ68-00294B(EN)(0.0) 


2005.3.15 

3:47 

PM 


페이지1

Summary of Contents for SU-2900 Series

Page 1: ...vacuum cleaner The design and specification may be different depending on the models IMPORTANT SAFETY INSTRUCTIONS 1 ASSEMBLING PARTS 2 ASSEMBLED VACUUM CLEANER PARTS 2 ATTACHING THE HANDLE 2 ATTACHING THE HOSE AND TOOLS 2 OPERATION 3 MAINTENANCE 4 TROUBLESHOOTING 6 Register your product at www samsung com global register ...

Page 2: ...openings and moving parts Do not pick up anything that is burning or smoking such as cigarettes matches or hot ashes Do not use without dirt cup or filters in place Empty cup and clean filter frequently when picking up very fine materials such as powder Turn off all controls before unplugging vacuum cleaner Use extra care when cleaning on stairs Do not use to pick up flammable or combustible mater...

Page 3: ...THE VACUUM CLEANER ONLY AT THE VOLTAGE SPECIFIED ON THE NAMEPLATE Front Back Step 1 Attaching the Handle Stand the vacuum upright and slide the base of the handle firmly into the grooves at the top of the vacuum body Insert the screw provided into the existing hole Tighten the screw securely with a screwdriver Before securing the handle please check that the handle is fitted to the vacuum body and...

Page 4: ... backtostartagain lowerfrontofcleaner and use only forward strokes Carpet height adjustment Carpet and rug cleaning takes place at the nozzle A When it is necessary to raise and lower the nozzle for various carpet pile heights rotate the nozzle control dial B to the desired setting Formaximumcleaningperformance The followingcarpetheightsettingsarerecommended Lowestsetting foralltypesofcarpet Highe...

Page 5: ...th the Dirt Cup and Filter Cup in the Center of the round part of the Cyclone Lever Remove the small round Filter and any debris on top of it Rinse well under warm water then air dry thoroughly before replacing The Post Motor Filter assists in the filtation process to return clean air to the room It is located behind the door on the front of the Cleaner When the filter becomes dirty open the door ...

Page 6: ...ectrical outlet Move the edge of a card across bottom plate while turning agitator To maintain cleaning effectiveness replace agitator if brushes do not touch card Grasp agitator firmly and fit it into position by first sliding the end opposite the belt into the rectangular slot F on side of cleaner Pull other side of agitator G into place Turn agitator making sure belt is not pinched between agit...

Page 7: ...ht down to remove If the Louvers are missing or not locked into place check and clear the tube in the center of the Dirt Cup 3 14 3 16 Problem Cleaner won t run Possible Cause Possible Solution Not firmly plugged in Plug unit in firmly No voltage in wall plug Check fuse or breaker Blown fuse or tripped breaker Replace fuse or reset breaker Problem Poor job of dirt pickup Possible Cause Possible So...

Page 8: ......

Page 9: ... ASPIRADORA 3 SUJETAR EL MANGO 3 SUJETAR LA MANGUERA Y LOS ACCESORIOS 3 FUNCIONAMIENTO 4 MANTENIMIENTO 5 SOLUCIÓN DE PROBLEMAS 7 Gane premios cuando registre su producto en www samsung com global register Lea estas instrucciones antes de poner en funcionamie nto la aspiradora El diseño y las especificaciones pueden variar dependiendo de los modelos ...

Page 10: ...ca ble No toque el enchufe ni la aspiradora con las manos mojadas No introduzca ningún objeto en las aberturas de la aspiradora No la ponga en funcionamiento si tiene alguna abertura bloqueada Manténgala libre de polvo pelusas cabellos y cualquier otro elemento que pudiera reducir el flu jo de aire Mantenga el cabello la ropa holgada los dedos y cualquier parte del cuerpo alejados de las a bertura...

Page 11: ...e servicio técnico o una persona con calificación similar para evitar un riesgo No use el aparato si se cayó se dañó o se hundió en agua No utilice el aparato en un espacio cerrado lleno de vapores emitidos por una pintura a base d e aceite un disolvente de pintura algunas sustancias a prueba de polillas polvo inflamable u ot ros vapores explosivos o tóxicos GUARDE ESTAS INSTRUCCIONES Esta aspirad...

Page 12: ...NAMIENTO LA ASPIRADORA SÓLO CON EL VOLTAJE ESPECIFICADO EN LA PLACA DE CARACTERÍSTICAS Parte delantera Parte trasera Paso 1 Sujetar el mango Coloque la aspiradora en posición vertical e inserte la base del mango con firmeza en las ranuras que se encuentran en la parte superior del cuerpo de la aspiradora Inserte el tornillo suministrado en el orificio existente Ajuste el tornillo en forma segura c...

Page 13: ...entede la aspiradora y haga sólo movimiento s hacia delante Ajuste de la altura de la alfombra La limpieza de las alfombras y tapetes se realiza en el frente de la aspiradora A En caso de ser necesario elevar y bajar el frente de la aspiradora para las distintas alturas de pelo de la alfombra rote l a perilla de control de altura B a la posición deseada Paraobtenerelmáximodesempeñodelimpieza Posic...

Page 14: ... protege el motor de los desechos Está ubicado debajo del Contenedor de Suciedad y el recipiente para el filtro en el centro de la parte circular de la palan ca del extractor de polvo Quite el filtro circular pequeño y cualquier desecho que quede sobre él Enjuáguelo bien con agua caliente y séquelo bi en antes de volver a colocarlo El filtro post motor ayuda en el proceso de filtración para devolv...

Page 15: ...una tarjeta a lo ancho de la placa inferior mientras hace girar el agitador Para mantener una limpieza eficaz reemplace el agitador si las escobillas no tocan la tarjeta Tome el agitador con firmeza y colóquelo insertando primero el extremo opuesto a la correa en la ranura rectangular F en el costado de la aspiradora Coloque el otro lado del agitador G en su lugar Haga girar el agitador para asegu...

Page 16: ...cto Rote la perilla de control de altura a una posición más baja Problema Es difícil mover la aspiradora 3 15 DJ68 00294B REV 0 0 Eliminar obstrucciones Desconecte la aspiradora del tomacorriente A veces puede obstruirse la manguera de la parte posterior de la aspiradora que lleva la suciedad de la parte delantera a la bolsa de polvo Si advierte un cambio en el sonido del motor de la aspiradora co...

Reviews: