background image

Aerial

SV-650GS

SV-455G/455GS/254G/254GS

TV

LINE IN 1

VIDEO

       AUDIO

LINE OUT

TV

LINE IN 1

VIDEO            AUDIO

LINE OUT

R          L

Aerial

RF

coaxial

cable

TV

2

GB

11

GB

10

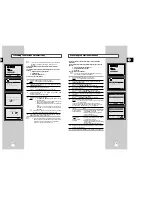
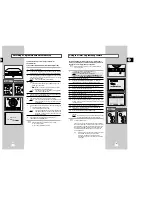
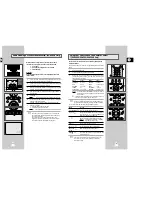
Deciding How to Connect Your VCR

You must take into account various factors when connecting audio or video systems:

Types of connectors available on your systems

Systems connected permanently to the VCR (satellite receiver for example) or temporarily
(camcorder for example)

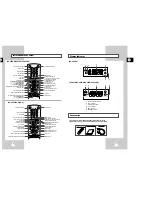
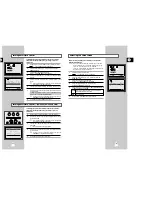
Your VCR is equipped with the following connectors.

Connector

Location

Type

Direction

Recommended Use

LINE IN 1

Rear

Audio/Video RCA

In

Satellite receiver

Television

Other VCR

LINE IN 2

Front

Audio/Video RCA

In

Audio system

Camcorder

Audio/Video

Rear

Audio/Video RCA

Out

Television

output

Other VCR

Audio system

OUT TO TV

Rear

75 

Out

Television 

coaxial

IN FROM ANT. Rear

75 

In

Aerial

coaxial

Cable television network

Satellite receiver

Whenever you connect an audio or video system to your VCR, ensure that all elements are
switched off.

Refer to the documentation supplied with your equipment for detailed connection instructions
and associated safety precautions.

TV

VIDEO                             AUDIO

LINE IN 2

LINE IN 1

VIDEO            AUDIO

R          L

LINE IN 1

VIDEO

       AUDIO

LINE IN 1

VIDEO

       AUDIO

LINE OUT

LINE IN 1

VIDEO            AUDIO

LINE OUT

R          L

LINE IN 2

VIDEO      L - AUDIO - R   

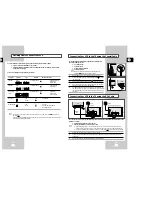
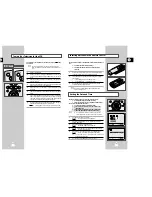
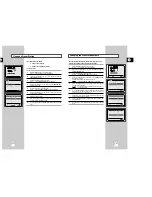
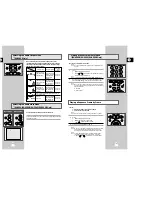
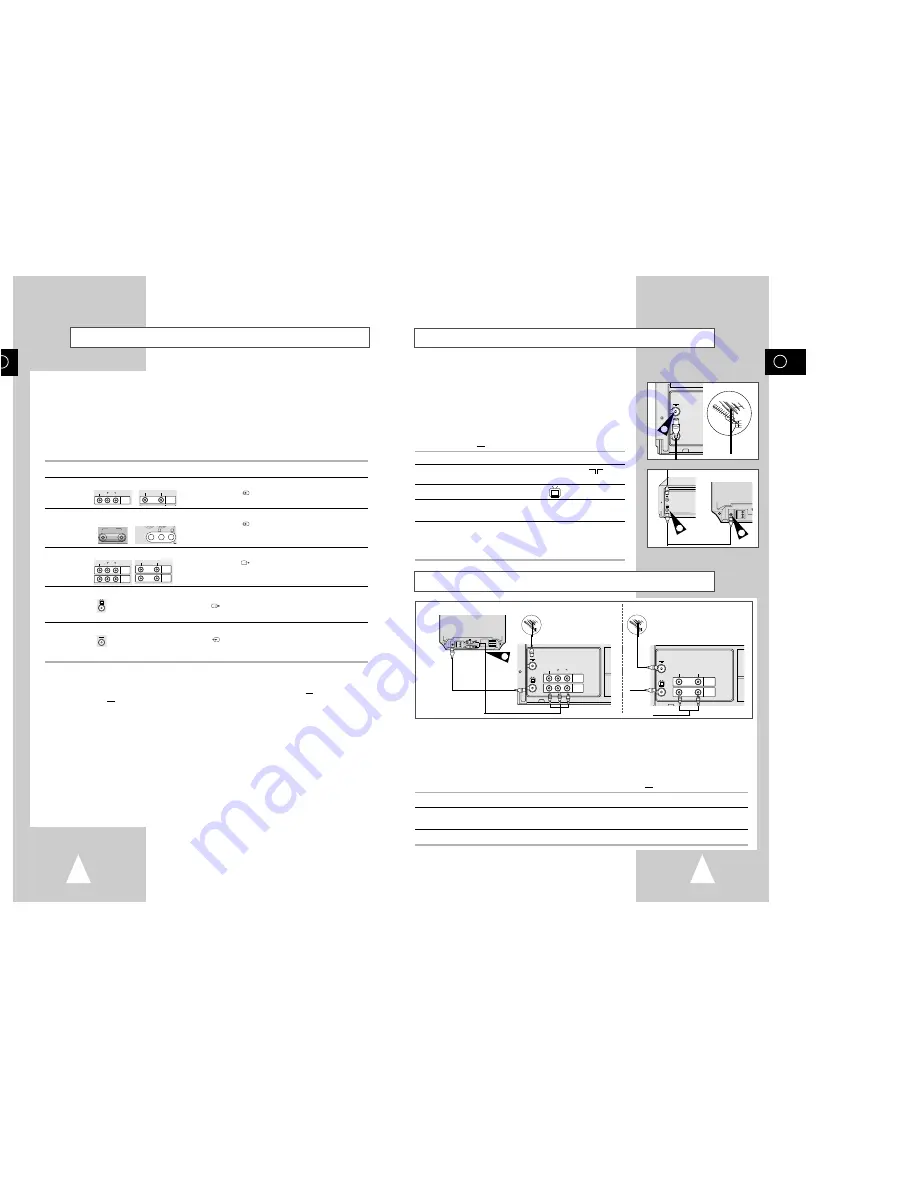
Connecting Your VCR to the TV using the Coaxial Cable

To receive television programmes a signal must be received from
one of the following sources:

An outdoor aerial

An indoor aerial

A cable television network

A satellite receiver

Make sure that both the television and the VCR are
switched off before connecting the cables.

1

Remove the aerial or network input cable from the television.

2

Connect this cable to the 75

coaxial socket marked 

on the 

rear of your VCR.

3

Plug the coaxial cable supplied into the 

socket on your VCR.

4

Plug the other end of the coaxial cable into the connector
previously used for the aerial on the television.

5

To obtain better quality pictures and sound on your television, you
can also connect your VCR to the television via the RCA cable
(see section below) if your television is equipped with this type of
connection.

TV

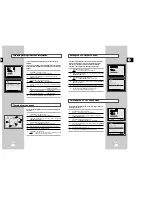
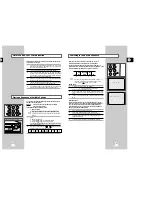
Connecting Your VCR to the TV using the RCA Cable

You can connect your VCR to the television using the RCA cable if the appropriate input is available on the
television. You thus:

Obtain better quality sound and pictures

Simplify the setting up procedure of your VCR

Regardless of the type of connection chosen, you must always connect the coaxial cable
supplied. Otherwise, no picture will be visible on the screen when the VCR is switched off.

Make sure that both the television and the VCR are switched off before connecting the cables.

1

Connect the coaxial cable as indicated in the above section.

2

Connect one end of the RCA Audio/Video cable to the Video output and Audio output socket on the rear
of the VCR.

3

Plug the other end into the appropriate connector on the television.

TV

LINE IN 1

VIDEO

       AUDIO

LINE OUT

4

2

TV

TV

LINE IN 1

VIDEO

       AUDIO

LINE OUT

3

Summary of Contents for SV-254G

Page 1: ...VIDEO CASSETTE RECORDER SV 650GS SV 455G SV 455GS SV 254G SV 254GS Instruction Manual www samsungvcr com PAL PAL NTSC ...

Page 2: ...ding Speed 22 Protecting a Recorded Cassette 23 Recording a Programme Immediately 23 Recording a Programme with Automatic Stop 24 Using the Timer Programming Feature 25 Checking a Preset Recording 26 Cancelling a Preset Recording 26 GB 2 About this manual Thank you for purchasing a Samsung Video Cassette Recorder VCR Your Owner s Instructions contain much valuable information on setting up and usi...

Page 3: ...ng Picture Alignment Manually 27 Intelligent Picture Control 28 Intelligent Picture Control SV 254G SV 254GS Only 28 Selecting the Colour Mode 29 Selecting the Audio Output Mode SV 650GS Only 30 Selecting the Audio Mute Mode SV 455G SV 455GS SV 254G SV 254GS Only 30 SEARCHING FOR A SEQUENCE Playing a Cassette in Slow Motion SV 650GS SV 455G SV 455GS Only 31 Playing a Sequence Frame by Frame 31 Pic...

Page 4: ...COMPARTMENT STANDBY ON BUTTON REW BUTTON STOP BUTTON PAUSE STILL BUTTON RECORD BUTTON FF BUTTON PROGRAMME SELECTION BUTTONS LINE IN 2 VIDEO AUDIO INPUT SOCKETS PLAY BUTTON VIDEO CASSETTE COMPARTMENT EJECT BUTTON PLAY BUTTON SHUTTLE RING STANDBY ON BUTTON STOP BUTTON VIDEO CASSETTE COMPARTMENT REW BUTTON RECORD BUTTON EJECT BUTTON SHARPNESS BUTTON Rear View of the VCR SV 455G SV 455GS SV 254G SV 25...

Page 5: ...TON AUDIO DUBBING BUTTON SV 650GS ONLY TV STANDBY ON BUTTON INDEX BUTTON FRAME ADVANCE BUTTON TUNER LINE IN 1 LINE IN 2 SELECTION REPEAT SELECTION BUTTON PROGRAMME SELECTION TRACKING BUTTONS DISPLAY BUTTON PLAY PAUSE STILL BUTTON FAST FORWARD FORWARD SEARCH BUTTON MENU BUTTON MENU SELECTION UP BUTTON MENU SELECTION BUTTON OK BUTTON TIMER BUTTON STANDBY ON BUTTON SHUTTLE BUTTON V LOCK BUTTON CLEAR ...

Page 6: ... the following sources An outdoor aerial An indoor aerial A cable television network A satellite receiver Make sure that both the television and the VCR are switched off before connecting the cables 1 Remove the aerial or network input cable from the television 2 Connect this cable to the 75Ω coaxial socket marked on the rear of your VCR 3 Plug the coaxial cable supplied into the socket on your VC...

Page 7: ... stations that it has found 6 On completion press MENU twice to exit the menu TV TV LINE IN 1 VIDEO AUDIO LINE OUT AUTO SET UP PLEASE WAIT 60 I I END MENU CLOCK TUE 12 00 1 JAN 2002 END MENU 2 Connecting Other Equipment to Your VCR You can connect other audio and or video equipment to your VCR in different ways The following illustrations give a few examples of the connection possibilities The RCA...

Page 8: ... on the remote control on the battery with on the remote control 3 Replace the cover by aligning it with the base of the remote control and pushing it back into place Do not mix different battery types manganese and alkaline for example Inserting Batteries in the Remote Control OK REC MENU SPEED DUB TV VCR TIMER 2 2 2 1 3 2 CLOCK SET PROG OPTIONS INSTALL CLOCK BONUS LANG CLOCK CLOCK TUE 12 00 1 JA...

Page 9: ...onding or buttons until the TV SYSTEM option is selected 5 Press the button to select G or K 6 On completion press MENU twice to exit the menu Selecting the RF OUT Sound Mode Displaying Hiding On Screen Information Choosing Your Language You can change the language in which information is displayed on the screen 1 Press MENU on the remote control Result The programming menu is displayed 2 Press th...

Page 10: ...n stored 11 On completion press the MENU button three times to exit the menu INSTALL AUTO SET UP MANUAL SET UP TV SYSTEM G VCR OUTPUT CH CH36 END MENU TV STATION TABLE PR CH 1 002 2 3 4 5 SWAPPING OK DELETE CLR RST MENU MANUAL TUNING PR 1 CH MFT MEMORY OK END MENU Presetting the Stations Automatically You do not need to preset the stations if you have already set them automatically see Plug Auto S...

Page 11: ... MENU button three times to exit the menu INSTALLATION PROG OPTIONS INSTALL CLOCK BONUS LANG INSTALL OK END MENU AUTO SET UP MANUAL SET UP TV SYSTEM G VCR OUTPUT CH CH36 END MENU TV STATION TABLE PR CH 1 002 2 3 4 5 SWAPPING OK MENU TV STATION TABLE PR CH 1 2 3 002 4 5 SWAPPING OK MENU If you have stored a TV station That you do not require At the wrong programme position you can cancel it 1 Press...

Page 12: ... The record indicator appears on the television and VCR display An index is recorded on the tape see page 33 7 To stop recording press once If the cassette is ejected when you start recording check that the safety tab is intact or the opening is covered with adhesive tape If you reach the end of the tape while recording the cassette rewinds automatically Selecting the Cassette Type If you wish to ...

Page 13: ... for 20 minutes and switch to LP mode for the remaining 40 minutes SPEED DUB TV VCR TIMER 1 PROG 1 JAN MON 21 28 PR DAY START STOP L1 MO 1 12 00 12 50SP DELETE CLR RST MENU VCRSTANDBY ON SLO SHUT V LO STANDBY ON SLO SHUT V LO 15 15 TIMER PROGRAMMING PROG OPTIONS INSTALL CLOCK BONUS LANG PROG OK END MENU Recording a Programme with Automatic Stop 3 LENGTH 2 30 SET LENGTH PRESS REC OK REC MENU SPEED ...

Page 14: ... MENU 3 2 REPEAT L PROG TRK DISP A TRK IPC TRK PROG UDIO A TRK IPC INPUT REPEAT TRK PROG AUDIO DISPLAY Checking a Preset Recording Cancelling a Preset Recording PROG 1 JAN MON 21 28 PR DAY START STOP L1 MO 1 12 00 12 50SP SET DELETE CLR RST MENU PROG 1 JAN MON 21 28 PR DAY START STOP L1 MO 1 12 00 12 50SP SET DELETE CLR RST MENU You can check your preset recordings When you have finished presettin...

Page 15: ...responding or buttons until the IPC option is selected 5 Press the button to select the IPC intelligent picture control option When intelligent picture control mode is ON the sharpness of the image is adjusted automatically 6 To adjust the sharpness manually press the button to turn the IPC mode OFF 7 Press the or buttons until the picture is displayed according to your preferences To adjust the s...

Page 16: ... SLOW as many times as required to decrease or increase the speed respectively To return to the normal speed press the II button twice 2 When playing back in slow motion picture interference may occur Press the PROG TRK or buttons to minimize this effect When you have been using the Slow Motion function for more than about five minutes the VCR will automatically play to protect the Cassette Video ...

Page 17: ... located 3 When an Index mark is found the VCR will playback the tape for 5 seconds after which it will continue searching for the next Index mark 4 If you want to watch the tape from a particular Index simply press II Index Skip Search This feature will enable you to fast forward rewind to a specific point on a tape E g if you have recorded 3 different programmes on a tape and you have rewound th...

Page 18: ... to the start point INTERVAL REPEAT is displayed Interval Repeat Play Auto Repeat Play AUTO POWER OFF OFF REPEAT PLAY OFF NO OF INTERVAL REPEAT 5 END MENU BONUS AUTO POWER OFF OFF REPEAT PLAY OFF NO OF INTERVAL REPEAT 5 END MENU BONUS EASY OPERATION PROG OPTIONS INSTALL CLOCK BONUS LANG BONUS OK END MENU EASY OPERATION PROG OPTIONS INSTALL CLOCK BONUS LANG BONUS OK END MENU The tape counter Indica...

Page 19: ...ropriate input on your VCR LINE IN 1 for the rear input LINE IN 2 for the front input 5 Start playing back the cassette to be copied 6 Hold REC down for a while to start recording on your VCR 7 When you have finished recording press on both VCRs If you wish to view the cassette being copied Your VCR must be connected as usual to the television see page 10 for further details Using the Assemble Edi...

Page 20: ...ion directly Using the TV Buttons on the Remote Control SV 650GS SV 455G SV 455GS Only VCRSTANDBY ON TVSTANDBY ON SLOW SHUTTLE V LOCK CLR RST F ADV INDEX TV VCR INPUT REPEAT SELECT TV VCR INPUT REPEAT VOL PROG TRK AUDIO DISP CLR RST F ADV INDEX TV VCR INPUT REPEAT VOL PROG TRK AUDIO DISP SELECT TV VCR INPUT REPEAT VOL PROG TRK AUDIO DISP 1 2 2 6 6 7 3 5 5 4 GB 38 With the Audio Dubbing function yo...

Page 21: ...43 dB SP Better than 43 dB SP Horizontal resolution More than 240 lines More than 240 lines AUDIO Input 8 dBm 47 Kohm unbalanced 8 dBm 47 Kohm unbalanced Output 8 3 dBm 1 Kohm unbalanced 8 3 dBm 1 Kohm unbalanced Wow and flutter WTD 0 4 max SP 0 4 max Signal to noise ratio 68 dB min IHF A filter 42 dB min IHF A filter Frequency response 20Hz 30kHz 100Hz 8kHz Power requirement 100 240V 50 60 Hz 100...

Page 22: ...201 R1 V L 49 75 OIRT 202 R2 V L 59 25 OIRT 203 R3 V L 77 25 OIRT 204 R4 V L 85 25 OIRT 205 R5 V L 93 25 OIRT 206 R6 V H 175 25 OIRT 207 R7 V H 183 25 OIRT 208 R8 V H 191 25 OIRT 209 R9 V H 199 25 OIRT 210 R10 V H 207 25 OIRT 211 R11 V H 215 25 OIRT 212 R12 V H 223 25 OIRT 244 M4 V H 163 25 Morocco 245 M5 V H 171 25 Morocco 246 M6 V H 179 25 Morocco 247 M7 V H 187 25 Morocco 248 M8 V H 195 25 Moro...

Page 23: ...THIS APPLIANCE IS DISTRIBUTED BY www samsungvcr com AC68 01823P ELECTRONICS ...

Reviews: