background image

29

28

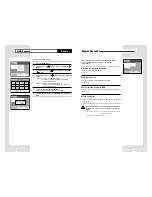
Set the TV channel

Set-Up

You can set air/cable TV channel in manual or automatically.
Also you can add or remove channels.

1

Press the MENU button.

2

Select Set-Up using 

buttons, then press the ENTER or  

buttons.

3

Select Channel using 

buttons, then press the ENTER or 

buttons.

4

See below  submenu setup.
Select mode using 

buttons, then press the ENTER or 

buttons.

Output CH

• Select output channel to TV tuner.(21 ~ 69CH)
• Set out channel to TV using 

buttons, then press the

ENTER button.

• Make sure connect RF coaxial cable between DHR and TV.

Auto Setup

Audio Options

Display Options

Auto CH Search

Please Wait

50%

lnstructions

Enter

Return

Menu

Exit

Move

Menu

Photo Album

Set-Up

Digital Recorder

lnstructions

Audio Options

Display Options

Language

DVD Player

Channel

Juke Box

Clock Setting

Auto Set-up

Manual Set-up

Output CH

Buffer Time

HDD Format

Enter

Return

Menu

Exit

Move

Output CH

60

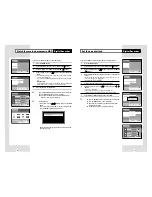
Auto Set-up

• The 

DHR

will automatically search for all available 

channels in the selected Tuner Band. 

This procedure may take a few minutes to complete.

• When finished, the lowest channel found will be displayed.

Manual Set-up

• Search & setup individual channel option in manual
• Set channels using 

➛❿

or 0~9 buttons, then press the

ENTER button to save.

Menu

Photo Album

Set-Up

Digital Recorder

lnstructions

DVD Player

Juke Box

Enter

Return

Menu

Exit

Move

Menu

lnstructions

Enter

Return

Menu

Exit

Photo Album

Set-Up

Digital Recorder

Buffer Time

Audio Options

Display Options

Language

DVD Player

Channel

Juke Box

Clock Setting

HDD Format

Move

Menu

lnstructions

Enter

Return

Menu

Exit

Photo Album

Set-Up

Digital Recorder

Audio Options

Display Options

Language

DVD Player

Channel

Juke Box

Clock Setting

Auto Set-up

Manual Set-up

Output CH

Buffer Time

HDD Format

Move

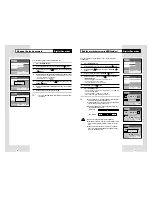
Set the clock

Set-Up

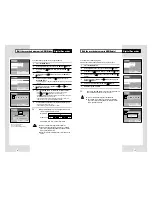
Set the time-shift buffering time

Set-Up

You can adjust present time and see it thru front panel display.
To use timer recording, you have to set the clock.

1

Press the MENU button.

2

Select Set-Up using 

buttons, then press the ENTER or 

buttons.

3

Select Clock Setting using 

buttons, then press the ENTER 

or 

buttons.

4

Select Manual Clock using 

➛❿

buttons, then press the 

ENTER button.

5

Adjust present time using 

➛❿

buttons, then press the 

ENTER button.

◆ 

Follow this information if you have chosen manual
clock. Auto Clock is a function that plucks time
information from the TV signal and automatically
synchronizes the clock based on that information. 
This function may not work depending on the
broadcast region. This function cannot be used if a
broadcast signal is not received by the antenna.

You never miss live TV programs. 

DHR memorizes live TV

programs for 30 min up to 2 hours.

1

Press the MENU button.

2

Select Set-Up using 

buttons, then press the ENTER or 

buttons.

3

Select Buffer Time using 

buttons, then press the ENTER

or 

buttons.

4

Select hours using 

buttons, then press the ENTER or 

buttons.

• Over the selected buffer time, erased from starting scene of buffer.
• The shorter buffer time will be helpful to save HDD’s recording 

space 

• The default buffer time is 1 hour.

◆ 

Press the Return button to move to the start buffered
position.

Menu

lnstructions

Photo Album

Set-Up

Digital Recorder

Buffer Time

Audio Options

Display Options

Language

DVD Player

Channel

Juke Box

Clock Setting

HDD Format

Auto Clock

Manual Clock

Enter

Return

Menu

Exit

Move

Auto Clock

On                

Off

Menu

lnstructions

Move

Enter

Return

Menu

Exit

Digital Recorder

DVD Player

Juke Box

Photo Album

Set-Up

Clock Setting

Buffer Time

Audio Options

Display Options

HDD Format

Language

Channel

Auto Clock

Manual Clock

Clock Setting

2002

01

01

1 2

: 0 0

Time     Date     Month    Year

Menu

lnstructions

Photo Album

Set-Up

Digital Recorder

Buffer Time

Audio Options

Display Options

Language

DVD Player

Channel

Juke Box

Clock Setting

HDD Format

Enter

Return

Menu

Exit

Move

Menu

lnstructions

Photo Album

Set-Up

Digital Recorder

Audio Options

Display Options

Language

DVD Player

Channel

Juke Box

Clock Setting

30 Min

1 Hr

1 Hr 30 Min

2 Hr

Off

Buffer Time

HDD Format

Enter

Return

Menu

Exit

Move

It can be taken a few seconds when the buffer time is changed.

Summary of Contents for SV-DVD40

Page 1: ...THIS APPLIANCE IS DISTRIBUTED BY www samsungdvd com AK68 00076F ELECTRONICS User s Manual DVD HDD Recorder DVD H40E...

Page 2: ...he plug with the fuse cover omitted if the cover is detachable If a replacement fuse cover is required it must be of the same colour as the pin face of the plug Replacement covers are available from y...

Page 3: ...broadcasting Simply press the Pause button II when you leave and when you return DVD H40 will instantly replay what you missed while you were away 2 Recorded Program List If customer record the video...

Page 4: ...time DVD H40 allows MP3 music from CD to be downloaded into HDD as many as consumer wants Max capacity of HDD for MP3 10GB If user include his her favorite photos in the same music folder then user ca...

Page 5: ...e below GUI screen 8 Connection to DVC or DSC Connecting DSC or DVC through A V Input port enables to enjoy and edit those video programs simply through TV screen Limited to 20 string Indicates select...

Page 6: ...Disc Copy 46 Preset of DVD language 47 Set the parental lock 48 Change the lock password 49 Using the Disc Title Menu 50 3D Sound Function 50 Selecting the Audio Language 51 Selecting the Subtitle La...

Page 7: ...naming your MP3 files do not exceed 15 characters and place mp3 as the file extension General name format of Title mp3 When composing your title make sure that you use 15 characters or less Use a deco...

Page 8: ...OR Rear View of the DHR DVD HDD Recorder Accessaries You have just purchased a SAMSUNG DHR Together with your DHR you will find the following accessaries in the box REMOTE CONTROL BATTERIES AUDIO VIDE...

Page 9: ...PLAY LIST button 28 RETURN button 29 MARK button 30 ANGLE button 31 AUDIO button 32 JOG SHUTTLE F W D 1 2 3 4 7 6 5 8 9 10 11 12 13 14 15 16 29 30 31 19 20 21 22 23 24 25 26 27 32 28 17 18 You must in...

Page 10: ...l must be received from one of the following sources An outdoor aerial An indoor aerial A cable television network A satellite receiver Make sure that both the television and the DHR are switched off...

Page 11: ...to select an external source VOL or Used to adjust the volume of the television PROG Up or Down Used to select the required channel TV MUTE Used to toggle the sound on and off The various functions wi...

Page 12: ...el of the DHR 2 Choose one of the following methods to connect the DHR to your TV RF Connection Connect the supplied RF antenna cable from the OUT TO TV jack on the rear panel of the DHR to your telev...

Page 13: ...nventional Audio CD CDDA is inserted it is automatically played back as the File List is displayed on the screen For MP3 or Photo CDs a desired file must be selected for playback once the File List is...

Page 14: ...anguage 1 Press the MENU button 2 Select Set Up using buttons then press the ENTER or buttons 3 Select Language using buttons then press the ENTER or buttons 4 Select language you want to change using...

Page 15: ...the MENU button 2 Select Set Up using buttons then press the ENTER or buttons 3 Select Clock Setting using buttons then press the ENTER or buttons 4 Select Manual Clock using buttons then press the E...

Page 16: ...p lnstructions Language Channel Clock Setting Buffer Time Audio Options Display Options Aspect Ratio OSD Message Front Display Video Out System HDD Format Move Enter Return Menu Exit Front Display On...

Page 17: ...page 35 36 Edit the recorded program in HDD You can combine divide delete or partial delete saved programs see page 37 40 Record TV program You can record TV programs by timer recording function or V...

Page 18: ...light play Select program then press the P LIST button The selected program will be played for 5 seconds in every 5 minutes length 5 Press Text button to change title Press the RETURN button to go bac...

Page 19: ...to one so play programs continuously 1 Press the MENU button 2 Select Digital Recorder then press the ENTER or buttons 3 Select Edit using buttons then press the ENTER or buttons 4 Select Combine the...

Page 20: ...rded program in HDD Delete White Unselected part Blue Selected part Red Current playback position Digital Recorder Edit the recorded program in HDD Divide Digital Recorder Live TV control will be stop...

Page 21: ...on Edit the recorded program in HDD Partial Delete Digital Recorder Original file Delete parts After delete A A B C A A A You can record TV programs in the HDD Make sure present time is set 1 Press th...

Page 22: ...or buttons 3 Select Recording using buttons then press the ENTER or buttons 4 Select VideoPlus then press the ENTER or buttons 5 Enter the program s VideoPlus code to record then press ENTER button R...

Page 23: ...ource using the INPUT SEL button for a satellite tuner or external video source Result The channel number is displayed and the programme can be seen on the television 4 Hold the REC button down for a...

Page 24: ...election Audio language DVD title s audio language selection Sub Title DVD title s subtitle language selection 4 Select language using buttons then press the ENTER button Press the RETURN button to go...

Page 25: ...layer Disc Language Juke Box Audio Language Lock Setting Change Password Lock Setting Level 8 Unlock Adult Kid Safe Level 7 Level 6 Level 5 Level 4 Level 3 Level 2 Level 1 Enter Return Menu Exit Move...

Page 26: ...with all DVDs How to have the same audio language comes up whenever you play DVD titles See Disc Language Audio Language Sub Title on page 47 You can select a desired subtitle quickly and easily with...

Page 27: ...AY PAUSE button Pause Press the ll PLAY PAUSE button on the remote control during playback The picture will Pause and the audio will mute To resume playback press the ll PLAY PAUSE button If the playe...

Page 28: ...ngle button when an angle icon is shown at the upper right hand corner then angle selection icon will be appeared at the upper left hand corner 2 Select desired screen angle using buttons 3 To turn of...

Page 29: ...7 You can play MP3 files in HDD You also make your own play list or edit MP3 files easily View the MP3 file list in HDD You can display saved MP3 files list in HDD and play see page 58 Edit the MP3 fi...

Page 30: ...le selection If you select folder then it shows you included files in folder 5 Press the P LIST button The selected files are displayed in selected order and play the first file All files in the folde...

Page 31: ...m CD to HDD You can copy MP3 files from CD to HDD 1 Press the MENU button 2 Select Juke Box using buttons then press the ENTER or buttons 3 Select Copy MP3 CD to HDD using buttons then press the ENTER...

Page 32: ...ou included file s folder 5 Press the P LIST button 8 files are display Select Next using buttons then press the Enter button to see the next 8 files Select Previous using buttons then press the Enter...

Page 33: ...ing Audio S N Above 70dB standard recording Audio frequency characteristics 20Hz 20KHz Disc DVD CD 12cm CD 8cm VIDEO CD 12cm DVD CD R 12cm CD RW 12cm Audio S N 95dB Audio dynamic range 105dB Menu lnst...

Page 34: ...g the reception of a TV program 7 The Copy key is pressed but does not respond The copy function will only work with DVDs but if they contain a copy protection signal the copy operation cannot be perf...

Page 35: ...are the consumers sole rights and Samsung its subsidiaries and distributors shall not be liable for indirect or consequential loss or any damage to records compact discs videos or audio taper or any...

Reviews: