background image

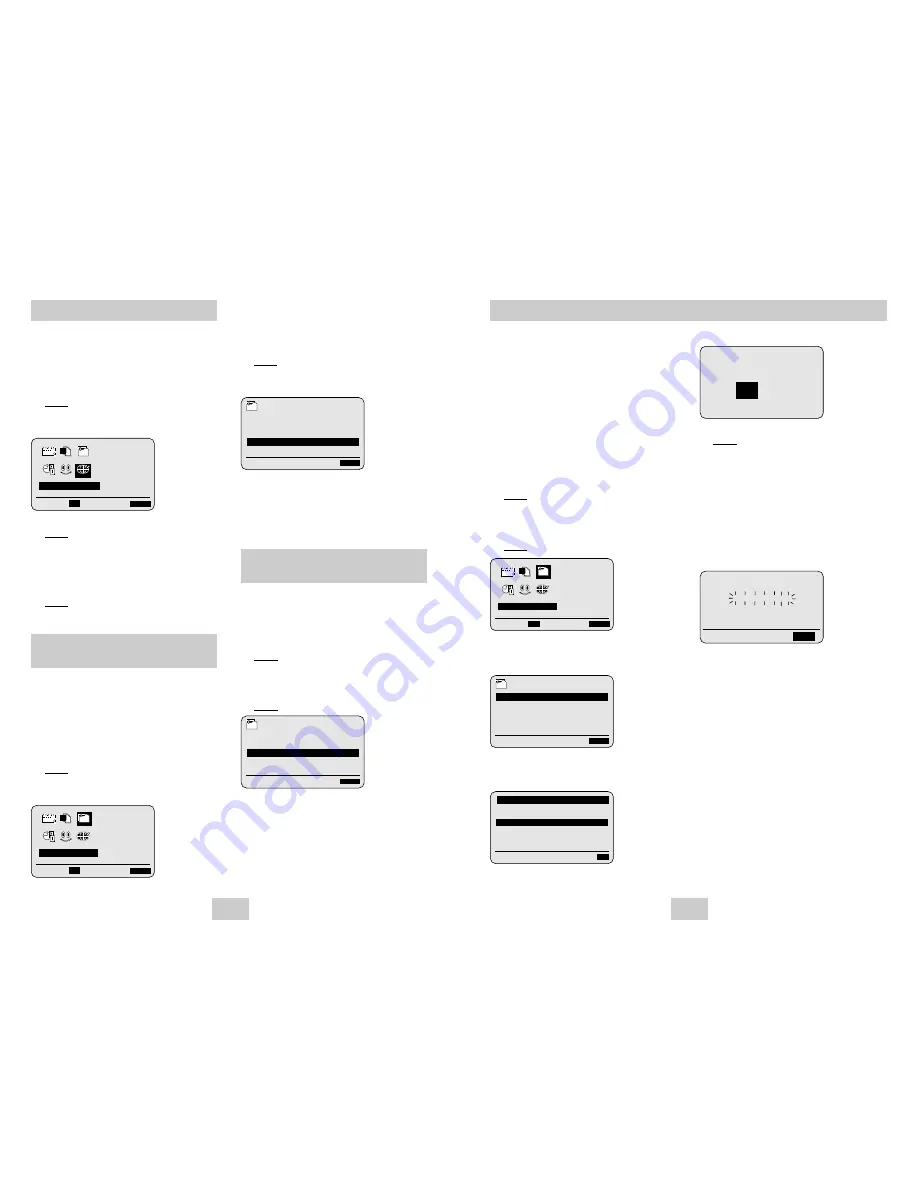
Your VCR output channel may need to be changed if the
pictures suffer from interference or if your TV cannot find
the pictures.  Also, you can change the VCR output
channel to adjust the frequency in which information is
displayed on the screen. 

1

Press MENU on the remote control.
Result: The programming menu is displayed.

2

Press the corresponding 

,

or 

buttons to

select the INSTALLATION option.

You can choose the sound mode (B/G or D/K )
according to the TV set connected to your VCR.

1

Press MENU on the remote control.
Result: The programming menu is displayed.

2

Press the corresponding 

,

or 

buttons to

select the INSTALLATION option.

3

Press the OK button to select this option.
Result: The INSTALLATION menu is displayed.

4

Press the corresponding 

or 

buttons, until 

the TV SYSTEM option is selected.

5

Press the 

button to select K or G.

6

On completion, press MENU twice to exit the 
menu.

3

Press the OK button to select this option.
Result: The INSTALLATION menu is displayed.

4

Press the corresponding 

or 

buttons, until the

VCR OUTPUT CH option is selected.

5

Select the required output channel by pressing the 

or 

buttons.

6

On completion, press MENU twice to exit the menu. 
Then tune your television again (see page 10).

ENG-13

ENG-12

Presetting the Stations Automatically

➛❿

OK

END:

MENU

PROG        OPTIONS     INSTALL

CLOCK       BONUS         LANG

   INSTALL

INSTALLATION

Setting the VCR Output
Channel

Setting the VCR Output
Channel

  INSTALL    

AUTO SET UP
MANUAL SET UP
TV SYSTEM     :G

VCR OUTPUT CH :CH36

END:

MENU

  INSTALL    

AUTO SET UP
MANUAL SET UP

TV SYSTEM     :K

VCR OUTPUT CH :CH36

END:

MENU

You can change the language in which information is
displayed on the screen.

1

Press MENU on the remote control.
Result: The programming menu is displayed.

2

Press the corresponding 

,

or 

buttons to

select the LANGUAGE SET option.

3

Press the OK button to select this option.
Result: The LANGUAGE SET menu is displayed.

4

Select the required language by pressing the 

or 

buttons.

5

Press OK to store the language selected.

6

Press MENU to exit the menu.
Result: From now on, all the on-screen information

will be displayed in the language selected.

➛❿

OK

END:

MENU

PROG        OPTIONS     INSTALL

CLOCK       BONUS         LANG

    LANG

LANGUAGE SET

Choosing Your Language

Selecting the RF OUT Sound
Mode (B/G-D/K)

6

Press OK to start the auto scanning.
Result:

The PLEASE WAIT indication flashes on

the television screen. 

The first frequency band is scanned and 

the first station found is displayed and 
stored.

The VCR then searches for the second 

station and so on.

When the automatic scanning procedure

has finished, the VCR switches 
automatically to programme  1.

➢ 

The number of stations automatically stored by the 

VCR depends on the number of stations that it has 
found.

7

If you wish to cancel the auto scanning before the 
end, press the MENU button three times to exit the 
menu.

◆ 

Once the auto scanning procedure has finished,
some stations may have been stored more than
once; select the stations with the best reception and
delete the ones no longer required (see page 15).

☛  

You do not need to preset the stations if you have

already set them automatically (see Plug & Auto

Set Up on page 10).

Your VCR contains a built-in tuner used to receive
television broadcasts. 

You must preset the stations received through the tuner.
This can be done:

Plug & Auto Set up (see page 10) 

Automatically

Manually  (see page 14)

You can store up to 80 stations.

1

Press the MENU button on the remote control.
Result: The programming menu is displayed.

2

Press the corresponding 

,

or 

buttons to

select the INSTALLATION option.

3

Press the OK button to select this option.
Result: The INSTALLATION menu is displayed.

4

Press the corresponding 

or 

buttons, until the

AUTO SET UP option is selected. Press the 

button to select this option.

5

Press the corresponding 

or 

buttons, to 

select the your SYSTEM SELECT. Press the OK
button to select this option.

AUTO SET UP

PLEASE WAIT

2

%

I--------------------I

END:

MENU

  INSTALL    

AUTO SET UP

MANUAL SET UP
TV SYSTEM

:K 

VCR OUTPUT CH 

:CH36

END:

MENU

** SYSTEM SELECT **

SYSTEM - B/G 

SYSTEM - D/K 

EXECUTE:

OK

YOUR DATA WILL BE LOST

PRESS  

OK

TO CONTINUE

MENU

TO EXIT

➛❿

OK

END:

MENU

PROG        OPTIONS     INSTALL

CLOCK       BONUS         LANG

   INSTALL

INSTALLATION

Summary of Contents for SV-M35K

Page 1: ...Video Cassette Recorder SV M625K SV M85K SV M35K www samsungvcr com Instruction Manual PAL SECAM ...

Page 2: ...ation Table 15 Recording Television Broadcasts Selecting the Cassette Type 16 Selecting the Recording Speed SV M625K SV M85K Only 16 NICAM SV M625KOnly 16 Recording a Programme Immediately 17 Protecting a Recorded Cassette 17 Recording a Programme with Automatic Stop 17 Using the Timer Programming Feature 18 Checking a Preset Recording 19 Cancelling a Preset Recording 19 Playing Back Playing a Cas...

Page 3: ...2 VIDEO INPUT SOCKET LINE IN 2 AUDIO INPUT SOCKETS Safety Instructions The following illustrations represent precautions The lightning bolt is a warning sign alerting you to dangerous voltage inside the product DO NOT OPEN THE DVD VCR Refer to service personnel Do NOT expose the DVD VCR to extreme temperature conditions below 5 C and above 40 C or to extreme humidity conditions less than 10 and mo...

Page 4: ... SELECTION BUTTON ENG 6 Rear View of the VCR TV LINE IN 1 AUDIO VIDEO LINE OUT R L AERIAL IN CONNECTOR OUT TO TV CONNECTOR AUDIO L R OUTPUT SOCKETS AUDIO L R INPUT SOCKETS VIDEO INPUT SOCKET VIDEO OUTPUT SOCKET SV M625K TV LINE IN 1 AUDIO VIDEO LINE OUT AUDIO OUTPUT SOCKET AUDIO INPUT SOCKET VIDEO OUTPUT SOCKET VIDEO INPUT SOCKET SV M85K SV M35K VCR STANDBY ON BUTTON SLOW BUTTON SV 4000 SV 940 ONL...

Page 5: ...ur VCR 4 Plug the other end of the coaxial cable into the connector previously used for the aerial on the television 5 To obtain better quality pictures and sound on your television you can also connect your VCR to the television via the RCA cable see section below if your television is equipped with this type of connection You have just purchased a SAMSUNG Video Cassette Recorder VCR Together wit...

Page 6: ...he power supply remains off for more than 1 hour SV M625K only The power supply remains off for more than 30 sec SV M85K SV M35K only Do not forget to reset the time when you change clocks from winter to summer time and vice versa 1 Press MENU on the remote control Result The programming menu is displayed 2 Press the corresponding or buttons to select the CLOCK SET option 3 Press the OK button to ...

Page 7: ...selected 6 Press MENU to exit the menu Result From now on all the on screen information will be displayed in the language selected OK END MENU PROG OPTIONS INSTALL CLOCK BONUS LANG LANG LANGUAGE SET Choosing Your Language Selecting the RF OUT Sound Mode B G D K 6 Press OK to start the auto scanning Result The PLEASE WAIT indication flashes on the television screen The first frequency band is scann...

Page 8: ...ging the Preset Station Table You do not need to preset the stations manually if you have already set them automatically To enable the VCR to decode a scrambled TV station the decoder must be switched on 1 Press the MENU button on the remote control Result The programming menu is displayed 2 Press the corresponding or buttons to select the INSTALLATION option 3 Press the OK button to select this o...

Page 9: ...ton down for a while to start recording Result The record indicator appears on the television screen and VCR display An index is recorded on the tape see page 23 6 Press the REC button several times to increase the recording time in 30 minute intervals up to four hours 1 hour intervals up to nine hours LP Result The length is displayed on the television displays The selected programme is recorded ...

Page 10: ...Switch on both the television and your VCR 2 Insert the video cassette to be played If the safety tab on the cassette is intact press ll Otherwise the cassette is played automatically When a cassette is loaded the tape position is optimized automatically to reduce disturbance Digital Auto Tracking When playing a cassette if the end of the tape is reached the cassette is rewound automatically NTSC ...

Page 11: ...ENU button on the remote control Result The programming menu is displayed 2 Press the corresponding or buttons to select the USER SET option 3 Press the OK button to select this option Result The USER SET menu is displayed 4 Press the corresponding or buttons until the IPC option is selected 5 Press the button to select the IPC intelligent picture control option When intelligent picture control mo...

Page 12: ...e playback speed using the Shuttle function up to nine times the normal speed Example You wish to analyze a sportsperson s technique movement by movement The Shuttle function is available on the Remote control No sound is heard when playing a sequence at variable speeds 1 Press ll during playback SHUTTLE to play the cassette backwards SHUTTLE to play the cassette forwards 2 Each time you press a S...

Page 13: ...wind to the sequence at which the counter was set to zero press or Some VCR information such as the counter can be displayed on the television screen unless you have deactivated the OSD mode refer to page 10 Press DISP or DISPLAY Once to display the current function programme number recording speed date time and counter Twice to display the counter only Three times to display the time remaining on...

Page 14: ...mote control until the MIX option is displayed see page 21 This function allows you to start a new recording at a specific position on the cassette while maintaining a very smooth scene change 1 Insert the cassette to be edited in your VCR 2 Press the ll button to start playback 3 When you reach the position from which you wish to start the new recording press the ll button 4 Press the F ADV butto...

Page 15: ...Output 1 0 0 2 Vp p 75 ohm unbalanced 1 0 0 2 Vp p 75 ohm unbalanced Signal to noise ratio Better than 43 dB SP Better than 43 dB Horizontal resolution More than 240 lines More than 240 lines AUDIO Input 8 dBm 47 Kohm unbalanced 8 dBm 47 Kohm unbalanced Output 8 3 dBm 1 Kohm unbalanced 8 3 dBm 1 Kohm unbalanced Wow and flutter WTD 0 4 max SP 0 4 max Signal to noise ratio 68 dB min IHF A filter 42 ...

Page 16: ... 201 R1 V L 49 75 OIRT 202 R2 V L 59 25 OIRT 203 R3 V L 77 25 OIRT 204 R4 V L 85 25 OIRT 205 R5 V L 93 25 OIRT 206 R6 V H 175 25 OIRT 207 R7 V H 183 25 OIRT 208 R8 V H 191 25 OIRT 209 R9 V H 199 25 OIRT 210 R10 V H 207 25 OIRT 211 R11 V H 215 25 OIRT 212 R12 V H 223 25 OIRT 244 M4 V H 163 25 Morocco 245 M5 V H 171 25 Morocco 246 M6 V H 179 25 Morocco 247 M7 V H 187 25 Morocco 248 M8 V H 195 25 Mor...

Page 17: ...ELECTRONICS THIS APPLIANCE IS DISTRIBUTED BY AC68 02131A ...

Reviews: