background image

Thank you for purchasing this Samsung product.

To receive more complete service, please register your product at www.samsung.com

Model                                                Serial No.                                               

If you have any questions, please call us at 1-800-SAMSUNG (1-800-726-7864) for assistance.

USER MANUAL

LSP7T / LSP9T

Summary of Contents for The Premiere LSP9T

Page 1: ...his Samsung product To receive more complete service please registeryour product at www samsung com Model Serial No If you have any questions please call us at 1 800 SAMSUNG 1 800 726 7864 for assistance USER MANUAL LSP7T LSP9T ...

Page 2: ...u can also useyourPC tovisit www samsung com and click Support On thewebsite you can download the manuals and see its contents onyourPC ormobile device Learningthe e Manual s assistancefunctions Search Select an item from the search results to load the corresponding page Index Select a keyword to navigate to the relevant page Sitemap It displays the lists foreach item in e Manual RecentlyViewed To...

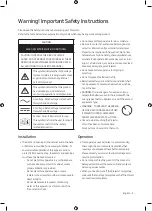
Page 3: ...unlight Do not placevessels vases etc containing wateron this apparatus as this can result in a fire orelectric shock Do not expose this apparatus to rain ormoisture Be sure to contact an authorized Samsung service centerforinformation ifyou intend to installyour Projectorin a locationwith heavydust high orlow temperatures high humidity chemical substances orwhere itwill operate 24 hours a daysuch...

Page 4: ...nds orsmells coming from it unplug it immediatelyand contact an authorized dealerorSamsung service center Be sure to pull the powerplug out of the outlet if the Projectoris to remain unused orifyou are going to leave the house foran extended period of time especiallywhen children elderly ordisabled people will be left alone in the house Accumulated dust can cause an electric shock an electric leak...

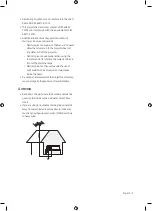
Page 5: ...ctor Notice is given to use cautionwhen using the remote control forstarting the projectorwhile in front of the projection lens Notice is given to the userto avoid the use of optical aids such as binoculars ortelescopes inside the beam Do not open ordisassemble the projectoras this may cause damage bythe exposure of laserRadiation Antenna Bend down the partwhere the outdoorantenna line goes into t...

Page 6: ...eyourwireless access point and network Youraccess point s manual should provide additional details about howto implement the following measures Secureyourwireless access point s management settingswith a unique password to prevent unauthorized changes to securityrelated settings Implement standard encryption e g WPA2 encryption onyourwireless access point to secureyourwireless network signal Secur...

Page 7: ...mote 10 Pairing the Projectorto the Samsung Smart Remote 11 Installing batteries into the Samsung Smart Remote 11 04 Installingthe Projector Image size and projection distance 13 Using the Powerbutton 14 Mounting the Projectoron awall 15 05 Troubleshooting and Maintenance Troubleshooting 16 06 Specifications and OtherInformation Specifications 17 Environmental Considerations 17 Decreasing powercon...

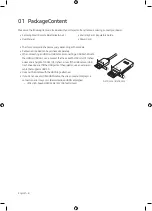
Page 8: ...ecting an HDMI orUSB cable orconnecting a USB flash drive to the HDMI orUSB port use a product that has awidth of18 mm 0 7 inches orless and a height of10 mm 0 3 inches orless If the USB cable orUSB flash drive does not fit the USB ports of the projector use an extension cable that supports USB 2 0 Use a certified cablewith the HDMI logo attached Ifyou do not use a certified HDMI cable the screen ...

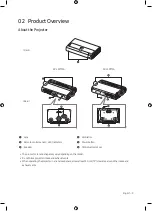
Page 9: ...2 Remote control sensor LED Indicators 5 Powerbutton 3 Speaker 6 Tilt Adjustment Foot The product colorand shape mayvarydepending on the model Do not block projectorintake and exhaustvents When operating the projectorin an enclosed space allowat least 50 cm 19 clearance around the intake and exhaustvents ...

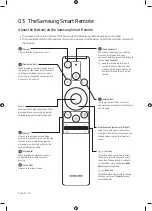
Page 10: ...content is playing Smart Hub Returns to the Home Screen Volume Move the button up ordown to adjust thevolume To mute the sound press the button When pressed in and held for1 second ormore the Accessibility Shortcuts menu appears Channel Move the button up ordown to change the channel To see the Guide screen press the button Select Selects orruns a highlighted item When pressedwhileyou arewatching ...

Page 11: ...d then press and hold the buttons labeled and as shown in the figure on the left simultaneouslyfor3 seconds ormore Installing batteries intothe Samsung Smart Remote To install the batteries push the rearcoveropen in the direction of the arrowat the bottom of the illustration and then insert the batteries as shown in the figure Make sure that the positive and negative ends are facing in the correct...

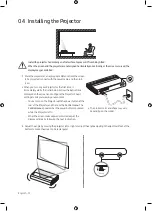
Page 12: ... Initial Setup Followthe instructions displayed on the screen and configure the Projector s basic settings to suityourviewing environment You can turn on the Projectorwith the powerbutton at the rearof the Projector and then use the Control menu The Control menu appearswhen the powerbutton is pressed while the Projectoris On When the screen looks skewed orblurred adjust the displaysettings byfollo...

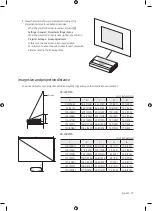
Page 13: ...on environment Screen SP LSP7TFA Unit inches mm C X Y A B 90 2286 78 4 1992 44 1 1121 9 7 247 13 7 349 95 2413 82 8 2103 46 6 1183 10 8 275 14 3 364 100 2540 87 2 2214 49 0 1245 11 9 303 14 9 379 105 2667 91 5 2324 51 5 1308 13 0 331 15 5 394 110 2794 95 9 2435 53 9 1370 14 1 359 16 1 409 115 2921 100 2 2546 56 4 1432 15 2 387 16 7 424 120 3048 104 6 2657 58 8 1494 16 3 415 17 3 439 SP LSP9TFA Uni...

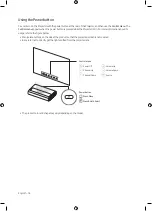
Page 14: ...rojectoris On Formore information about its usage referto the figure below Manipulate buttons on the side of the product so that the projected screen is not covered Be careful not to directlyget the light emitted from the projectorlens Control menu PowerOff Volume Up Channel Up Volume Down Channel Down Source Powerbutton Press Move Press Hold Select The product colorand shape mayvarydepending on t...

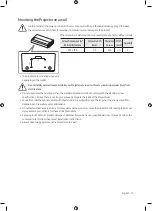
Page 15: ...injuryfrom electric shock Do not use screws that are longerthan the standard dimension ordo not complywith the standard screw specifications Screws that are too long maycause damage to the inside of the Projectorset Forwall mounts that do not complywith the standard screwspecifications the length of the screws maydiffer depending on thewall mount specifications Do not fasten the screws too firmly ...

Page 16: ...or Weak orNo Signal is displayed onthe Projector oryou cannotfind a channel Perform a Projectorself diagnosis to determine if the problem is caused bythe Projectororthe device Settings Support Device Care Self Diagnosis Picture Test orSound Test If the test results are normal make sure the connection to the device is correct and that all cables are fully inserted Remove and reconnect all cables co...

Page 17: ...Storage Temperature Storage Humidity 50 F to104 F 10 C to 40 C 10 to 80 non condensing 4 F to113 F 20 C to 45 C 5 to 95 non condensing Notes Design and specifications are subject to changewithout priornotice This device is a Class B digital apparatus Forinformation about the powersupply and more information about powerconsumption referto the information on the label attached to the product Forthe ...

Page 18: ... drawa small amount of power To decrease powerconsumption unplug the powercordwhenyou don t intend to use the Projectorfora long time Licenses The terms HDMI and HDMI High Definition Multimedia Interface and the HDMI Logo are trademarks orregistered trademarks of HDMI Licensing LLC in the United States and othercountries ...

Page 19: ...This page is intentionally left blank ...

Page 20: ...t Samsung Electronics America Inc 85 Challenger Road Ridgefield Park NJ 07660 accessibility contact information in U S A accessibility sea samsung com If you experience issues please do not take the Projector back to the store In the United States of America call us at 1 800 SAMSUNG 1 800 726 7864 orvisit us at www samsung com orwww samsung com spsn for support and warranty service 04 2020 Samsung...

Reviews: