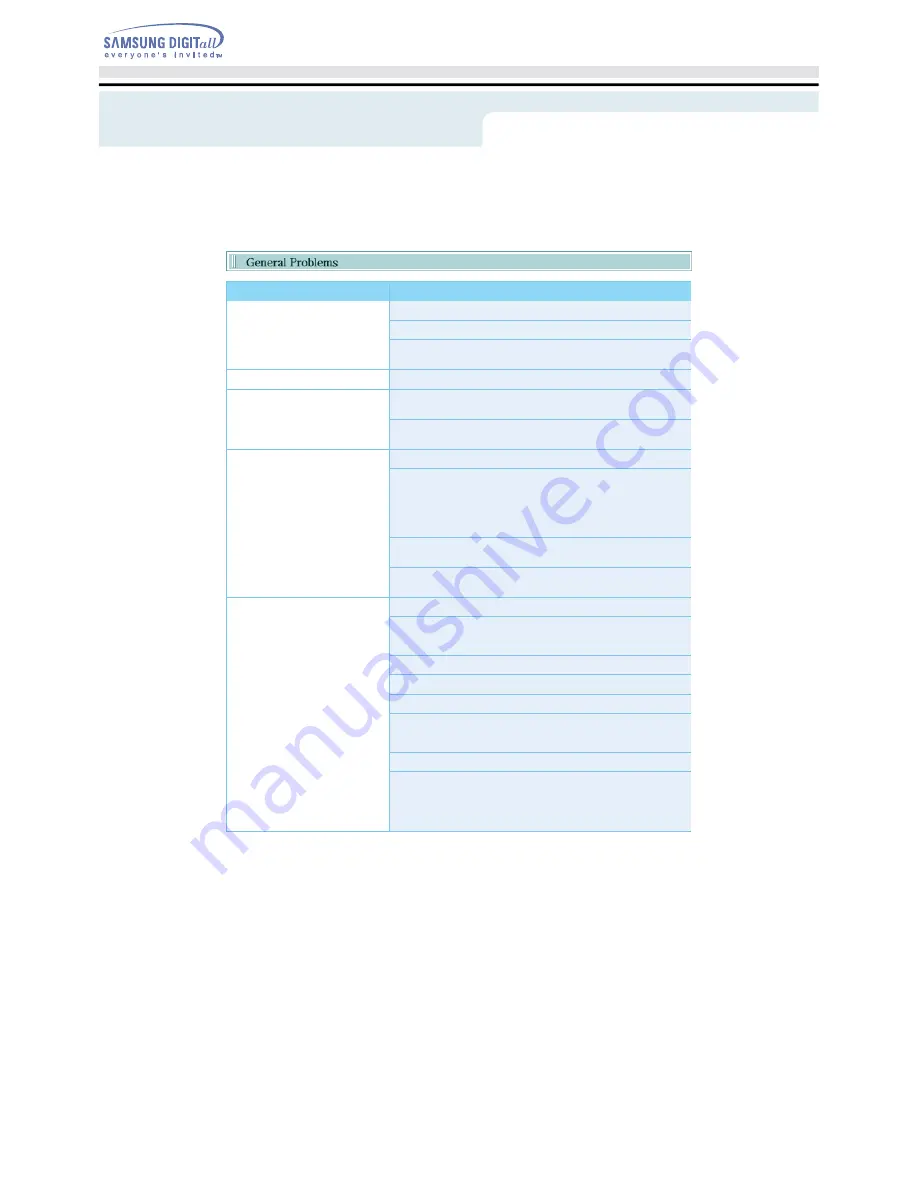
background image

Problem

Meaning / Solution

The tray won't open.

See if the PC on.

Make sure the power cable within the PC is connected properly.

If the tray still won't open with the power on, turn the power off and 
insert a pin(paper clip) into the emergency hole to open.

The tray won't close.

Make sure the disc has been inserted properly.

The PC is not working properly.

See if the jumper(s) is properly connected to the Master/Slave 
Selection port.

See if the drive is properly connected to the PC. 
See if the floppy disc remains in the PC.

The drive is not working properly.

See if the drive is connected properly to the PC.

See if the device drive program has been installed properly.

No sound is heard from an audio 
CD.

Check whether the audio cable is correctly connected to the sound 
output terminal on the drive and the sound card CD-IN terminal.

Check that the sound card is operational.

If the Digital CD Audio Output box is checked, no sound comes  
out of the analog audio outputterminal of the driver.

Check the condition of the CD and wipe the surface of the CD  
clean before use.

The Window OS can't detect the 
drive.

See if the device drive program has been installed properly.

Can be an OS problem. Try reinstalling the Windows OS program.

The system won't read the disc.

See if the system detects the drive.

Make sure you use the types of discs that are supported by the drive.

See if the on/off light turns into green.

Make sure you inserted the disc with the label facing up.

Make sure you are using the right program for disc playback.

See if the disc is clean.

See if any congealing has occurred.

Make sure the region code of the drive matches the disc number.

The drive is connected to the 
sound card but cannot seem to 
detect it.

Your sound card is using AT BUS interface. 
Connect the card to the E-IDE port or replace the card with a new 
card with the built-in E-IDE interface capacity.

Troubleshooting

Summary of Contents for TS-H542A

Page 1: ...Installing Device Driver and Confirming The Installation Firmware Update Confirming the Installation of Device Driver Installing the MS DOS device driver How To Use The DVD R RW Drive How to Use the...

Page 2: ...g way damage to home or property could result Important to read and understand at all times Do not disassemble Always make sure that the disc does not have a crack before use If the disc has a crack e...

Page 3: ...t it from severe shocks It can damage the drive or cause it to malfunction Do not place the drive in direct sunlight Avoid low or high temperature environments Avoid high humidity environments During...

Page 4: ...e sure to close all working programs before attempting to open the tray and always use the open close button Do not insert a pin into the emergency opening while in operation Do not insert hands in th...

Page 5: ...t the risk of fire do not spill such liquids as alcohol and benzene on the drive Do not disassemble attempt to repair or modify the device without express approval as directed in the manual To reduce...

Page 6: ...ower Port DVD R RW Drive 40 pin interface cable audio cable four screws to install the drive drive installation instruction sheets software programs software Nero Express 6 3 InCD 4 WinDVD Creator Win...

Page 7: ...ecifications Item Description OS Microsoft Windows 98 SE 2000 Me XP SP 1 0 or higher CPU 700 MHz or greater IBM compatible PC Recommendation Pentium4 2 0GHz or higher RAM 256Mbytes or greater HDD Acce...

Page 8: ...DVD R Media 12X 8X 4X 2 4X Taiyo Yuden RICOH Taiyo Yuden Mitsubishi Chemical RiTEK CMC RICOH Mitsubishi Chemical RiTEK CMC Prodisc Optdisc DVD RW Media 4X 2 4X RICOH Mitsubishi Chemical RiTEK CMC RIC...

Page 9: ...If necessary attach the support devices on both sides of the drive The support devices are PC accessories Purchase a pair if necessary SCREW M3 X 6 X 4 4 Insert the DVD R RW Drive after removing the p...

Page 10: ...RW Drive A Cutoff edges 1 5V DC 2 Ground 3 Ground 4 12V DC Improperly connected power cable may cause malfunction Check the direction of the power cable and the cutoff edges before connecting the cab...

Page 11: ...aster Slave port in the back of the DVD R RW Drive When you have one DVD R RW Drive Set it to MA Master a Master Drive Select the MA jumper b HDD c Motherboard d Primary 1 e Secondly 1 When you have o...

Page 12: ...ice using the host interface signal CSEL Connection to MA is recommended MA Master SL Slave CS Cable Select CSEL Connecting the Audio Cable When Connected to the Sound Card To listen to the sound from...

Page 13: ...u bar in the upper right hand corner 3 Click Download Live Update Full Version Click Firmware Downloads to manually download Firmware select a drive model from the list and click to start downloading...

Page 14: ...click on the Device Manager tab 3 Click DVD CD ROM drive in the Device Manager window 1 in the picture in the left appear if the driver is installed properly Windows XP 1 Go to Start Settings Control...

Page 15: ...in MS DOS and supports only the read function as in the case of a CD ROM drive We recommend that you not install the MS DOS device driver when you use the record function Manual Setup 1 Make the C SAM...

Page 16: ...2cm discs The drive cannot read the disc properly if any part of the disc is place outside the tray guiding line How to Use a Vertically Installed Drive This drive can be installed vertically You can...

Page 17: ...decoder software program Provided with WinDVD Recorder Use WinDVD Recorder to change the region code of the DVD R RW Drive DVD Region Protection Coding RPC The RPC feature is supported on DVD players...

Page 18: ...grams and a window as shown below appears Windows 98 Me Click the Add Remove button to remove the program Windows 2000 Click the Add Remove button to remove the program Windows XP Click the Add Remove...

Page 19: ...gn objects from the surface of the drive using soft cloth Do not use benzene paint thinner or any other solvents Cleaning the interior of the unit with such things as a cotton swab may cause failure o...

Page 20: ...r the direct sunlight Place it so that it sits on its side on a flat surface Do not scratch or place a label on the disc Handle the disc with caution to prevent damage from external shock Do not expos...

Page 21: ...e edge of the disc to hold Clean the disc lightly with soft cotton cloth starting from the center and move to the edge of the disc Use only disc cleaning liquids Do not use benzene paint thinner or an...

Page 22: ...ds Reading Green Blinks every 0 3 seconds Audio Playback Analog Mode Green Blinks every 0 3 seconds Audio Playback Digital Mode Green Blinks every 0 3 seconds Standby Off No Disc Off The indicator lig...

Page 23: ...sound card is operational If the Digital CD Audio Output box is checked no sound comes out of the analog audio outputterminal of the driver Check the condition of the CD and wipe the surface of the C...

Page 24: ...f the supported discs depends on the condition of the disc and the recording format of the drive Therefore the read write quality may not be perfect Fcc information to the user This equipment has been...

Reviews: