background image

English-8

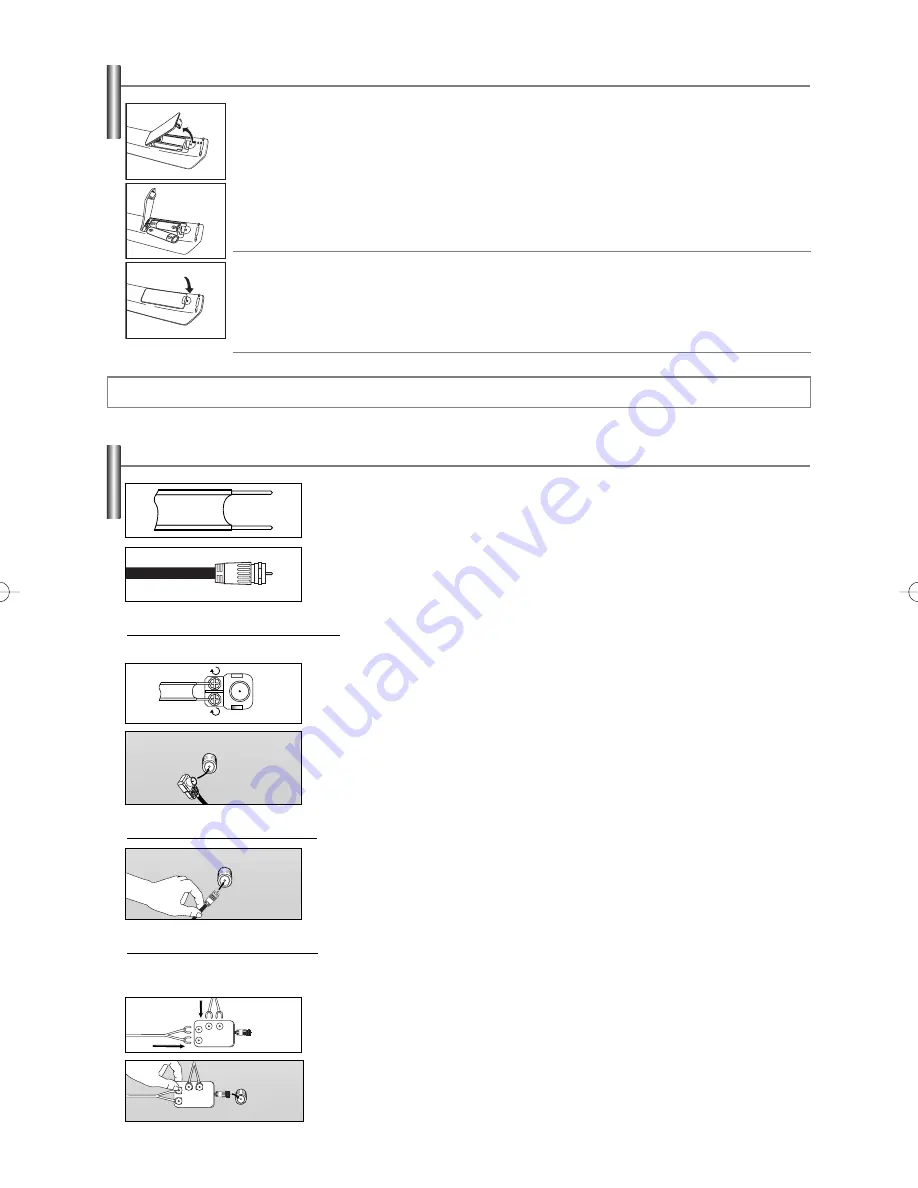
Installing Batteries in the Remote Control

1.

Lift the cover at the back of the remote control upward as shown in the figure.

2.

Install two AAA size batteries.

➢ 

Make sure to match the “+” and “–” ends of the batteries with the diagram inside the compartment.

3.

Replace the cover.

➢ 

Remove the batteries and store them in a cool, dry place if you won’t be using the remote control for a long time. 

The remote control can be used up to about 23 feet from the TV. 

(Assuming typical TV usage, the batteries last for about one year.)

➢ 

If the remote control doesn’t work, check the following:

1. Is the TV power on?
2. Are the plus and minus ends of the batteries reversed?
3. Are the batteries drained?
4. Is there a power outage, or is the power cord unplugged?
5. Is there a special fluorescent light or neon sign nearby?

Connections

Connecting VHF and UHF Antennas

1.

Place the wires from the twin leads under the screws on a 300-75

adapter (not

supplied). 
Use a screwdriver to tighten the screws.

2.

Plug the adaptor into the ANT IN terminal on the back of the TV.

If your antenna has a set of leads that look like this, see “Antennas with 300 Ω Flat Twin Leads”
below.

If your antenna has one lead that looks like this, see “Antennas with 75 Ω Round Leads”.
If you have two antennas, see “Separate VHF and UHF Antennas”.

Antennas with 300 

 Flat Twin Leads

If you are using an off-air antenna (such as a roof antenna or “rabbit ears”) that has 300 Ω twin flat leads, follow the directions below.

1.

Plug the antenna lead into the ANT IN terminal on the back of the TV.

Antennas with 75 

 Round Leads

1.

Connect both antenna leads to the combiner.

2.

Plug the combiner into the ANT IN terminal on the bottom of the back panel.

Separate VHF and UHF Antennas

If you have two separate antennas for your TV (one VHF and one UHF), you must combine the two antenna signals before connecting 
the antennas to the TV. This procedure requires an optional combiner-adaptor (available at most electronics shops).

UHF

VHF

UHF

VHF

ANT IN

ANT IN

ANT IN

AA68-03871A-00Eng  7/18/06  6:07 PM  Page 8

Summary of Contents for TX-S3064WR, TX-S3065WR

Page 1: ...Register your product at www samsung com global register Owner s Instructions TX S3064WR TX S3065WR COLOR TELEVISION ...

Page 2: ...ch as the dark side bars on non expanded standard format television video and programming should be limited to no more than 15 of the total television viewing per week Additionally viewing other stationary images and text such as stock market reports video game displays station logos web sites or computer graphics and patterns should be limited as described above for all televisions Displaying any...

Page 3: ... Viewing the Display 15 Viewing the Menus 15 Memorizing the Channels 16 To Select the Source 17 To Edit the Input Source Name 17 PICTURE CONTROL Using Automatic Picture Settings 18 Changing the Screen Size 19 Freezing the Current Picture 19 Digital Noise Reduction 20 Tilt 20 Setting the Film Mode 20 SOUND CONTROL Using Automatic Sound Settings 21 Customizing the Sound 21 Setting the SRS TruSurroun...

Page 4: ...s a virtual Dolby surround system Remote Control AAA Batteries Owner s Instructions Safety Guide Manual Warranty Cards Registration Card Not available in all locations Accessories Please make sure the following items are included with your TV If any items are missing contact your dealer S VIDEO Cable Video Cable Audio Cable Antenna Cable Component Cable The following parts are sold separately and ...

Page 5: ...e this button as you would use the ENTER button on the remote control 2 MENU Press to see an on screen menu of your TV s features 3 VOL Press to increase or decrease the volume In the on screen menu use the VOL buttons as you use the œ œ and buttons or ENTER button on the remote control 4 CH Press to change channels In the on screen menu use the CH button as you would use the and button on the rem...

Page 6: ...80i 480p 720p 1080i Connect Component audio and video 4 HDMI IN Connect to the HDMI jack of a device with an HDMI output 5 ANT IN Connect to an antenna air or cable TV system 1 S VIDEO Video inputs for external devices with an S Video output 2 AV IN 3 Video and audio inputs for external devices such as a camcorder or VCR Viewing the Connection Panel Side Panel Jacks Use the left side panel jacks t...

Page 7: ...nd mode 8 P MODE Press to select the picture mode 9 SRS Selects SRS TruSurround XT mode 0 MTS Press to choose stereo mono or Separate Audio Program SAP broadcast AUTO PROG Press to automatically store selected Air Cable channels ADD DEL Use to store and delete channels to from memory SOURCE Press to display all of the available video sources INFO Press to display information on the TV screen PRE C...

Page 8: ...rews on a 300 75 Ω adapter not supplied Use a screwdriver to tighten the screws 2 Plug the adaptor into the ANT IN terminal on the back of the TV If your antenna has a set of leads that look like this see Antennas with 300 Ω Flat Twin Leads below If your antenna has one lead that looks like this see Antennas with 75 Ω Round Leads If you have two antennas see Separate VHF and UHF Antennas Antennas ...

Page 9: ...ble 3 Connect an Antenna Cable between an OUTPUT terminal on the splitter and the IN terminal on the cable box Splitter Cable Box Incoming cable 4 Connect an Antenna Cable between the ANT OUT terminal on the cable box and the B IN terminal on the RF A B switch Splitter Cable Box RF A B Switch Incoming cable 5 Connect another cable between the other OUT terminal on the splitter and the A IN termina...

Page 10: ...n When connecting an external device match the color of the connection terminal to the cable Also you can connect to AV IN 3 on the side panel of TV 1 2 VCR Rear Panel TV Rear Panel Antenna Cable Not supplied Video Cable Not supplied Audio Cable Not supplied 2 3 4 5 Connecting an S VHS VCR Your Samsung TV can be connected to an S Video signal from an S VHS VCR This connection delivers a better pic...

Page 11: ...necting an external device match the color of the connection terminal to the cable Connecting a Camcorder The side panel jacks on your TV make it easy to connect a camcorder to your TV They allow you to view the camcorder tapes without using a VCR 1 Connect a Video Cable or S Video Cable between the AV IN 3 VIDEO or S VIDEO jack on the TV and the VIDEO or S VIDEO jack on the camcorder 2 Connect Au...

Page 12: ...nd supports multi channel digital audio Each external input source device has a different back panel configuration When connecting an external device match the color of the connection terminal to the cable When connecting via HDMI you do not need to connect Audio Cables You only need to connect Audio cables when connecting via HDMI DVI Audio Cable Not supplied or 1 Connecting a DVD Player Set Top ...

Page 13: ...button on the TV Plug Play Feature When the television is initially powered on three basic customer settings proceed automatically and subsequently setting the language channel and clock 1 Press the POWER button on the remote control The message Plug Play is displayed It flickers for a little while and then Language menu is automatically displayed 2 Press the or button to select the language then ...

Page 14: ... Start Plug Play displayed For further details on setting up options refer to the previous page Plug Play can only be accessed in the TV mode If you want to reset this feature Move Adjust Skip Clock Set Hour Minute am pm TV am Search Enter Skip Air 31 Stop 4 Press the ENTER button to select Start The TV will begin memorizing all of the available channels Press the ENTER button to stop After all th...

Page 15: ...he MUTE button Adjusting the Volume Viewing the Display 1 Press the INFO button on the remote control The TV will display the channel the type of sound and the status of certain picture and sound settings The display identifies the current channel and the status of certain audio video settings Press the INFO button once more or wait approximately 10 seconds and it disappears automatically Air 3 Mo...

Page 16: ...rizing channels selecting a broadcast source memorizing the channels automatic and adding and deleting channels manual Selecting the Video Signal source Before your television can begin memorizing the available channels you must specify the type of signal source that is connected to the TV i e an antenna or a cable system 1 Press the MENU button to display the menu Press the or button to select Ch...

Page 17: ...ed to the input jacks to make your input source selection easier 1 Press the MENU button to display the menu Press the ENTER button to select Input Press the or button to select Edit Name then press the ENTER button 2 Press the or button to select AV1 AV2 AV3 S Video Component1 Component2 or HDMI input jack then press the ENTER button 3 Press the or button to select VCR DVD Cable STB HD STB Sat ST...

Page 18: ... gauge will automatically disappear after about 10 seconds 4 Press the œ œ or button to decrease or increase the value of a particular item Each adjusted setting will be stored separately according to its input mode When you make changes to Contrast Brightness Sharpness Color or Tint OSD color will also be adjusted accordingly 5 Press the ENTER button to return to Mode 6 Press the or button to sel...

Page 19: ...ture on the screen Zoom2 Expands the Zoom1 format picture 4 3 Sets the picture to 4 3 normal mode Move Enter Return TV Picture Mode Dynamic Size 16 9 Digital NR On Tilt 0 Film Mode Off Move Enter Return TV Size 16 9 Zoom1 Zoom2 4 3 Viewing with a 16 9 signal When a 16 9 signal is received The illustrations below show the picture change while viewing a DVD title Viewing with a 4 3 signal When a 4 3...

Page 20: ... or button to select Off or On then press the ENTER button Press the EXIT button to exit Move Enter Return TV Picture Mode Dynamic Size 16 9 Digital NR On Tilt 0 Film Mode Off Move Enter Return TV Picture Mode Dynamic Size 16 9 Digital NR On Tilt 0 Film Mode Off Off On Move œ œ Adjust Return TV Picture Mode Dynamic Size 16 9 Digital NR On Tilt 0 Film Mode Off Move Enter Return TV Picture Mode Dyna...

Page 21: ...tandard Equalizer SRS Trusurround XT Off MTS Mono Auto Volume Off Move Enter Return TV Sound Mode Standard Equalizer SRS Trusurround XT Off MTS Mono Auto Volume Off Move Adjust Return TV Equalizer Move Enter Return TV Sound Mode Standard Equalizer SRS Trusurround XT Off MTS Mono Auto Volume Off Standard Music Movie Speech Custom Customizing the Sound The sound settings can be adjusted to suit your...

Page 22: ...rround sound experience through any two speaker playback system including internal television speakers It is fully compatible with all multichannel formats 1 Press the MENU button to display the menu Press the or button to select Sound then press the ENTER button 2 Press the or button to select SRS TruSurround XT then press the ENTER button 3 Press the or button to select Off or On then press the ...

Page 23: ...hen press the ENTER button 2 Press the or button to select Add Delete then press the ENTER button 3 Press the or button to select the channel to be add or erase 4 Press the ENTER button to move to the field 5 Press the ENTER button to add the channel The symbol next to the channel appears and the channel is added If you press the ENTER button again the symbol next to the channel disappears and the...

Page 24: ...just Return TV Name Air 1 A Air 2 Air 3 Air 4 Air 5 Fine Tuning Channel Reception 1 Press the MENU button to display the menu Press the or button to select Channel then press the ENTER button 2 Press the or button to select Fine Tune then press the ENTER button 3 To obtain a sharp and clear picture and good sound quality press the œ œ or button to reach the required setting The channel number is c...

Page 25: ...rent time will appear every time you press the INFO button 1 Press the MENU button to display the menu Press the or button to select Setup then press the ENTER button 2 Press the or button to select Time then press the ENTER button 3 Press the or button to select Sleep Timer then press the ENTER button 4 Press the or button to select the preset time interval Off 30 60 90 120 150 180 for staying on...

Page 26: ...et the hour then press the button to move to the next step Set other items using the same method as above Press the EXIT button to exit Auto Power Off When you set the timer On the TV will eventually turn off if no controls are operated for 3 hours after the TV was turned on by timer This function is only available in timer On mode and prevents overheating which may occur if a TV is on for too lon...

Page 27: ... you forget the PIN press the remote control buttons in the following sequence which resets the pin to 0 0 0 0 Power Off Mute 8 2 4 Power On Function Description Using the V Chip The V Chip feature automatically locks out programs that are deemed inappropriate for children The user must enter a PIN personal ID number before any of the V Chip restrictions are set up or changed Setting Up Your Perso...

Page 28: ...ing either of two methods The TV guidelines or the MPAA rating 1 Press the MENU button to display the menu Press the or button to select Setup then press the ENTER button 2 Press the or button to select V Chip then press the ENTER button The message Enter PIN will appear Enter your 4 digit PIN number 3 The V Chip screen will appear Press the or button to select TV Parental Guidelines then press th...

Page 29: ...V 14 and TV MA will automatically be blocked FV Fantasy violence D Sexually suggestive dialog L Adult language S Sexual situation V Violence 7 Press the EXIT button to clear all the screens Or proceed to the next section and set up additional restrictions based on the MPAA codes These categories consist of two separate groups TV Y and TV Y7 young children through age 7 and TV G through TV MA every...

Page 30: ... 4 Press the or button to select one of the categories then press the ENTER or button Press the or button to select B or U Press the EXIT button to exit The V Chip will automatically block any category that is more restrictive For example if you block the PG 13 category then R NC 17 and X will automatically be blocked also G General audience no restrictions PG Parental guidance suggested PG 13 Par...

Page 31: ... then PG 14 and 18 will automatically be blocked also E Exempt programming includes news sports documentaries and other information programming talk shows music videos and variety programming C Programming intended for children under age 8 C8 Programming generally considered acceptable for children 8 years and over to watch on their own G General programming suitable for all audiences PG Parental ...

Page 32: ...ive For example if you block 8 ans category then 13 ans 16 ans and 18 ans will automatically be blocked also E Exempt programming includes news sports documentaries and other information programming talk shows music videos and variety programming G General 8 ans Not recommended for young children 13 ans Programming may not be suitable for children under the age of 13 16 ans Programming is not suit...

Page 33: ...n Press the or button to select 1 or 2 then press the ENTER button Different channels and fields display different information Field 2 carries additional information that supplements the information in Field 1 For example Channel 1 may have subtitles in English while Channel 2 has subtitles in Spanish The availability of captions depends on the program being broadcast Press the EXIT button to exit...

Page 34: ...ect Language then press the ENTER button Press the or button to select the appropriate language English Español Português or Français then press the ENTER button Press the EXIT button to exit Move Enter Skip Setup Plug Play Language Time V Chip Caption More TV English Español Português Français Move Enter Return TV Setup More Blue Screen On Melody On Move Enter Return TV Setup More Blue Screen On ...

Page 35: ...n Check the antenna connections Make sure the MUTE button is off First check the volume of units connected to your TV digital broadcasting receiver DVD cable broadcasting receiver VCR etc Then adjust the TV volume accordingly Check all wire connections Unplug the TV for 30 seconds then try operating it again Make sure the wall outlet is working Replace the remote control batteries Clean the upper ...

Page 36: ...Center 1 800 SAMSUNG 7267864 1 800 SAMSUNG 7267864 Web Site www samsung com ca www samsung com Address Samsung Electronics Canada Inc Customer Service 55 Standish Court Mississauga Ontario L5R 4B2 Canada Samsung Electronique Canada Inc Service à la Clientèle 55 Standish Court Mississauga Ontario L5R 4B2 Canada Samsung Electronics America Inc 105 Challenger Road Ridgefield Park NJ 07660 0511 ...

Reviews: