Connections
y
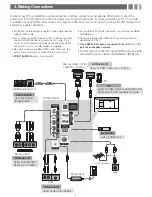
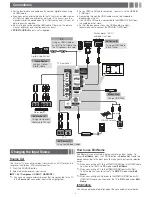
For the best picture and audio quality, connect digital devices using
an HDMI cable.
y
If you connect an external device to the TV that uses an older version
of HDMI, the video and audio may not work. If this occurs, ask the
manufacturer of the device about the HDMI version and, if it is out of
date, request an upgrade.
y
Be sure to purchase a certified HDMI cable. Otherwise, the picture
may not display or a connection error may occur.
y
PC/DVI AUDIO IN
input is not supported.
y
For an HDMI to DVI cable connection, you must use the
HDMI IN
2 (DVI)
port.
y
Connecting through the HDMI cable may not be supported
depending on the PC.
y
If an HDMI to DVI cable is connected to the
HDMI IN 2 (DVI)
port,
the audio does not work.
y
For Set-top box connection using HDMI cable, we highly
recommend you to connect the
HDMI IN 1 (STB)
port.
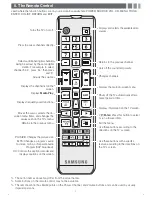
Changing the Input Source
Source List
Use to select TV or an external input source such as a DVD player / Blu-
ray player / cable box / STB satellite receiver.
1.
Press the
SOURCE
button.
2.
Select a desired external input source.
■
TV / AV / Component / HDMI1 / HDMI2/DVI
✎
You can only choose external devices that are connected to the TV.
In the
Source List
, connected inputs will be highlighted.
How to use Edit Name
Edit Name lets you associate a device name to an input source. To
access
Edit Name
, press the
TOOLS
button in
Source List
. Name the
device connected to the input jacks to make your input source selection
easier.
✎
When connecting a PC to the
HDMI IN 2(DVI)
port with HDMI cable,
you should set the TV to
PC
mode under
Edit Name
.
✎
When connecting a PC to the
HDMI IN 2(DVI)
port with HDMI
to DVI cable, you should set the TV to
DVI PC
mode under
Edit
Name
.
✎
When connecting an AV devices to the
HDMI IN 2(DVI)
port with
HDMI to DVI cable, you should set the TV to
DVI
mode under
Edit
Name
.
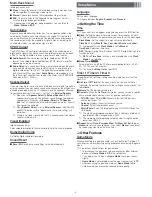
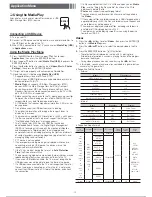
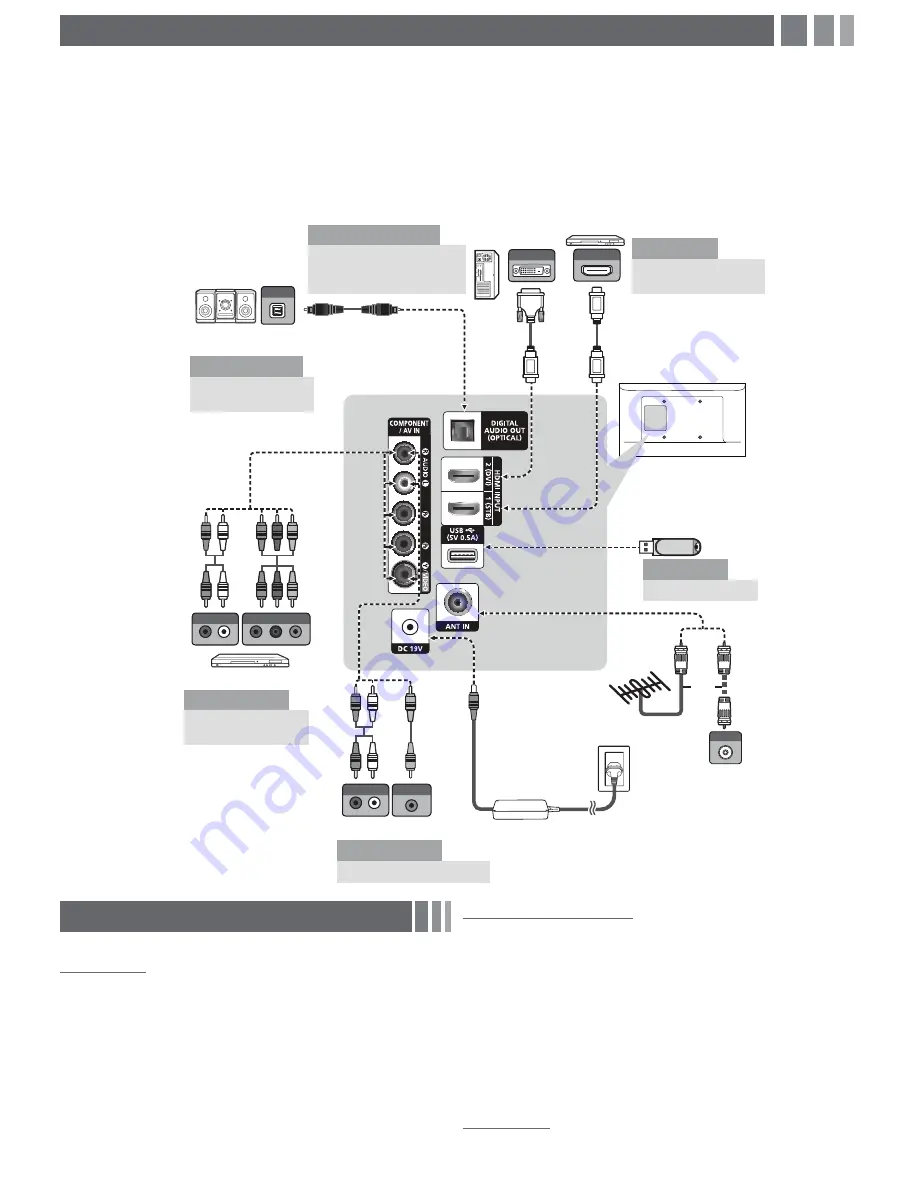
Information
You can see detailed information about the connected external device.
ANT OUT
W
R
R
W
AUDIO OUT
R-AUDIO-L
COMPONENT OUT
P
R
P
B
Y
R
B
R
B
R
G
RG
OPTICAL
DVI OUT
HDMI OUT
AUDIO OUT
R-AUDIO-L
VIDEO OUT
W
R
Y
R
R
Y
W
TV Rear Panel
VCR
AV Device (2)
Using Audio/Video Cables
Blu-ray player
AV Device (3)
Using a Component
Cable (up to 1080p)
Media Play
Using a USB Drive
AV Device (1)
Using an HDMI Cable
(up to 1080p)
PC
Using an HDMI Cable or
an HDMI to DVI Cable. Use
the PC speakers for audio.
Audio Device
Using an Optical
(Digital) Cable
Digital Audio System
Blu-ray player / DVD /
cable box / sat box
PC
or
VHF/UHF Antenna
Cable
- 4 -


