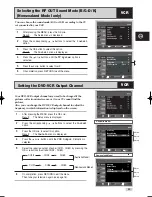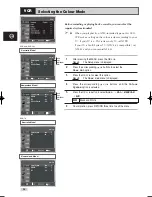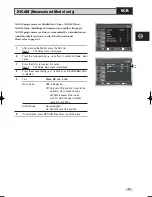
background image

21

GB

Presetting the Stations Automatically

You do not need to preset the stations if you have already 

set them automatically (see Plug & Auto Set Up on page 15).

Your DVD-VCR contains a built-in tuner used to receive television
broadcasts. 
You must preset the stations received through the tuner. This can be
done:

Plug & Auto Set up (see page 15)

Automatically

Manually  (see page 22)

You can store up to 80 stations.

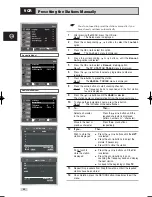
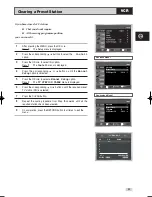
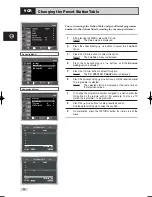
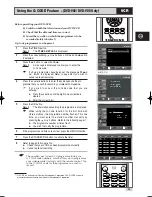
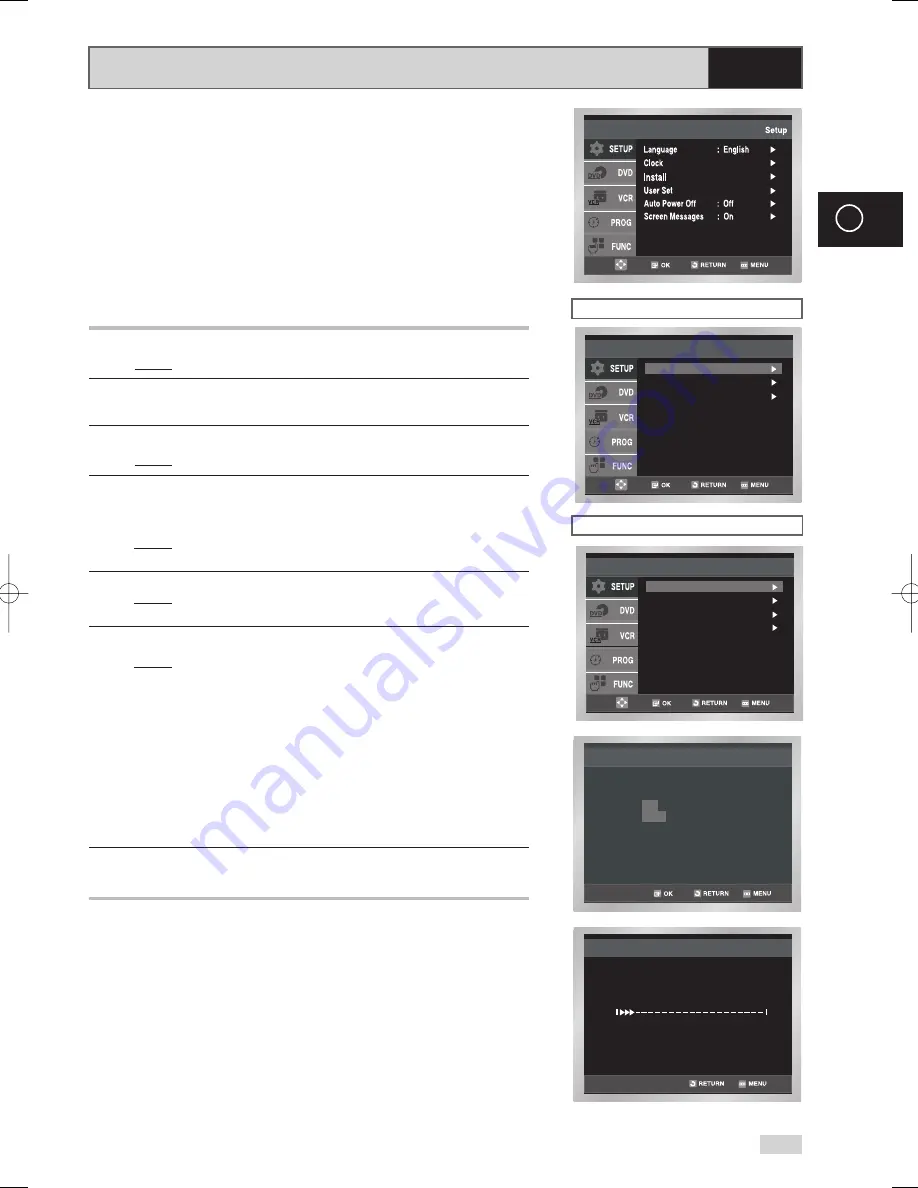
1

After pressing the MENU, press the OK or 

Š

.

Result:

The Setup menu is displayed.

2

Press the corresponding 

›

,

‚

buttons to select the

Install

option.

3

Press the OK or

Š

to select this option.

Result:

The 

Install 

menu is displayed.

4

Press the corresponding 

›

or

‚

buttons, until the 

Auto Setup

is selected.
And then press the OK or

Š

to select this option.

Result:

A message appears, indicating that any channels
already preset on your DVD-VCR will be deleted.

5

Press OK button.

Result:

A message appears, indicating that any channels
already preset on your VCR will be deleted.

6

Press OK to start the auto scanning.

Result:

The 

Please Wait

indication highlight on the

television screen. 

The first frequency band is scanned and the first
station found is displayed and stored.

The DVD-VCR then searches for the second station
and so on.

When the automatic scanning procedure has
finished, the DVD-VCR switches automatically to 
programme  1.

The number of stations automatically stored by the DVD-
VCR depends on the number of stations that it has found.

7

If you wish to cancel the auto scanning before the end, press the 
MENU button to exit the menu.

Once the auto scanning procedure has finished, some
stations may have been stored more than once; select
the stations with the best reception and delete the ones
no longer required (see page 23).

Auto Setup

Your date will be lost
Press   OK   to continue
             Menu      to exit   

Auto Setup

Manual Setup
TV System                    : G
VCR Output CH            : CH 36

Install

Auto Setup

Manual Setup
VCR Output CH            : CH 38

Install

Auto Setup

                          Please Wait

                                                                   15%

Australia Model

Newzealand Model

VCR

  00169N DVD-V70/XSA-GB1  11/14/05  9:51 AM  Page 21

Summary of Contents for V80

Page 1: ...DVD VCR DVD V70 DVD V80 DVD V85 www samsung com au PAL EJECT STANDBY ON DVD PROG VCR LINE2 OPEN CLOSE STANDBY ON OK Instruction Manual...

Page 2: ...r the DVD VCR 16 Deck Control Keys 17 Basic TV Tuner Operations 18 Inserting Batteries in the Remote Control 19 Setting the Date and Time 19 Setting the Menu Language 20 SETTING UP YOUR DVD VCR Preset...

Page 3: ...at Variable Speeds 41 Searching for a Specific Sequence 42 Using the Tape Counter 44 Connecting an RCA Audio Video Input Cable 45 Using the Assemble Edit Function 46 Recording from Another VCR or Camc...

Page 4: ...ogy that is protected by method claims of certain U S patents and other intellectual property rights owned by Macrovision Corporation and other rights owners Use of this copyright protection technolog...

Page 5: ...di tions below 5 C and above 40 C or to extreme humidity conditions less than 10 and more than 75 Do NOT expose the DVD VCR to direct sunlight Do NOT expose the DVD VCR to any liquids Do NOT place any...

Page 6: ...rear panel of the player Playback Region Number PAL NTSC broadcast system in USA Canada japan South Korea etc NTSC 12 Cm 8 Cm Single sided 240 min Double sided 480 min Single sided 80 min Double sided...

Page 7: ...VD PROG VCR LINE2 DVD V85 VIDEO CASSETTE COMPARTMENT LINE2 VIDEO INPUT JACK REW SKIP BACK BUTTON RECORD BUTTON EJECT BUTTON PROGRAMME SELECTION BUTTON OPEN CLOSE BUTTON VCR SELECT BUTTON DVD SELECT BU...

Page 8: ...DEO OR COMPONENT COMPONENT VIDEO OUT DIGITAL AUDIO OUT SOCKET COAXIAL S VIDEO OUT JACK DIGITAL AUDIO OUT SOCKET OPTICAL RF ANTENNA INPUT RF OUT TO TV LINE IN 1 LINE OUT TO TV COMPOSITE COMPONENT VIDEO...

Page 9: ...EED SP LP 15 RECORD 16 TIMER 17 ANGLE IPC 18 OPEN CLOSE 19 0 9 20 TV VCR 21 INPUT SEL 22 F ADV STEP 23 PROG 24 FAST FORWARD SKIP NEXT 25 PLAY STILL 26 INFO 27 RETURN 28 RIGHT 29 OK 30 EZ VIEW 31 DISC...

Page 10: ...RECORD 16 TIMER 17 ANGLE IPC 18 OPEN CLOSE 19 0 9 20 TV VCR 21 VCR TV SELECT 22 INPUT SEL F ADV STEP 23 PROG TRACKING 24 FAST FORWARD SKIP NEXT 25 PLAY STILL 26 INFO 27 RETURN 28 RIGHT 29 OK 30 EZ VI...

Page 11: ...ABLE OWNER S INSTRUCTIONS COAXIAL CABLE STEREO 1 2 3 4 5 6 7 8 1 The DVD Deck is active 2 A DVD CD VCD or SVCD is loaded 3 The time counter position time remaining or current deck status is displayed...

Page 12: ...Other VCR Audio output Rear Audio RCA Out Audio out DVD only LINE 2 Front LINE 2 In Audio in Audio Video Video in COMPONENT Rear RCA Out COMPONENT out DVD only output S VIDEO Rear S JACK Out S Video...

Page 13: ...television you can also connect your DVD VCR to the television via the RCA cable see section below if your television is equipped with this type of connection TV 3 2 You can connect your DVD VCR to th...

Page 14: ...r video equipment to your DVD VCR in different ways The following illustrations give a few examples of the connection possibilities The RCA input output connectors on the rear of the DVD VCR are used...

Page 15: ...the DVD VCR into the mains Result The Language Set menu is displayed 3 Select the required language by pressing the or buttons 4 Press OK to store the language selected Result A message appears 5 Pres...

Page 16: ...video cassette in the DVD VCR Check that the DVD VCR starts reading the cassette if not press II button 5 Start a scan on your television or set the television to UHF channel 36 Australia UHF 38 CH 6...

Page 17: ...tton Press the VCR button on remote control when you want to control the VCR deck The VCR indicator will light on the Front Panel Display to show that VHS deck is selected 4 INPUT SEL BUTTON Press the...

Page 18: ...ilt in TV tuner 1 TV VCR Button Press to switch between your TV s tuner and the VCR s internal tuner 2 PROG Button Press to change to the next or previous channel 3 0 9 Buttons Press to select channel...

Page 19: ...VCR contains a 24 hour clock and calendar used to Automatically stop programme recording Preset your DVD VCR to record a programme automatically You must set the date and time when You purchase the D...

Page 20: ...OK or 3 Set menu Language Place the selection arrow next to your desired Language then press the OK button 4 Press the or buttons to select language you want Place the selection arrow next to your de...

Page 21: ...ears indicating that any channels already preset on your VCR will be deleted 6 Press OK to start the auto scanning Result The Please Wait indication highlight on the television screen The first freque...

Page 22: ...on Result The first letter of the name flashes 11 To Then Select a character Press the or button until the in the name required character is displayed letters numbers or character Move to the next or...

Page 23: ...ion is selected 5 Press the OK or to select a Manual Setup option Result The TV STATION TABLE menu is displayed 6 Press the corresponding or buttons until the required preset TV station PR is selected...

Page 24: ...required preset TV programme is selected Result The selected station is displayed at the same time on the television screen 7 To change the programme number assigned to a station press the OK button o...

Page 25: ...g the OK or buttons Australia CH28 CH69 CH28 CH38 CH69 CH21 CH36 CH69 6 On completion press RETURN to exit the menu Then tune your television again see page 16 Auto Setup Manual Setup Install TV Syste...

Page 26: ...ding buttons to select the User Set option 3 Press the OK or to select this option Result The User Set menu is displayed 4 Press the corresponding or buttons until the Colour System option is selected...

Page 27: ...uttons to select the User Set option 3 Press the OK or to select this option Result The User Set menu is displayed 4 Press the corresponding or buttons until the NICAM option is selected 5 To Press OK...

Page 28: ...button to turn the IPC mode OFF 8 Press the or buttons until the picture is displayed according to your preferences If you do not press a button within ten seconds the PICTURE menu disappears automat...

Page 29: ...t delays or over runs the VCR has a function called G CODE EXTEND allowing you to extend the recording time by up to 60 minutes 1 After pressing the MENU press the OK or 2 Press the corresponding butt...

Page 30: ...layed 4 On completion press RETURN twice to exit the menu Language English User Set Auto Power Off Off Install Screen Messages On Repeat Play Off S VHS Off VCR Setup Tape Select E180 On Off If you wis...

Page 31: ...ice to exit the menu Tape Select E180 Repeat Play Off S VHS Off VCR Setup The DVD VCR allows you to playback high quality S VHS tapes 1 During S VHS play mode after pressing the MENU press the corresp...

Page 32: ...lasts twice as long The recording is of a slightly lower quality To record a cassette Press the SPEED button on the remote control until In standard play mode SP is displayed In long play mode LP is d...

Page 33: ...indow visible and the safety tab intact or the opening covered with adhesive tape Result The DVD VCR is switched on automatically 4 Select The station to be recorded using the PROG or buttons or The L...

Page 34: ...programme can be seen on the television 5 Select the recording speed by pressing the SPEED button as many times as required see page 32 6 Hold the REC button down for a while to start recording Result...

Page 35: ...television magazine If you wish to correct the G Code code that you are entering Press the button until the digit to be corrected is cleared Enter the correct digit 5 Press the OK button Result The i...

Page 36: ...ore changing any other value Record a programme every day Press the or buttons until the DAY selection flashes Monday to Sunday at the same time Press the or buttons until the DLY Daily value is displ...

Page 37: ...r buttons 10 Press to select the recording stop time 11 Select the required recording stop time by pressing the or buttons following the same procedure as when selecting the recording start time 12 Pr...

Page 38: ...s the or buttons to select and change any values as required For more details refer to the previous page 5 On completion press RETURN twice You can cancel any programmes that are Incorrect No longer r...

Page 39: ...ched the cassette is rewound automatically NTSC tapes can be played back but cannot be recorded with this DVD VCR 3 To Then press Stop the playback STOP Eject the cassette EJECT Playing a Cassette O E...

Page 40: ...hes to Hi Fi after five seconds of Mono To select the sound mode simply press the AUDIO button on the remote control until the required option is displayed L R MIX L R MONO You can play a cassette in...

Page 41: ...s the TRK buttons to minimize this effect You can vary the playback speed using the Shuttle function up to nine times the normal speed Example You wish to analyze a sportsperson s technique movement b...

Page 42: ...s the CLEAR button at the point on the tape where you want to set the counter to 0 00 00 The VCR will rewind or fast forward searching for the 0 00 00 counter position and then automatically stop at t...

Page 43: ...This feature will enable you to fast forward rewind to a specific point on a tape E g if you have recorded 3 different programmes on a tape and you have rewound the tape to the beginning by using this...

Page 44: ...INFO twice to display the counter Press CLEAR when you want to set the tape counter to zero 3 When you are ready Start playback or Recording Press the button To fast froward or rewind to the sequence...

Page 45: ...before connecting the cables 1 Connect one end of the RCA audio video cable into the VIDEO INPUT socket on the front of the DVD VCR 2 Plug the other end of the audio video cable into the appropriate...

Page 46: ...shed recording press OK 2 5 4 You can copy a cassette to your DVD VCR from another video source such as another VCR or a camcorder It is an infringement of copyright laws to copy prerecorded cassettes...

Page 47: ...ble with the remote control it will switch off It is now programmed to operate with the remote control If several codes are indicated for your television brand try each one in turn until you find one...

Page 48: ...CR player with a TV and other components It is only available for DVD The VCR out can not watch by this connection OPTICAL COAXIAL DVD VCR or Television Connection to an Audio System Connection to an...

Page 49: ...ton 2 Select DVD using buttons then OK or button 3 Select Language Setup using buttons then press the OK or button 4 Select Disc Menu using buttons then press the OK or button 5 Use the buttons to sel...

Page 50: ...s then OK or button 3 Select Language Setup using buttons then press the OK or button 4 Select Subtitle using buttons then press the OK or button 5 Use the buttons to select English Select Automatic i...

Page 51: ...Digital Audio Output DTS 1 Off Doesn t output digital signal 2 On Outputs DTS Bitstream via digital output only Select DTS when connecting to a DTS Decoder Dynamic Compression 1 On To select dynamic...

Page 52: ...of the screen 2 4 3 Pan Scan Select this for conventional size TVs when you want to see the central portion of the 16 9 screen Extreme left and right side of movie picture will be cut off 3 16 9 Wide...

Page 53: ...sword again The Parental Control screen appears About the Rating Level The Rating Level will work only when Use Password is set to Yes To unlock the player use to select No Use or OK to select Rating...

Page 54: ...oder you have the option to bypass the DVD VCR s built in Dolby Digital Decoder Use the DIGITAL AUDIO OUT connection below 1 Digital Audio Out Connect EITHER an optical cable OR a digital coaxial cabl...

Page 55: ...orward and backward through disc chapters tracks Skip Forward will jump to the next chapter track Skip Back will jump to the beginning of the current chapter track Press Skip Back again to jump to the...

Page 56: ...p and bottom of the screen will disappear The picture will look vertically stretched Depending on the type of disc the black bars may not disappear completely Zoom Fit The top bottom left and right of...

Page 57: ...picture will look vertically stretched Zoom Fit When a 4 3 DVD is viewed on a 16 9 TV black bars will appear at the left and right of the screen in order to prevent the picture from looking horizontal...

Page 58: ...time as a reference Refers to the language of the film soundtrack In the example the soundtrack is played in English 5 1CH A DVD disc can have up to eight different soundtracks Refers to the subtitle...

Page 59: ...contain up to 32 subtitle languages How to have the same subtitle language come up wheneveryou play a DVD Refer to Setting Up the Language Features on page 50 ENG On ENG Off OK Using the SUBTITLE butt...

Page 60: ...terminate the function press the CLEAR button A B REPEAT does not allow you to set point B until at least 5 seconds has elapsed after point A has been set 3 Press OK 4 To return to normal play press R...

Page 61: ...audio languages are represented by abbreviations 3 Use the buttons to select Stereo or On VCD CD This function depends on what languages are encoded on the disc and may not work with all DVDs A DVD di...

Page 62: ...f the display 1 During play press the MARK button on the remote 2 Use the buttons to select a marked scene 3 Press the PLAY STILL ll buttons to skip to the marked scene 1 During play press the MARK bu...

Page 63: ...will appear on the right side of the screen Up to 8 music folders can be displayed at a time If you have more than 8 folders on a disc press the buttons to bring them up on the screen 2 Use the button...

Page 64: ...least 64Kbps when recording WMA files Sound quality with WMA files basically depends on the rate of compression decompression you choose Getting audio CD quality sound requires an analog digital samp...

Page 65: ...utton 2 Use the buttons to select RANDOM Press the OK button The disc will be played in random order Depending on the disc the Program and Random Play functions may not work To resume normal play pres...

Page 66: ...to the Album Screen Each time the OK button is pressed the picture rotates 90 degrees clockwise Each time the OK button is pressed the picture is enlarged up to 2X Normal 2X Normal The unit enters sli...

Page 67: ...vely written multisession disc can be played If there is a blank segment in the multisession disc the disc can be played only up to the blank segment A maximum of 500 images can be stored on a single...

Page 68: ...al CH38 Australia model Audio DVD VCR RCA jack Output Audio DVD only Digital audio out OPTICAL COAXIAL Video DVD VCR RCA jack Video DVD only S Video out COMPONENT out RCA jack Tape format VHS type vid...

Page 69: ...ing If poor pictures appear on a variety of cassettes the video heads may need cleaning This is not a common problem and unless it appears the heads should not be cleaned When cleaning the video heads...

Page 70: ...t 4 You ve requested a title or chapter number or search time that is out of range Some of the functions selected in the Setup Menu may not work properly if the disc is not encoded with the correspond...

Page 71: ...THIS APPLIANCE IS DISTRIBUTED BY www samsung com au AK68 00169N ELECTRONICS...

Reviews: