background image

EN-5

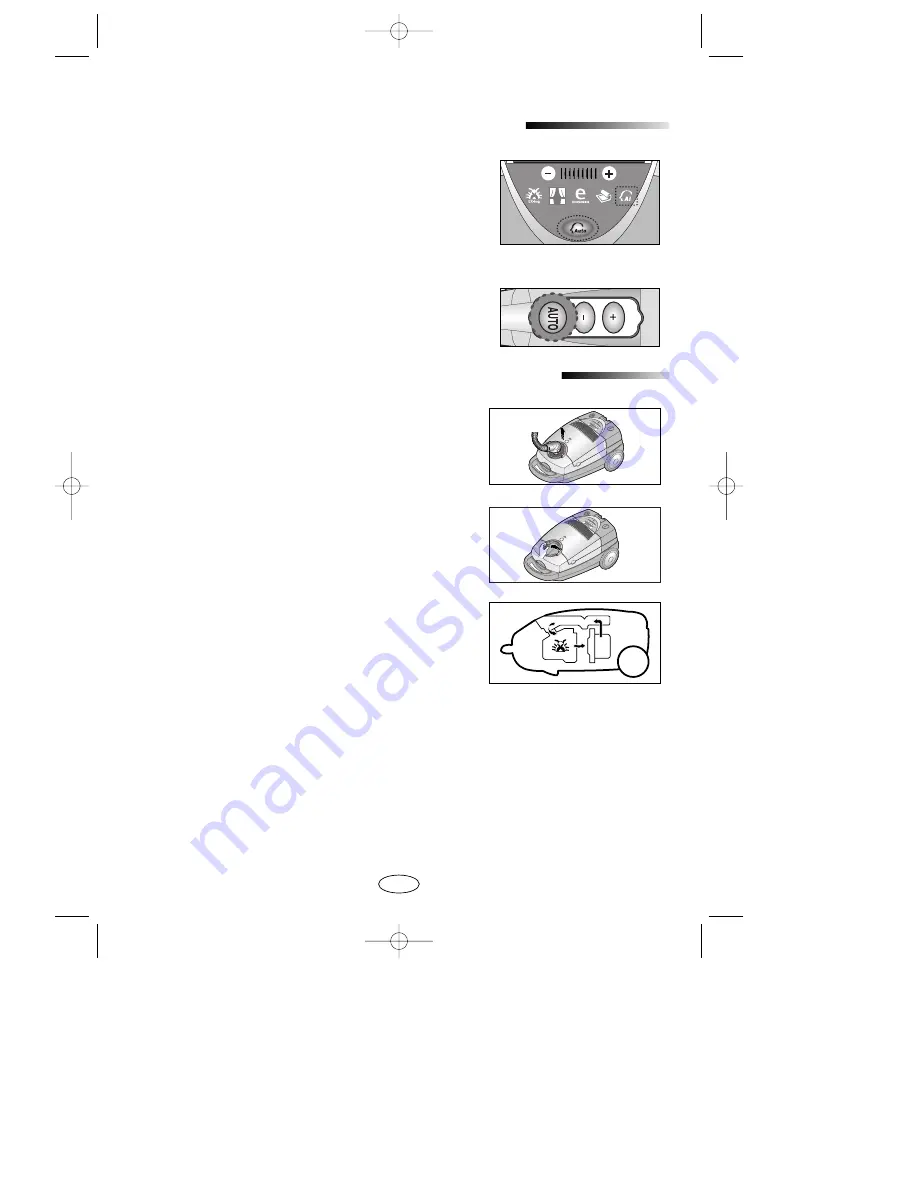
Using Exbug Elimination System (DEPENDING ON MODEL)

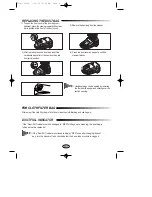
AUTO MODE (BUTTON CONTROL TYPE ONLY)

If you press AUTO MODE, the power is automatically set at
1200~1300 watt.
This mode reduces the suction power fluctuation which is caused by
the fluctuation of airflow quantity to the motor. 

For example, when dust bag is full, the quantity of air to the motor will
be decreased and power will be down followingly. AUTO MODE, in
this case, increases the power automatically for sufficient suction. 

If you want to go back to the normal control type, just press "+" or "-" 
buttons.

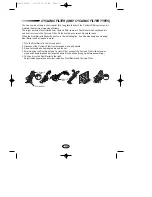
It is best to use the Mite Killing cycle immediately after you have finished
your cleaning.

Ensure machine is plugged in and the power point is switched on.

Disconnect the hose from the cleaner by pressing in the two but-
tons on the hose end and lift the hose out.

Close the hose connection cover on the top of the cleaner until
tone is heard. Make sure that it is fully shut.

Switch the cleaner on and the cleaner will run.

The Mite Killer cycle will automatically stop when complete.

Unplug the cleaner, rewind the cord, open the hoses connection cover and re-connect the hose.
Your cleaner can be used immediately after the Mite Killer cycle stop or by interrupting the cycle. To do
this,switch cleaner off,open the hose connection cover and re-connect the hose.

DJ68-00093D  1/30/02 10:45 AM  Page 6

Summary of Contents for VC-8726VT

Page 1: ...Operating Instructions VC 8926E VC 8926EN VC 8928E VC 8928EN VC 8930E VC 8930EN VACUUM CLEANER Before operating this unit please read the instructions carefully DJ68 00093D 1 30 02 10 44 AM Page 1 ...

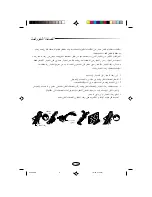
Page 2: ...ner away from stoves and other heat sources Heat can deform and discolour the plastic parts of the unit 6 Avoid picking up hard sharp objects with the vacuum cleaner as they may damage the cleaner parts Do not stand on the hose assembly Do not put a weight on the hose Do not block the suction or the exhaustion part 7 Switch the vacuum cleaner off at the machine before unplugging from the electrica...

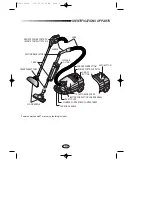
Page 3: ...ONTROL TYPE ONLY CARRYING HANDLE DUST COVER TOOL STORAGE COVER BUTTON FOR SUCTION HOSE REMOVAL ON OFF BUTTON POWER CONTROL SWITCH AUTO BUTTON CORD REWIND BUTTON FLOOR NOZZLE TUBE CYCLONIC FILTER TRANSPARENT TUBE SUCTION REGULATOR HANDLE HOSE CLAMPER FOR DUST BAG COMPARTMENT DJ68 00093D 1 30 02 10 44 AM Page 3 ...

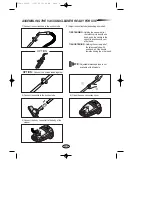
Page 4: ...nd push the handle in the opposite direction with your other hand SHORTENING Holding the narrow part of the telescopic tube with one hand pull the handle towards it using the other hand OPTION Connect the suction tubes together 1 Connect the suction hose to the suction tube 5 Connect the body connector to the body of the cleaner NOTE Adjustable telescopic tube is not available with all models OPTI...

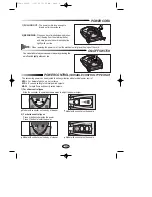
Page 5: ...rds to adjust the power output Model with controller on the body of cleaner Model with controller on the body of cleaner 2 For button control types Press button to heighten the power Press button to lower the power Model with controller on the handle NOTE When removing the power cord from the electrical outlet grasp the plug not the cord POWER CORD 1 PULLING OUT The power cord is long enough to dr...

Page 6: ...he Mite Killing cycle immediately after you have finished your cleaning Ensure machine is plugged in and the power point is switched on Disconnect the hose from the cleaner by pressing in the two but tons on the hose end and lift the hose out Close the hose connection cover on the top of the cleaner until tone is heard Make sure that it is fully shut Switch the cleaner on and the cleaner will run ...

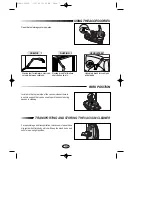
Page 7: ...h for cushions and drapery PARK POSITION TRANSPORTING AND STORING THE VACUUM CLEANER Located in the top rear side of the vacuum cleaner there is a nozzle support that can be used to park the nozzle during pauses in cleaning For easy storage and transportation this vacuum cleaner has a clip system built into body which will keep the wand hose and nozzle in an upright position DJ68 00093D 1 30 02 10...

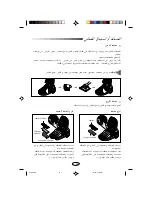
Page 8: ...ards the clam per is located at the front of the dust cover 4 Press the dust cover down gently until the clamper relocks 3 After removing the used dust bag insert the cardboard bag collar of the new dust bag into its original position DUST FULL INDICATOR If the Dust Full indicator switch changes to RED while you are cleaning the dust bag is full and must be replaced NOTE If the Dust Full indicator...

Page 9: ... indicating line it needs disposing and cleaning Dust Barrel can be cleaned in water 1 Turn the Dust Barrel to the left and pull it 2 Disconnect the Cyclonic Filter from extension wand and handle 3 Remove thread and hair tangled around the net 4 After cleaning the Dust Barrel and Cyclonic Filter connect the Cyclonic Filter with extension wand and handle washed part should be dried in the shade thr...

Page 10: ...r Micro Filter Type OUTLET FILTER Open the dust cover and lift off the grille Grasp filter and pull it out with preliminary filter After cleaning preliminary filter reposition new filter and preliminary filter by reversing this procedure Grasp grille filter and pull it out with preliminary filter After cleaning preliminary filter reposition new filter compartment and preliminary filter by reversin...

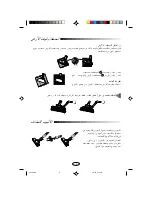
Page 11: ...ien substance with a stick from it After cleaning it reassemble the nozzle to the tube USAGE OF FLOOR NOZZLE Select the carpet indicator when cleaning carpets Select flat surface indicator when cleaning the floors tiles etc FOR RUG FLOOR SELECTOR Before use make sure that the position of the selector is in the right position for the type of surface to be cleaned FOR UNIVERSAL BRUSH Use the floor n...

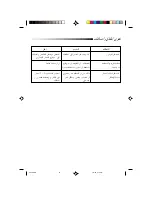
Page 12: ...dually Filter nozzle suction hose Remove the object decreasing or tube is blocked Cord does not rewind fully Check that the cord is not Pull the cord out 2 3m twisted or wound unevenly push down the cord rewind button PROBLEM CAUSE REMEDY TROUBLE SHOOTING DJ68 00093D 1 30 02 10 45 AM Page 12 ...

Page 13: ...Oð bł Ë fÐUI qO uð h pK b UO Ãd v ÆÍ u i HMð jHA uH Ë UHB dš Ë W uÞ Â UIzUŽ U Oý bð UO u Ë jHA Ëb jHA œ UO pKÝ qšb ô s bBQð u K dOž pK Ê Í U Ð pK V Ý U U9 Ušœù dOž qJAÐ dCÐ UB Ë Ë Ã U v Ë tOKŽ jG u ÆÈ ÆpK واﺻﻼﺣﻪ اﳋﻠﻞ ﲢﺮى 8900 ARB 1 2 02 2 16 AM 12 ...

Page 14: ..._ dý _ nOEM Ë dI Æa ÆÆÆ bO ﻟﻠﻔﺮ اﻟﻌﺎﻣﺔ ﺷﺎة u Âb Ý _ W _ nOEM u _ lOLł s ÆŸ ﻣﻼﺣﻈﺔ E UHB qC vKŽ uB K Ò d n _ Uý uÐ Æ uIý œ WDÝ u _ u _ lM1 UHA Ë d uÞ s  u q UOý_UÐ UL bÝ Ë ÆfÐö اﻷﻧﺒﻮ ﺳﺪ ﺣﺎﻟﺔ ﻓﻲ اﻟﺸﻔﺎف ب uH qB u _ s W wA Æ dG uÐ tM V tHOEMð bFÐ Æ VOC WDÝ uH lOL bŽ u _ l W Æ اﻟﺸﻔﺎف اﻷﻧﺒﻮب اﻷرض ﻓﻮﻫﺔ اﺳﺘﺨﺪام AR 8900 ARB 1 2 02 2 16 AM 11 ...

Page 15: ...U9 w UB nOH s bÐ ô Æ U G lLł fOB اﳋﺮوج ﻣﺼﻔﺎة dO Š UDž Ë U G lLł fOB ÆWJ A V Ý ﻣﺼﻔﺎة ﻟﻨﻮع UHB W bON9 UHB Ë UHB p UHB l à U v UN Ý ÆW bONL UHB bŽ W bONL UHB nOEMð bFÐ Ë b b vKŽ ULN UJ v W bMNL UHB dð dłù Ác fJŽ VOð Æ اﻟﺪﻗﻴﻘﺔ اﳌﺼﻔﺎة ﻟﻨﻮع UHB WJ ý UHB WIO b Ë UHB WJ ý p l à U v UN Ý ÆW bONL UHB UHB bŽ W bONL UHB nOEMð bFÐ Ë b b vKŽ ULN UJ v W bONL UHB dð dłù Ác fJŽ VOð Æ اﳌﺼﺎﻓﻲ اﺳﺘﺒﺪال أو اﻟﺼﻴﺎﻧﺔ W bO...

Page 16: ...ÆWOÞ ÆjI dH _ U G vKŽ Í Ë q bMŽ u v qB v Š U G UÐ U G UŽ dHð s bÐ ô œb È Ë U G m ÆnOEM Ë nOEMð p J1 Æ U UÐ U G UŽ Æ Ëœ Ò Ë Ë U O v U G UŽ Æt Ý Æ Ëd UHB qB uÝU s WOÞ Ë b bL Æi I Æ Ë jO Æ UHBLK WJ A uŠ pÐUA dFA Æ Ë nOEMð bFÐ Ë U G UŽ Ëd UHB WOÞ B Ò Ëd UHB V uÝU w WOÞ Ë b bL i I e s bÐ ô tK ž Íc tHOH ÆUN UJ v UHB œUŽ q U U9 qE w Ƶ Ë l œ Ë U G UŽ Ëœ Ò Æ5LO v Á Uýù W öŽ qB j u J Ë vKŽ WÐ Ë U G UŽ Ëd U...

Page 17: ... U G lLł fOB eK öž œUŽ r ð v Š WÝö Ð Æ ﻣﻼﺣﻈﺔ öš s U G lLł fOB r š sJ1 Ë tM rKOH W W v t O ð ÆjHA اﻟﻘﻤﺎش ﻣﻦ اﳌﺼﻔﺎة ﻟﻜﻴﺲ Ë WOýULI UHB fOB nE t b Ý bFÐ U G UÐ U K 2 fOJ ÊUB d t b Ý dš ÆÈ ﻣﻼﺣﻈﺔ R ÊUB u dý d UÐ ULz œ dLŠ U G WOLB È Ë U G fOB q b ð s rž W MJ n dNJ Ë qLF sŽ WOzUÐ d ÊUB ULŽ h uÞ u ô Ë Â uH Ë Ëb W Æô  œ R Êu u dý W MJ UÐ nOEM UMŁ dLŠ U G WOLB È Ô dH Æ U G fOB q b ð اﻟﻐﺒﺎر ﻛﻤﻴﺔ ﻣﺴﺘﻮى ﻣﺆﺷﺮ...

Page 18: ...EM U G Uý d ÀUŁ_ u ÆÆÆ V J Æa ﺗﻨﺠﻴﺪ ﺷﻘﻮق ﻏﺒﺎر اﻟﻮﻗﻮف N ﻣﻮﻗ dNJ W MJ n uK UÐ WOzUÐ W MJ s WOHK WŠ Ë u UM u t b Ý sJ1 œUMÝ W u W MJ u UMŁ R n ÆqLF sŽ X وﺣﻔﻈﻬﺎ اﻟﻜﻬﺮﺑﺎﺋﻴﺔ اﳌﻜﻨﺴﺔ ﻧﻘﻞ Ë W MJ kHŠ qŠ s W MJ Ác qN UNKI dNJ Ëe WOzUÐ YOŠ r w wKš b p A ÂUEMÐ œ u UÐ kH u ú rOI n Ë d uÞ Ë Â uH ÆW AR 8900 ARB 1 2 02 2 17 AM 7 ...

Page 19: ... ﻓﻘﻂ اﻟﺘﺤﻜﻢ زر ﻧﻮع اﻷوﺗﻮﻣﺎﺗﻴﻜﻴﺔ اﻟﻮﺿﻌﻴﺔ u vKŽ jGC W UŠ w Ë_ WOF uð W UD j r WOJOðU Ë uð Ë UOJOðU u Ác Æ dOG iH ð WOF w u dOGð sŽ W UM jHA uN WOLB d v dO Íc Æ WOLB iH Mð U G UÐ U G fOB ö bMŽ U qO Ý vKŽ uN d v R U2 u UH v Íœ Ë jHA j bMŽ u Ë_ WOF uð eð W U Ác w WOJOðU Ë W UD œ œ uð UOJOðU Æw UJ jHAK uF œ ÆjI Ë vKŽ jG ÍœUF rJ v œ Ë UO Ãd s W MJ fÐU qB n Ò Ë UO pKÝ d qO uð UDž uÞ Ë Â qO uð bŽ d uÞ Ë ÆÂ...

Page 20: ... Ð ÂbI l QÐ U ù ØqOGA vKŽ اﻟﺸﻔﻂ ﻗﻮة ﻓﻲ اﻟﺘﺤﻜﻢ ﻓﻘﻂ اﺨﻤﻟﺘﻠﻔﺔ اﻟﺸﻔﻂ ﻗﻮات ﻓﻲ اﻟﺘﺤﻜﻢ ﻧﻮع u qFł pMJ1 dNJ W MJLK jHA dG U ÝUM WOzUÐ uÐ p u WDÝ ÆjHA MIN d WAL _ nOEM Ω v œ_ dzU WJ ý q WIO ECO uI j Ω ÍœUB ô u W œUF œU K W œUB ô aÝ MAX _ nOEM Ω vB _ Ë VKB u b bA œU ÆaÝ u W MJ r ł w rJ œ q œ u i I w rJ œ q œ اﻟﺘﺤﻜﻢ زر ﻟﻨﻮع ﺑﺎﻟﻨﺴﺒﺔ ٢ d vKŽ jG uI l Æ uI iH vKŽ jG Æ ﻗﻮ ﻓﻲ اﻟﺘﺤﻜﻢ ع ﻟﻨﻮ ﺑﺎﻟﻨﺴﺒﺔ ١ ﺑﺎﻧﺰ اﻟﺸﻔﻂ ة ﻻق ...

Page 21: ... اﺧﺘﻴﺎر ي ÆUF jHA VOÐU q u j u V Š jHA q œ ١ اﻟﺘﻤﺪﻳﺪ e p u _ s oOC uJ OK Ë bOÐ wÐ Ë bŠ l œ e ÁU UÐ i I oOC uÐ dš b WDÝ ÆÈ ٢ اﻟﺘﻘﺼﻴﺮ e p u _ s oOC uJ OK Ë bOÐ wÐ Ë bŠ V Ý e u i I oOC uÐ dš b WDÝ ÆÈ ﻣﻼﺣﻈﺔ u _  b Ý sJ1 ô uJ OK w j CK qÐUI wÐ u lOLł Æ ö œ dš q uÞ u v jHA  ÆjHA UO šô Í AR 8900 ARB 1 2 02 2 17 AM 4 ...

Page 22: ...HA jI bFÐ sŽ rJ Ÿu dš uÞ Â i I pK n dO Š UDž Ëœ_ kHŠ ù dš W uÞ jHA  dO Š UDž U G lLł eK dO  U G lLł fOB qIM i I u rEM jHA u u _ W Ëd UHB WOÞ e u Ð WLKF U d u V Š Æq œ wŽUMD ô qIF ØqOGA UI ù u w rJ ÕU H jHA AR 8900 ARB 1 2 02 2 17 AM 3 ...

Page 23: ...dNJ W MJ Âb ð ô dL Ë UI Ê bOŽ UI ô WOzUÐ kHŠ ÆdzU UIŽ Ë dNJ W MJ eNł sŽ bOFÐ WOzUÐ Ë W b d œUB dš_ d ÆÈ Rð b uAð v Íœ t Ë u eł_ Êu q Æ UN s WOJO Ýö Æ Ë W KB UOýô UI VM uÐ œU dNJ W MJ WDÝ Rð b UN ô WOzUÐ d À bŠ v Íœ eł w uð ô ÆW MJ d vKŽ W MJ n uÞ Ë Æ Â d vKŽ qI lCð ô uÞ Ë Æ qšb b ð ô uN Ãd Ë jHA Æ Æ Ë dNJ W MJ n b UO Ãd s fÐUI Ÿe q qLF sŽ WOzUÐ Ë ÆÍ fÐUI p Æ U G lLł fOB q b ð q UO Ãd s fÐUI Ÿe bM...

Page 24: ...DJ68 00093D REV 0 3 DJ68 00093D AR 1 30 02 10 47 AM Page 1 ...

Reviews: