background image

10_


contents

contents

INSTALLING YOUR WASHER

11

11

  Unpacking your washer

11

  Overview of your washer

12 Electrical

12 Grounding

12 Water

13 Drain 

facility

13 Flooring

13 Location 

considerations

13 

Alcove or closet installation

14 

Required Dimensions for Installation

15

  Important note to installer

OPERATING INSTRUCTIONS

17

17

  Loading your washer

17

 Getting 

started

WASHING A LOAD OF LAUNDRY

18

18

  Overview of the control panel

21 Child 

Lock

22 

Spin Only Adjustment  

22  

22 My 

cycle

23 

Washing clothes using the cycle selector

24

 Detergent 

use

24

 Features

MAINTAINING YOUR WASHER

26

26

  Cleaning the exterior

26

  Cleaning the interior

26

  Storing your washer

26

  Preserving the top cover and the front frame

27

  Cleaning the dispensers

28

 Pure 

Cycle

TROUBLESHOOTING

29

29

  Check these solutions if your washer…

31

 Information 

codes

APPENDIX

33

33

  Fabric care chart

34

 Cycle 

chart

36

  Helping the environment

36

  Declaration of conformity

36

 Specifi cation

WA5471ABP-03050A_EN.indd   Sec6:10

WA5471ABP-03050A_EN.indd   Sec6:10

2011-03-04   

 1:51:28

2011-03-04   

 1:51:28

Summary of Contents for WA5451ANW/XAA

Page 1: ...ng this Samsung product To receive more complete service or accessory parts please register your product at or contact www samsung com register 1 800 SAMSUNG 726 7864 WA5471AB WA5451AN WA5471ABP 03050...

Page 2: ...otor delivers power right to the washer tub from a variable speed reversible motor A beltless direct drive motor generates a higher spin speed of 1 100rpm for more effective quiet operation The washer...

Page 3: ...Hazards or unsafe practices that may result in severe personal injury or death CAUTION Hazards or unsafe practices that may result in minor personal injury or property damage CAUTION To reduce the ris...

Page 4: ...with the controls 8 Do not repair or replace any part of the appliance or attempt any servicing unless it is specifically recommended in the user maintenance instructions or in published user repair...

Page 5: ...be properly grounded Do not ground the appliance to a gas pipe plastic water pipe or telephone line Improper grounding may result in electric shock fire an explosion or problems with the product Neve...

Page 6: ...result in electric shock or fire In the event of a gas leak such as propane gas LP gas etc ventilate the area immediately Do not turn any appliance or light on or off Do not use a ventilating fan A s...

Page 7: ...appliance in any area other than the tub unplug the power plug and contact your nearest service center Failing to do so may result in electric shock or fire If the water supply hose comes loose from t...

Page 8: ...aterial such as insecticide onto the surface of the appliance As well as being harmful to humans it may also result in electric shock fire or problems with the product Do not place an object that gene...

Page 9: ...the oil Do not use hot water from water cooling heating devices This may result in problems with the washer Do not use natural hand washing soap for the washer If it hardens and accumulates inside the...

Page 10: ...21 Child Lock 22 Spin Only Adjustment 22 Garment 22 My cycle 23 Washing clothes using the cycle selector 24 Detergent use 24 Features MAINTAINING YOUR WASHER 26 26 Cleaning the exterior 26 Cleaning th...

Page 11: ...n wear protective gloves whenever lifting or carrying the unit Packing materials can be dangerous to children Keep all packing material plastic bags polystyrene etc well out of childrens reach OVERVIE...

Page 12: ...70 Latest Revision and local codes and ordinances It is the personal responsibility of the appliance owner to provide adequate electrical service for this appliance NEVER CONNECT THE GROUND WIRE TO PL...

Page 13: ...eakly supported structure Location considerations Do not install your washer in areas where water may freeze since your washer will always retain some water in its water valve pump and hose areas Froz...

Page 14: ...additional space installing your washer 27in 68 6 cm 44 6in 113 5 cm 38 4in 97 6 cm 27 1in 69 0 cm 28 6in 72 8 cm 44 6in 113 5 cm 57 5in 146 2 cm Closet or Door 48in 310 cm 24in 155 cm 3in 7 6 cm 3in...

Page 15: ...or the power cord Doesn t have any carpeting that will obstruct ventilation openings STEP 2 Installing your Washer 1 If you use a stand pipe make sure the connection between the drain hose and the sta...

Page 16: ...lve and the faucet connections for leaks 4 Plug the power cord into a 3 Prong well grounded 120 volt 60 Hz approved electrical outlet protected by a 15 amp fuse or comparable circuit breaker Your wash...

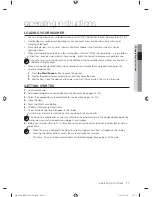
Page 17: ...r 3 Add the item close the door and then press the Start Pause Button The cycle will resume GETTING STARTED 1 Load your Washer 2 Add liquid detergent only and additives to the dispenser see pages 24 2...

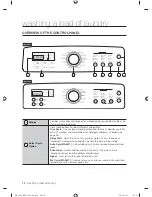
Page 18: ...28 Delay Start Delay the start of any cycle for up to 24 hours in one hour increments Displayed hour indicates the time the wash will be started Extra Spin WA5471 Add additional spin time to remove m...

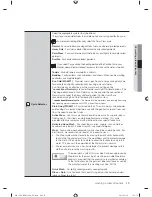
Page 19: ...PowerFoam Stain Away WA5471 For stained clothes The stain Away cycle provides outstanding stain removal performance with the gentlest care and frees you from the need to pre treat stains Active Wear...

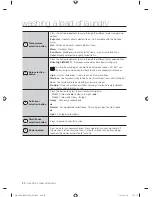
Page 20: ...jeans and sturdy cottons Medium Use for jeans wrinkle free or wash and wear items and synthetics Low Use for delicate items needing a slow spin speed No Spin Drains your Washer without spinning Use fo...

Page 21: ...cancel the CL mode you need to turn the power off and then on again To cancel the ds mode deactivate the Child Lock function To deactivate the Child Lock function press and hold the Spin and the Soil...

Page 22: ...button and then open the door 2 Load the washer with clothes 3 Add detergent and softener and or bleach if needed to the appropriate compartments and then close the door 4 Press the My Cycle button T...

Page 23: ...s time you can control the wash temperature the number of rinse cycles the spinning speed and the delay time by pressing the appropriate option button 8 Press the Start Pause button on the Cycle Selec...

Page 24: ...additives to their respective compartments before starting your Washer The automatic dispenser MUST ALWAYS be in place before you start your Washer DO NOT open the automatic dispenser when your washe...

Page 25: ...if not used properly If you prefer to use color safe non chlorine bleach add it to the appropriate detergent compartment DO NOT pour color safe bleach into the Bleach compartment Loading the Fabric s...

Page 26: ...deposits may be removed if needed Use cleaners labeled Washer safe STORING YOUR WASHER Washers can be damaged if water is not removed from hoses and internal components before storage Prepare your Was...

Page 27: ...drawer with warm water to remove traces of accumulated laundry products 4 To clean the drawer opening use a small non metal brush to clean the recess Remove all residue from the upper and lower parts...

Page 28: ...machine The Pure Cycle Auto Indicator Function If the Pure Cycle button is lit after a wash it indicates that tub drum cleaning is required In this case remove the laundry from the washing machine tur...

Page 29: ...ke sure your Washer is running with sufficient water pressure Vibrates or is too noisy Make sure your Washer is set on a level surface If the surface is not level adjust your Washer feet to level the...

Page 30: ...ater too high It may take a few moments for the door lock mechanism to disengage Does not drain and or spin Check the fuse or reset the circuit breaker Straighten the drain hoses Eliminate kinked hose...

Page 31: ...ears call for service Your washer is not draining It can also mean that the unit senses a small clog while draining Do the following 1 Turn off the unit and turn it on again 2 Select only the Spin Cyc...

Page 32: ...pauses until the suds dissapate Then the unit will go back into operation When it finishes washing End and the SUd code will blink in turn To prevent reduce the amount of detergent For any codes not l...

Page 33: ...needed High Drip Dry Tumble Dry Cycle Medium Dry Flat Normal Low For machine washable wool Loads should be under 8 pounds Permanent Press Wrinkle Resistant Wrinkle Control Gentle Delicates The dot sy...

Page 34: ...in Away z z z z z z z z z z z z z Eco Cold z z z z z z z z z z Pure Cycle z z Options PowerFoam Display Time Min Delay Start Extra Spin Extra Rinse Signal My Cycle Normal z z z z z z 50 Heavy Duty z z...

Page 35: ...z z z z Active Wear z z z z z z z z z z Pure Cycle z z Options Display Time Min Delay Start Extra Rinse Signal Normal z z z 50 Heavy Duty z z z 61 Perm Press z z z 44 Sanitize z z z 120 Towels z z z 5...

Page 36: ...re the wash cycle only when necessary Save water and electricity by only washing full loads the exact amount depends upon the program used DECLARATION OF CONFORMITY This appliance complies with UL2157...

Page 37: ...itioned parts or products if found to be defective during the limited warranty period specified above All replaced parts and products become the property of SAMSUNG and must be returned to SAMSUNG Rep...

Page 38: ...RODUCT SOLD BY SAMSUNG AND CAUSING THE ALLEGED DAMAGE WITHOUT LIMITING THE FOREGOING PURCHASER ASSUMES ALL RISK AND LIABILITY FOR LOSS DAMAGE OR INJURY TO PURCHASER AND PURCHASER S PROPERTY AND TO OTH...

Page 39: ...memo WA5471ABP 03050A_EN indd Sec11 39 WA5471ABP 03050A_EN indd Sec11 39 2011 03 04 1 51 40 2011 03 04 1 51 40...

Page 40: ...ISIT US ONLINE AT U S A 1 800 SAMSUNG 726 7864 www samsung com MEXICO 01 800 SAMSUNG 726 7864 www samsung com Code No DC68 03050A_EN WA5471ABP 03050A_EN indd Sec11 40 WA5471ABP 03050A_EN indd Sec11 40...

Page 41: ...es Gracias por adquirir este producto Samsung Para recibir un servicio m s completo registre su producto en www samsung com register WA5471AB WA5451AN WA5471ABP 03050A_MES_v2 indd 1 WA5471ABP 03050A_M...

Page 42: ...ento directo suministra energ a al tambor de la lavadora desde un motor reversible de velocidad variable Un motor de accionamiento directo sin correa genera una velocidad m s alta de centrifugado de 1...

Page 43: ...r cticas inseguras que pueden causar lesiones f sicas graves o la muerte PRECAUCI N Peligros o pr cticas inseguras que pueden causar lesiones f sicas leves o da os materiales PRECAUCI N Para reducir e...

Page 44: ...i que los controles 8 No repare reemplace ni intente realizar el mantenimiento de cualquier pieza del electrodom stico salvo que est recomendado espec camente en las instrucciones de mantenimiento del...

Page 45: ...a tierra correctamente La toma de tierra no se ha de conectar a una conducci n de gas o de agua ni a la l nea telef nica La conexi n a tierra inadecuada puede provocar un incendio una descarga el ctr...

Page 46: ...endio o una descarga el ctrica En caso de fugas de gas tales como propano LP etc ventile el rea inmediatamente No encienda ni apague ning n electrodom stico ni ninguna luz No utilice un ventilador Una...

Page 47: ...distinto del tambor desenchufe el cable de alimentaci n y comun quese con el centro de servicio m s cercano Si no lo hace puede provocar un incendio o una descarga el ctrica Si se a oja la manguera de...

Page 48: ...as en la super cie del electrodom stico Adem s de ser perjudiciales para las personas tambi n pueden provocar una descarga el ctrica un incendio o problemas con el producto No coloque objetos que gene...

Page 49: ...n del aceite No utilice agua caliente de los dispositivos de calentamiento o enfriamiento del agua Podr a tener problemas con la lavadora No utilice jab n natural para lavado a mano en la lavadora Si...

Page 50: ...guro para ni os 22 Ajuste del centrifugado 22 Garment M s prendas 22 Mi ciclo 23 Lavado de prendas con el selector de ciclos 24 Uso del detergente 24 Funciones MANTENIMIENTO DE LA LAVADORA 26 26 Limpi...

Page 51: ...que levante o transporte la unidad Los materiales de embalaje pueden ser peligrosos para los ni os mantenga todo el material de embalaje bolsas de pl stico poliestireno etc fuera del alcance de los ni...

Page 52: ...los c digos y ordenanzas locales Es exclusiva responsabilidad del propietario del electrodom stico proveer los servicios el ctricos adecuados para este electrodom stico NUNCA CONECTE EL CABLE A TIERRA...

Page 53: ...nsideraciones acerca de la ubicaci n No instale la lavadora en reas donde el agua se congele dado que la lavadora siempre retendr algo de agua en el rea de la v lvula de agua la bomba y la manguera El...

Page 54: ...l instalaci n de la lavadora 27 pulg 68 6 cm 44 6 pulg 113 5 cm 38 4 pulg 97 6 cm 27 1 pulg 69 0 cm 28 6 pulg 72 8 cm 44 6 pulg 113 5 cm 57 5 pulg 146 2 cm Gabinete o puerta 48 pulg 310 cm 24 pulg 155...

Page 55: ...cable de alimentaci n No tenga alfombras que obstruyan los ori cios de ventilaci n PASO 2 Instalaci n de la lavadora 1 Si utiliza una toma de agua aseg rese de que la conexi n entre la manguera de dr...

Page 56: ...la llave de agua para veri car si hay p rdidas 4 Enchufe el cable de alimentaci n a un tomacorriente aprobado de tres pines correctamente conectado a tierra de 120 voltios y 60 Hz protegido por un fu...

Page 57: ...ierre la puerta y luego presione el bot n Start Pause Inicio Pausa El ciclo se reanudar C MO COMENZAR 1 Cargue la lavadora 2 Agregue s lo detergente l quido y aditivos al dosi cador consulte las p gin...

Page 58: ...avado Extra Spin Centrifugado extra WA5471 Agregue tiempo adicional de centrifugado para extraer m s agua de las cargas Extra Rinse Enjuague extra Agregue un enjuague adicional al nal del ciclo para r...

Page 59: ...n rendimiento excepcional en la eliminaci n de manchas cuida delicadamente sus prendas y evita la necesidad de realizar tratamiento previo a las manchas Active Wear Ropa deportiva Use este ciclo para...

Page 60: ...lgodones resistentes Medium Mediano Use para los jeans las prendas sin arrugas o que no necesitan planchado y las telas sint ticas Low Bajo Use para prendas delicadas que necesitan centrifugado a velo...

Page 61: ...t n de encendido Para cancelar el modo CL se debe apagar y encender la alimentaci n Para cancelar el modo ds desactive la funci n Child Lock Seguro para ni os Para desactivar la funci n Child Lock Seg...

Page 62: ...asos 1 Presione el bot n Power Encendido y abra la puerta 2 Cargue las prendas en la lavadora 3 Agregue el detergente y el suavizante o la lej a si es necesario en el compartimiento adecuado y luego c...

Page 63: ...dores correspondientes en el panel de control 7 En ese momento puede controlar la temperatura del lavado la cantidad de ciclos de enjuague la velocidad de centrifugado y el tiempo de retardo presionan...

Page 64: ...y el suavizante de telas Coloque todos los aditivos de lavado en su compartimiento respectivo antes de poner en funcionamiento la lavadora El dosi cador autom tico SIEMPRE DEBE estar en su sitio ante...

Page 65: ...Si pre ere usar lej a sin cloro con protecci n para ropa de color agr guela al compartimiento para el detergente apropiado NO vierta lej a con protecci n para ropa de color directamente en el comparti...

Page 66: ...dep sitos de agua dura si fuera necesario Use limpiadores con el r tulo Washer safe Seguro para lavadoras C MO GUARDAR LA LAVADORA Las lavadoras se pueden da ar si no se extrae el agua de las manguer...

Page 67: ...a caliente para eliminar cualquier resto de los productos de lavado que se pudieran haber acumulado 4 Para limpiar la apertura del caj n utilice un cepillo peque o no met lico para limpiar el hueco El...

Page 68: ...n del indicador autom tico de Pure Cycle Si se ilumina el bot n Pure Cycle Pure Cycle despu s de un lavado indica que es necesaria la limpieza del tubo tambor En este caso retire la ropa de la lavado...

Page 69: ...lavadora funcione con su ciente presi n de agua Vibra o hace demasiado ruido Compruebe que la lavadora est ubicada sobre una super cie nivelada Si la super cie no est nivelada ajuste las patas de la l...

Page 70: ...nismo de cierre de la puerta se desconecte NO drena y o no centrifuga Controle el fusible o reinicie el disyuntor Enderece las mangueras de drenaje Elimine las mangueras enroscadas Si existe alguna re...

Page 71: ...c digo vuelve a aparecer comun quese con el servicio t cnico El motor no funciona correctamente Reinicie el ciclo presionando el bot n Start Pause Inicio Pausa Si el c digo vuelve a aparecer comun qu...

Page 72: ...cio t cnico Se detect alta corriente Reinicie el ciclo Si el c digo vuelve a aparecer comun quese con el servicio t cnico Se detect demasiada espuma durante la sesi n de lavado La unidad se detiene ha...

Page 73: ...ue escurra Ciclo de secado en secadora Medium Mediana Secar en posici n horizontal Normal Normal Bajo Para lanas que se puedan lavar en lavadora Las cargas deben tener un peso inferior a las 8 lb Perm...

Page 74: ...gico fr o Pure Cycle Opciones PowerFoam Tiempo display min Inicio retardado Centrifugado extra Enjuague extra Se al Mi ciclo Normal Normal 50 Heavy Duty Servicio pesado 61 Perm Press Plancha permanen...

Page 75: ...s Tiempo display min Inicio retardado Enjuague extra Se al Normal Normal 50 Heavy Duty Servicio pesado 61 Perm Press Plancha permanente 44 Sanitize Desinfecci n 120 Towels Toallas 50 Bedding Ropa de c...

Page 76: ...ando sea necesario Ahorre agua y electricidad utilizando la capacidad total de la lavadora la cantidad exacta depende del programa que se utilice DECLARACI N DE CONFORMIDAD Este electrodom stico cumpl...

Page 77: ...en la presente garant a con piezas o productos nuevos o reacondicionados si se comprueba que es defectuoso durante el per odo limitado de la garant a especi cado anteriormente Todas las piezas y los...

Page 78: ...NINGUNA NDOLE CONTRA SAMSUNG SUPERAR EL PRECIO DE COMPRA DEL PRODUCTO VENDIDO POR SAMSUNG Y CAUSANTE DEL PRESUNTO DA O SIN LIMITAR LO PRECEDENTE EL COMPRADOR ASUME TODO EL RIESGO Y LA RESPONSABILIDAD...

Page 79: ...notas WA5471ABP 03050A_MES_v2 indd Sec11 39 WA5471ABP 03050A_MES_v2 indd Sec11 39 2011 03 04 1 57 46 2011 03 04 1 57 46...

Page 80: ...TENOS EN L NEA EN U S A 1 800 SAMSUNG 726 7864 www samsung com M XICO 01 800 SAMSUNG 726 7864 www samsung com N de c digo DC68 03050A_MES WA5471ABP 03050A_MES_v2 indd Sec11 40 WA5471ABP 03050A_MES_v2...

Reviews: