background image

English - 17

INS
TALLA

TION

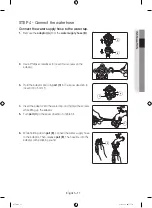
STEP 4 - Connect the water hose

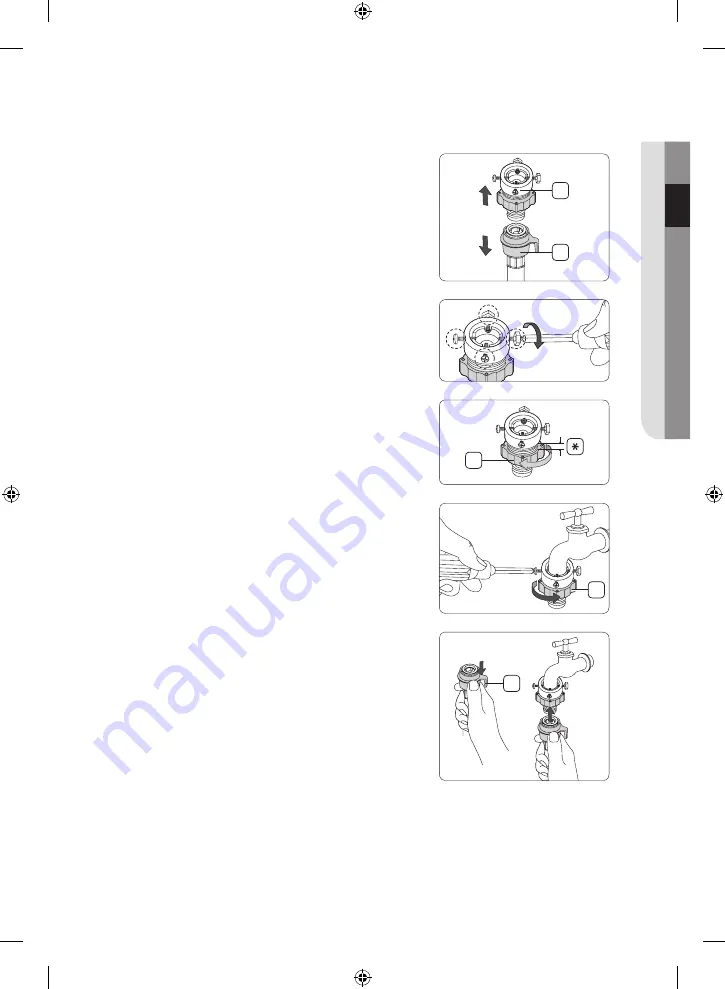
Connect the water supply hose to the water tap.

1. 

Remove the 

adaptor (A)

 from the 

water supply hose (B)

.

A

B

2. 

Use a Philips screwdriver to loosen four screws on the 
adaptor.

3. 

Hold the adaptor and turn 

part (C)

 in the arrow direction to 

loosen it by 5 mm (*).

C

4. 

Insert the adaptor into the water tap, and tighten the screws 
while lifting up the adaptor. 

5. 

Turn 

part (C)

 in the arrow direction to tighten it.

C

6. 

While holding down 

part (E)

, connect the water supply hose 

to the adaptor. Then, release 

part (E)

. The hose fits into the 

adaptor with a clicking sound.

E

Untitled-1   17

2016-10-12     11:11:49

Summary of Contents for WD12J8 Series

Page 1: ...WD12J8 Washing Machine User manual Imagine the possibilities Thank you for purchasing this Samsung product Untitled 1 1 2016 10 12 11 11 46...

Page 2: ...settings 20 Laundry guidelines 21 Detergent drawer guidelines 23 Operations 25 Control panel 25 Simple steps to start 26 Course overview 28 Settings 32 Maintenance 34 Eco drum clean 34 Smart check 35...

Page 3: ...operating your washing machine Because the following operating instructions cover various models the characteristics of your washing machine may differ slightly from those described in this manual and...

Page 4: ...th the appliance Cleaning and user maintenance shall not be made by children without supervision 3 Children should be supervised to ensure that they do not play with the appliance 4 If the supply cord...

Page 5: ...les and clothes or pillows fitted with foam rubber pads should not be dried in the tumble dryer 16 Fabric softeners or similar products should be used as specified by the fabric softener instructions...

Page 6: ...he socket in the opposite direction the electric wires within the cable may be damaged and this may result in electric shock or fire Keep all packaging materials out of the reach of children as these...

Page 7: ...NG Critical usage WARNINGS If the appliance is flooded turn off the water power supplies immediately and contact your nearest service centre Do not touch the power plug with wet hands Failure to do so...

Page 8: ...may cause a short circuit fire and or electric shock Do not attempt to repair disassemble or modify the appliance yourself Do not use a fuse such as copper steel wire etc other than a standard fuse W...

Page 9: ...ter tap and check if the water supply hose connector is firmly tightened and that there is no water leak before using the product If the screws on the water supply hose connector are loose it may resu...

Page 10: ...taminated by oils creams or lotions usually found in skincare shops or massage clinics This may cause the rubber seal to become deformed and result in a water leak Do not leave metal objects such as s...

Page 11: ...E Correct Disposal of This Product Waste Electrical Electronic Equipment Applicable in countries with separate collection systems This marking on the product accessories or literature indicates that t...

Page 12: ...customer centre or the retailer 1 2 9 11 10 4 5 6 3 7 8 1 Detergent drawer 2 Door 3 Work top 4 Control panel 5 Power plug 6 Drain hose 7 Drum 8 Levelling feet 9 Debris filter 10 Emergency drain tube...

Page 13: ...onnect the ground wire to plastic plumbing gas lines or hot water pipes Improperly connected grounding conductors may cause electric shock Water supply A proper water pressure for this washing machine...

Page 14: ...washing machine on a platform or a poorly supported structure Water temperature Do not install the washing machine in areas where water may freeze as the washing machine always retains some water in i...

Page 15: ...lways higher than the freezing point 0 C Away from a heat source STEP 2 Remove the shipping bolts Unpack the product package and remove all shipping bolts 1 Loosen all shipping bolts on the rear of th...

Page 16: ...aging materials can be dangerous to children Dispose all packaging material plastic bags polystyrene etc out of children s reach STEP 3 Adjust the levelling feet 1 Gently slide the washing machine int...

Page 17: ...daptor 3 Hold the adaptor and turn part C in the arrow direction to loosen it by 5 mm C 4 Insert the adaptor into the water tap and tighten the screws while lifting up the adaptor 5 Turn part C in the...

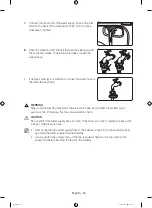
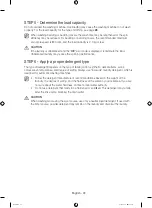
Page 18: ...Stop using the washing machine if there is a water leak and contact a local Samsung service centre Otherwise this may cause electric shock CAUTION Do not stretch the water supply hose by force If the...

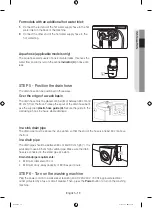
Page 19: ...out of the drain hose bent use the supplied plastic hose guide A Secure the guide to the wall using a hook to ensure stable drainage A ln a sink drain pipe The drain pipe must be above the sink siphon...

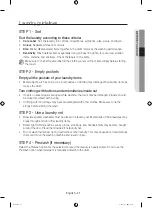
Page 20: ...washing machine Make sure the drum is empty before running Calibration 1 Press the Power button to turn on the washing machine 2 Press and hold the Options button for 3 seconds 3 Press the Up Down ar...

Page 21: ...h buttons and embroideries inside out If pants or jacket zippers are open while washing the drum may be damaged Zippers should be closed and fixed with a string Clothing with long strings may become e...

Page 22: ...t type The type of detergent depends on the type of fabric cotton synthetic delicate items wool colour wash temperature and degree of soiling Always use low suds laundry detergent which is designed fo...

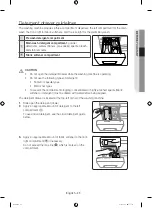
Page 23: ...erating Do not use the following types of detergent Tablet or capsule types Ball or net types To prevent the compartment clogging concentrated or highly enriched agents fabric softener or detergent mu...

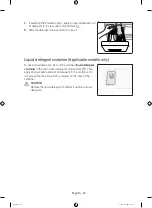
Page 24: ...iner Applicable models only To use a liquid detergent first put the provided liquid detergent container in the main wash detergent compartment Then apply an appropriate amount of detergent to the cont...

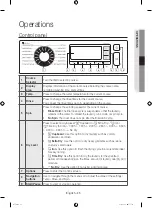
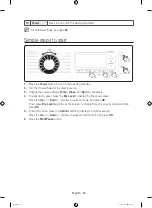
Page 25: ...in after the final drain cycle 6 Dry Level Press to select a drying level Cupboard Extra Dry Iron Time Dry 30 min 1 00 h 1 30 h 2 00 h 2 30 h 3 00 h 3 30 h 4 00 h 4 30 h No Dry Cupboard Use this optio...

Page 26: ...mp Rinse and Spin as necessary 4 To select a Dry Level press the Dry Level to display the Dry Level screen Press the Up Down arrows to select a mode and press OK Then press Dry Level again to exit the...

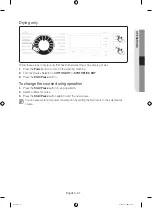
Page 27: ...the Course Selector to COTTON DRY or SYNTHETICS DRY 3 Press the Start Pause button To change the course during operation 1 Press the Start Pause button to stop operation 2 Select a different course 3...

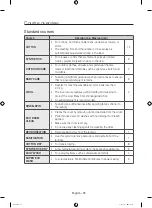
Page 28: ...kg The wool course features gentle cradling and soaking to protect the wool fibres from shrinkage distortion A neutral detergent is recommended 2 RINSE SPIN Featuring an additional rinse after applyi...

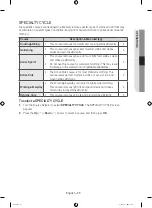
Page 29: ...iently Do not use this course for waterproof clothing This may result in damage to the waterproof or breathable capabilities 4 Active Kids The Active Kids course is for most children s clothing This c...

Page 30: ...d It takes a minimum of about 15 minutes depending on the conditions such as the water pressure water hardness and or extra options selected The Quick Wash time increases in this sequence Off 15 min 2...

Page 31: ...elect the Delay End 4 Use the arrows to set the end time of the current course and press OK 5 Press Start Pause button Use case You want to finish a two hour course 3 hours later from now For this you...

Page 32: ...it will reactivate the Child Lock To add detergent or more laundry in the drum or to change the course settings in the Child Lock state you must first stop or release the Child Lock When the washing m...

Page 33: ...rotating clockwise and anticlockwise for several minutes 3 When complete the washing machine turns off automatically Eco Check The energy water efficiency of the current course is displayed with a tec...

Page 34: ...erature for ECO DRUM CLEAN is set to 70 C which cannot be changed CAUTION Do not use any cleaning agents for cleaning the drum Chemical residue in the drum deteriorates the washing performance Eco dru...

Page 35: ...mart Washer app on your mobile device and tap Smart Check 2 Present the mobile device to the washing machine s display panel so that the mobile device and the washing machine face each other Then the...

Page 36: ...he washing machine from the main socket 2 Gently press the top area of the filter cover to open 3 Gently pull out the emergency drain tube 4 While holding the end of the drain tube open the tube cap 5...

Page 37: ...supply hose from the back of the washing machine Cover the hose with a cloth to prevent water from gushing out 4 Use pliers to pull out the mesh filter from the inlet valve hole 5 Submerge the mesh f...

Page 38: ...soft brushes Make sure the drain pump propeller inside the filter is unclogged 7 Reinsert the debris filter and turn the filter cap to the right To open the safety filter cap push in and turn it antic...

Page 39: ...ent container from the drawer A 3 Clean the drawer components in flowing water using a soft brush 4 Clean the drawer recess using a soft brush 5 Reinsert the release lever and the liquid detergent con...

Page 40: ...washing machine still doesn t operate normally repeat the above steps until it operates normally Care against an extended time of disuse Avoid leaving the washing machine unused for an extended time...

Page 41: ...with sufficient water pressure Make sure the detergent is added to the center of the detergent drawer The washing machine vibrates badly or makes noise Make sure the washing machine is installed on a...

Page 42: ...ake sure the washing machine is operating with sufficient water pressure Clean the mesh filter as it may be clogged 5E Clean the debris filter as it may be clogged Make sure the drain hose is not kink...

Page 43: ...ance cannot be connected to a power source Remove the door so that animals and small children cannot get trapped inside the appliance Do not exceed the detergent quantities recommended in the detergen...

Page 44: ...on Delicate fabric Can be dry cleaned using any solvent Item can be washed at 95 C Dry Clean Item can be washed at 60 C Dry clean with perchloride lighter fuel pure alcohol or R113 only Item can be wa...

Page 45: ...E WD12J8 WASH AND SPIN CAPACITY 12 0 kg DRY CAPACITY 8 0 kg DIMENSIONS W600 D600 H850 mm WATER PRESSURE 50 kPa 800 kPa NET WEIGHT 82 kg POWER CONSUMPTION WASHING AND HEATING 220 V 2000 W 240 V 2400 W...

Page 46: ...information on the label and the Sheet relate Wash Cotton 60 C Intensive 1400 rpm Dry Cotton Dry Cupboard Spin Estimatd annual consumption for a 4 person household always using the dries 200 cycles En...

Page 47: ...Memo Untitled 1 47 2016 10 12 11 11 56...

Page 48: ...QUESTIONS OR COMMENTS COUNTRY CALL OR VISIT US ONLINE AT UK 0330 SAMSUNG 7267864 www samsung com uk support EIRE 0818 717100 www samsung com ie support DC68 03483A 02 Untitled 1 48 2016 10 12 11 11 56...

Reviews: