English - 14
mEEtING INstALLAtIoN REQuIREmENts
Electrical supply and grounding
Never use an extension cord.
Use only the power cord that comes with your washing machine.
When preparing for installation, ensure that your power supply offers:
•
AC 220-240V / 50Hz fuse or circuit breaker
•
Individual branch circuit serving only your washing machine
Your washing machine must be grounded. If your washing machine malfunctions or breaks
down, grounding will reduce the risk of electric shock by providing a path of least resistance for
the electric current.
Your washing machine comes with a power cord having a three-prong grounding plug for use in
a properly installed and grounded outlet.
Never connect the ground wire to plastic plumbing lines, gas lines, or hot water pipes.
Improperly connecting the equipment-grounding conductor can result in electric shock.
Check with a qualified electrician or serviceman if you are unsure if the washing machine is
properly grounded. Do not modify the plug provided with the washing machine. If it does not fit
the outlet, have a proper outlet installed by a qualified electrician.
Water supply
Your washing machine will fill properly when your water pressure is 50 kPa ~ 800 kPa. Water
pressure less than 50 kPa may cause water valve failure, not allowing the water valve to shut
off completely. Or, it may take the washing machine longer to fill than what the controls allow,
resulting in your washing machine turning off. (A fill-time limit, designed to prevent overflows/
flooding if an internal hose becomes loose, is built into the controls.)
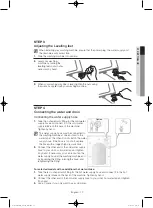
The water taps must be within 120cm of the back of your washing machine for the provided inlet
hoses provided to reach your washing machine.
Most plumbing supply stores sell inlet hoses of various lengths up to 305 cm long.
You can reduce the risk of leaks and water damage by:
• Making water taps easily accessible.
• Turning off taps when the washing machine is not in use.
• Periodically checking for leaks at water inlet hose fittings.
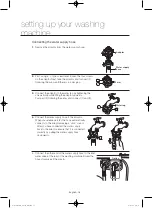
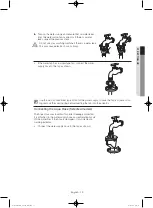
Before using your washing machine for the first time, check all connections at the water
valve and taps for leaks.
setting up your washing
machine
WARNING
WARNING
WD752U4BK_03213L_EN.indd 14
2014/5/14 9:25:33
Summary of Contents for WD752U4BK Series
Page 47: ...3 19 Samsung 39 WD752U4BK_03213L_TH indd 3 2014 5 14 9 24 09...
Page 48: ...4 Samsung Samsung www samsung com WD752U4BK_03213L_TH indd 4 2014 5 14 9 24 10...
Page 49: ...5 8 WD752U4BK_03213L_TH indd 5 2014 5 14 9 24 10...
Page 50: ...6 AC 220 240V 50Hz WD752U4BK_03213L_TH indd 6 2014 5 14 9 24 10...
Page 51: ...7 WD752U4BK_03213L_TH indd 7 2014 5 14 9 24 10...
Page 52: ...8 WD752U4BK_03213L_TH indd 8 2014 5 14 9 24 10...
Page 53: ...9 Samsung Samsung WD752U4BK_03213L_TH indd 9 2014 5 14 9 24 10...
Page 54: ...10 WD752U4BK_03213L_TH indd 10 2014 5 14 9 24 10...
Page 55: ...11 WD752U4BK_03213L_TH indd 11 2014 5 14 9 24 10...
Page 57: ...13 01 Samsung Samsung 3 5 WD752U4BK_03213L_TH indd 13 2014 5 14 9 24 11...
Page 59: ...15 01 Samsung 65 25 50 25 465 465 1 h 0 C WD752U4BK_03213L_TH indd 15 2014 5 14 9 24 11...
Page 60: ...16 2 1 2 3 4 WD752U4BK_03213L_TH indd 16 2014 5 14 9 24 11...
Page 61: ...17 01 3 1 2 3 4 1 L 2 1 L 2 3 Y WD752U4BK_03213L_TH indd 17 2014 5 14 9 24 12...
Page 62: ...18 1 2 2 5 3 2 1 2 4 3 5 1 2 5 1 2 3 WD752U4BK_03213L_TH indd 18 2014 5 14 9 24 12...
Page 63: ...19 01 6 Aqua Hose Aqua Hose WD752U4BK_03213L_TH indd 19 2014 5 14 9 24 13...
Page 65: ...21 02 Samsung 1 2 3 4 33 MAX A 1 31 32 2 3 4 5 6 WD752U4BK_03213L_TH indd 21 2014 5 14 9 24 14...
Page 68: ...24 10 10 11 12 13 WD752U4BK_03213L_TH indd 24 2014 5 14 9 24 15...
Page 69: ...25 02 3 3 3 19 1 1 2 3 4 3 3 WD752U4BK_03213L_TH indd 25 2014 5 14 9 24 16...
Page 70: ...26 1 2 3 4 1 2 3 4 41 5 3 3 3 LED 3 WD752U4BK_03213L_TH indd 26 2014 5 14 9 24 16...
Page 71: ...27 02 1 2 3 4 MAX A 33 5 WD752U4BK_03213L_TH indd 27 2014 5 14 9 24 16...
Page 74: ...30 Samsung 1 2 3 4 5 6 7 8 9 5 1 2 1 2 WD752U4BK_03213L_TH indd 30 2014 5 14 9 24 16...
Page 76: ...32 WD752U4BK 7 5 2 5 2 0 2 0 UE WD752U4BK_03213L_TH indd 32 2014 5 14 9 24 16...
Page 77: ...33 02 1 2 3 MAX FILL 4 MAX MAX WD752U4BK_03213L_TH indd 33 2014 5 14 9 24 17...
Page 78: ...34 1 2 70 C 70 C 60 C 30 C 3 4 1 10 WD752U4BK_03213L_TH indd 34 2014 5 14 9 24 17...
Page 79: ...35 03 36 1 2 3 4 15 5 6 7 WD752U4BK_03213L_TH indd 35 2014 5 14 9 24 18...
Page 80: ...36 5 6 5E 1 35 2 3 4 5 6 7 1 2 3 WD752U4BK_03213L_TH indd 36 2014 5 14 9 24 18...
Page 81: ...37 03 1 2 3 4 5 6 7 4E 1 2 3 4 5 6 WD752U4BK_03213L_TH indd 37 2014 5 14 9 24 18...
Page 82: ...38 1 2 3 4 10 5 1 2 3 WD752U4BK_03213L_TH indd 38 2014 5 14 9 24 18...
Page 83: ...39 04 3 Samsung WD752U4BK_03213L_TH indd 39 2014 5 14 9 24 18...


