background image

setting up your new washing machine 

_13

01 SETTING UP

STEP 3

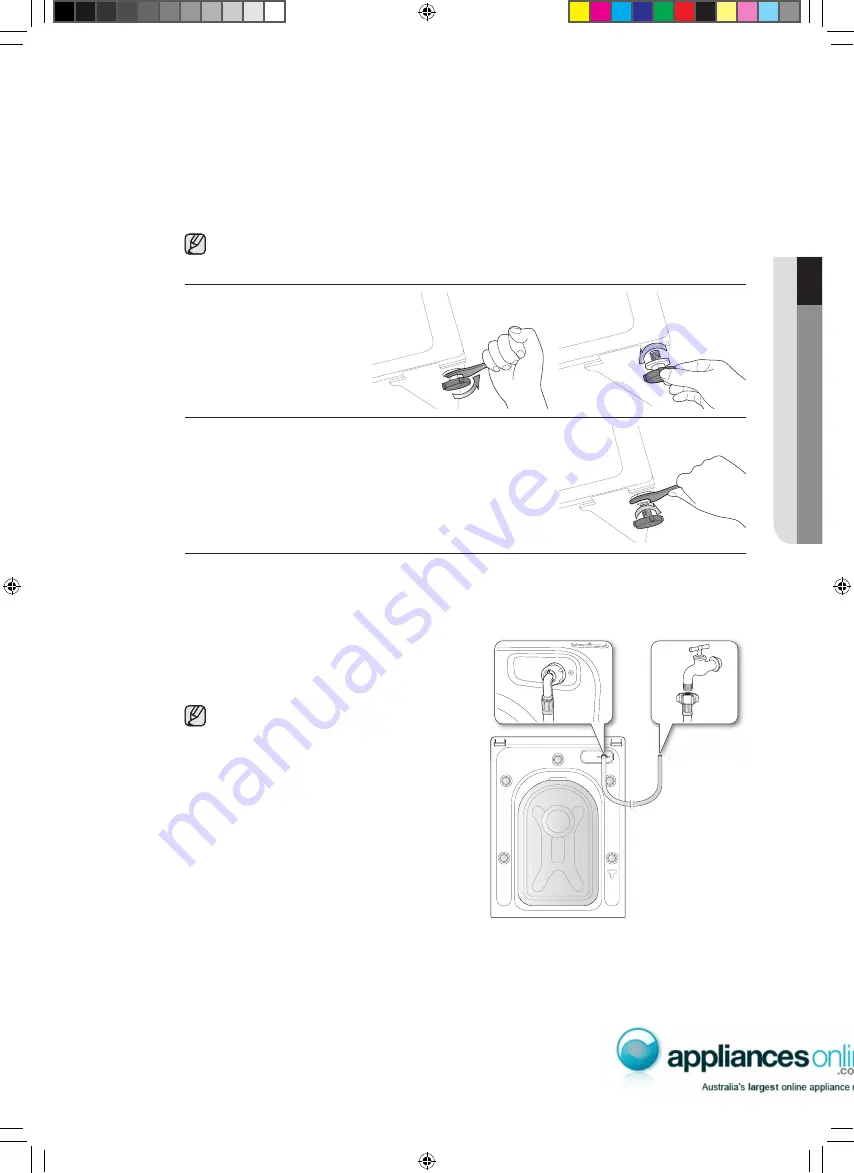
Adjusting the levelling feet

When installing your washing machine, ensure that the power plug, the water supply and 
the drain are easily accessible.

1. 

Slide the washing machine into position.

2. 

Level your washing 
machine by turning the 
leveling feet in and out as 
necessary by hand. 

3. 

When your washing machine is level, tighten the nuts using 
the wrench supplied with your washing machine.

STEP 4

Connecting the water and drain

Connecting the water supply hose

1. 

Take the L-shaped arm fitting for the cold water 
supply hose and connect it to the cold water 
supply intake on the back of the machine. 
Tighten by hand.

The water supply hose must be connected 
to the washing machine at one end and to 
the water tap at the other. Do not stretch the 
water supply hose. If the hose is too short, 
replace the hose with a longer, high pressure 
hose.

2. 

Connect the other end of the cold water supply 
hose to your sink’s cold water tap and tighten 
it by hand. If necessary, you can reposition the 
water supply hose at the washing machine end 
by loosening the fitting, rotating the hose, and 
retightening the fitting.

For selected models with an additional hot water intake:

1. 

Take the red L-shaped arm fitting for the hot water supply hose and connect it to the hot 
water supply intake on the back of the machine. Tighten by hand.

2. 

Connect the other end of the hot water supply hose to your sink’s hot water tap and tighten 
it by hand.

3. 

Use a Y-piece if you only want to use cold water.

WD8704EJ-02719A_EN.indd   13

2009-10-20   ø¿¿¸ 11:08:06

Summary of Contents for WD8704EJ

Page 1: ...omplete service please register your product at www samsung com register WD8704EJ A F G H S V W Z WD8702EJ A F G H S V W Z WD8704RJ A F G H S V W Z WD8702RJ A F G H S V W Z WD8704CJ A F G H S V W Z WD...

Page 2: ...ou when it is activated Wool Certi ed The machine has been tested and passed the required Woolmark Company speci cation for machine washable wool products Fabrics should be washed according to the ins...

Page 3: ...isplay enables you to make quick and accurate adjustments to your wash for excellent washing results Wide door Extra wide door aperture for convenient viewing Easily add and remove laundry especially...

Page 4: ...llow these basic safety precautions CAUTION To reduce the risk of re or explosion follow these basic precautions Do NOT attempt Do NOT disassemble Do NOT touch Follow directions explicitly Unplug the...

Page 5: ...the power cord before servicing your washing machine Before each wash empty the pockets of your laundry Small irregularly shaped hard objects such as coins knives pins and paperclips could damage you...

Page 6: ...ck of experience and knowledge unless they have been given supervision or instruction concerning use of the appliance by a person responsible for their safety Children should be supervised to ensure t...

Page 7: ...ain metal reinforcements should not be placed in a tumble dryer Damage to the tumble dryer can result if metal reinforcements come loose during drying When available a drying rack could be used for su...

Page 8: ...lector 25 Washing clothes manually 26 LAUNDRY GUIDELINES 27 Detergent and additives information 27 Which detergent to use 27 Detergent drawer CLEANING AND MAINTAINING YOUR WASHING MACHINE 28 28 Draini...

Page 9: ...fully unpack your washing machine and make sure you ve received all of the parts shown below If your washing machine was damaged during shipping or if you do not have all of the parts contact Samsung...

Page 10: ...ing the equipment grounding conductor can result electrical shock Check with a quali ed electrician or serviceman if you are unsure if the washing machine is properly grounded Do not modify the plug p...

Page 11: ...since your washing machine always retains some water in its water valve pump and hose areas Frozen water in the lines can cause damage to belts the pump and other components Alcove or closet installat...

Page 12: ...panner and pull it through the wide section of the hole Repeat for each bolt 3 Fill the holes with the supplied plastic covers 4 Store the shipping bolts away safely in case you have to move the washi...

Page 13: ...supply hose must be connected to the washing machine at one end and to the water tap at the other Do not stretch the water supply hose If the hose is too short replace the hose with a longer high pres...

Page 14: ...2 following the arrow and connect 1 and 2 4 Connect the water supply hose to the adaptor When you release part 3 the hose automatically connects to the adaptor making a click sound After you have con...

Page 15: ...o not use your washing machine if there is a water leaks This may cause electric shock or injury If the water tap has a screw type tap connect the water supply hose to the tap as shown Use the most co...

Page 16: ...nd of the hose is at least 60 cm above the ground 3 ln a drain pipe We recommend using a 65 cm high vertical pipe it must be no shorter than 60 cm and no longer than 90 cm STEP 5 Powering your washing...

Page 17: ...leach and stain removal product Compartment Additives e g fabric softener or former ll no higher than lower edge MAX of A BASIC INSTRUCTIONS 1 Load your laundry into the washing machine Do not overloa...

Page 18: ...continued to protect the wool bers from shrinkage distortion and for a super gentle clean This stop operation is not a problem Neutral detergent is recommended for wool course for improved washing re...

Page 19: ...the nal drain Rinse Hold The laundry remains soaking in the nal rinse water Before the laundry can be unloaded either a Drain or Spin cycle must be performed DRYING BUTTON Only include items that are...

Page 20: ...e sound is turned off for all cycles When the Sound off function is activated the lamp on the Sound Off button and the control panel are illuminated When the Sound off function is deactivated a buzzer...

Page 21: ...activate the Sound Off function press the Sound Off button The lamp on the Sound Off button and the control panel will be lit when this feature is activated Delay end You can set the washing machine t...

Page 22: ...g sequence Deodorise Sanitise MODE CYCLE TIME Deodorise 29 min Sanitise 59 min When one of these options has been selected no other button can be selected and you can only select the delay end time fr...

Page 23: ...kg and 4kg the Time Dry option is recommended The selected course can not be changed after the machine has started drying If you run a wash dry course the SPIN speed will automatically be set to High...

Page 24: ...ener in the detergent tray and close it again 2 Rotate the jog dial until your desired wash cycle is illuminated cotton synthetics denim and sports wear 3 Press Drying button until Time Dry option ill...

Page 25: ...arting a wash it is possible to add remove laundry items 1 Press the Start Pause button to unlock the door The door cannot be opened when the water is too HOT or the water level is too HIGH 2 After cl...

Page 26: ...and embroidered clothes inside out before washing them If zips of pants and jackets are open while washing the spin basket may be damaged Zips should be closed and xed with a string before washing Clo...

Page 27: ...unt of water before adding to the machine Do not use detergent that has hardened or solidi ed as the detergent may remain in the rinse cycle It may cause your washing machine to not rinse properly or...

Page 28: ...drain cap by turning it to the left 4 Hold the cap on the end of the emergency drain tube and slowly pull it out about 15 cm 5 Allow all the water to ow into a bowl 6 Reinsert the drain tube and scre...

Page 29: ...perform a rinse cycle without any laundry in the drum CLEANING THE DEBRIS FILTER We recommend cleaning the debris lter 5 or 6 times a year or when the error message of 5E is displayed Refer to Draini...

Page 30: ...loosen the water supply hose 3 Remove the water supply hose and soak it in warm water 4 Pour warm water into the washing machine drum and let it sit for 10 minutes 5 Reconnect the water supply hose to...

Page 31: ...r washing machine is running with suf cient water pressure Make sure the detergent is added to the center of the detergent drawer Vibrates or is too noisy Make sure your washing machine is on a level...

Page 32: ...aundry load is unbalanced Redistribute the load If only one item of clothing needs washing such as a bathrobe or pair of jeans the nal spin result might be unsatisfactory and an UE error message will...

Page 33: ...0 Synthetics 1200 1200 90 Denim 800 800 78 Sports Wear 1200 1200 72 Delicates 800 800 50 Wool 800 800 38 Handwash 400 400 31 Deodorise 29 Sanitise 59 Drying 257 Water Saving 1400 1200 199 Quick 29 140...

Page 34: ...be hung to dry Can be bleached in cold water Dry on clothes hanger Do not bleach Tumble dry normal heat Can be ironed at 200 C max Tumble dry reduced heat Can be ironed at 150 C max Do not tumble dry...

Page 35: ...WD8702CJ WD8702DJ WD8702EJ WD8702RJ WASHING 220 V 150 W 240 V 150 W WASH AND HEATING 220 V 2000 W 240 V 2400 W DRYING 230V 1600W SPIN MODEL WD8704CJ WD8704DJ WD8704EJ WD8704RJ WD8702CJ WD8702DJ WD8702...

Page 36: ...QUESTIONS OR COMMENTS Country CALL OR VISIT US ONLINE AT AUSTRALIA 1300 362 603 www samsung com au Code No DC68 02719A_EN WD8704EJ 02719A_EN indd 36 2009 10 20 11 08 18...

Reviews: