- 3 -
- 4 -
7
L
L
R
R R
R
F
F
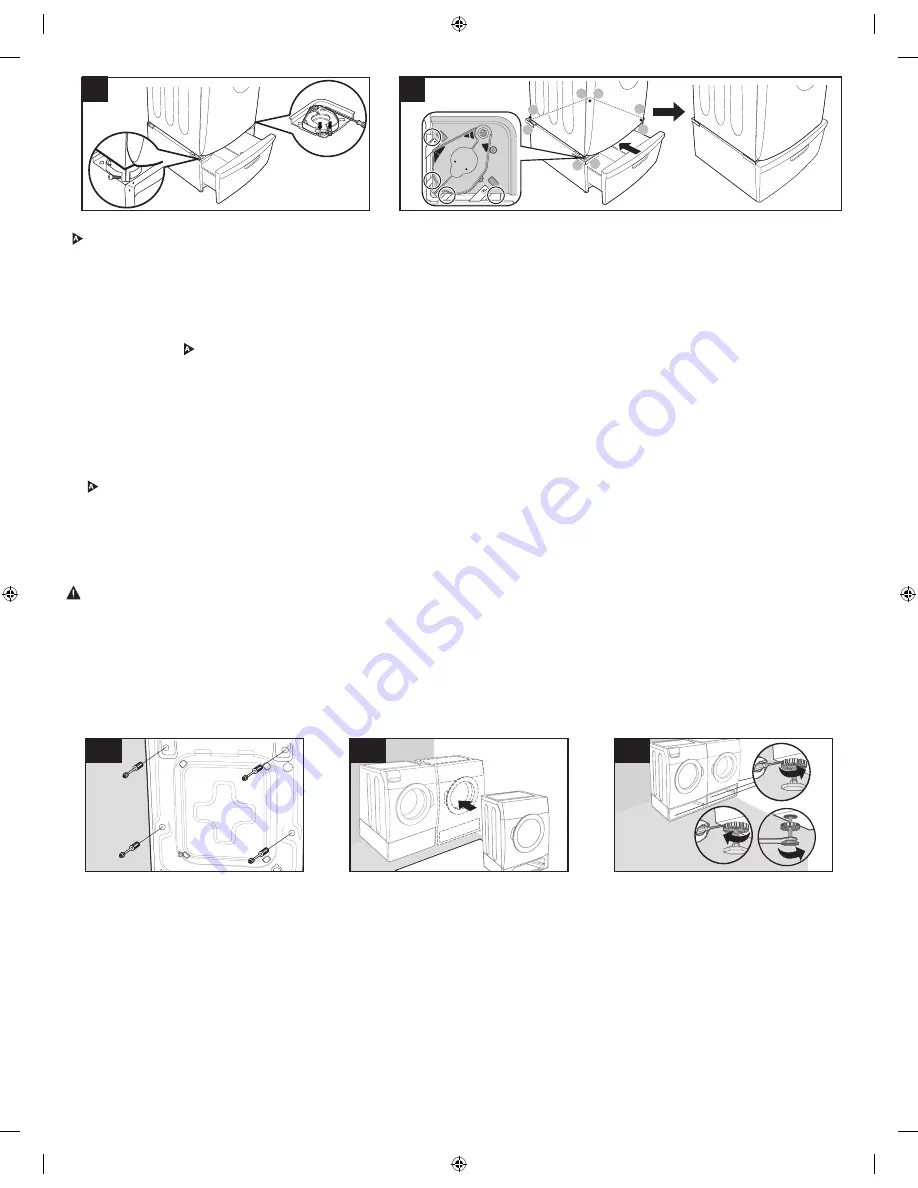
Close and lock the clamps by hand, and then screw an M5 screw
( ) through the screw hole of each clamp to secure the washer
or dryer to the pedestal.
Important:
You must close and lock each clamp by hand. Do not
use a plyers or similar tool to close the clamp. You can break the
clamp. If you can’t close the clamp by hand, move the washer or
dryer slightly, and then try again.
Cierre y asegure manualmente las abrazaderas y a continuación
atornille un tornillo M5( ) a través del orificio de cada
abrazadera para asegurar la lavadora o la secadora en el
pedestal.
Importante:
Las abrazaderas se deben cerrar y asegurar
manualmente. No utilice alicates ni herramientas similares para
cerrar la abrazadera. Podría romperla. Si no puede cerrar la
abrazadera manualmente, mueva ligeramente la lavadora o la
secadora e inténtelo de nuevo.
Fermez et verrouillez les colliers à la main, puis vissez une vis
M5( ) à travers le trou de vis de chaque collier afin de fixer le
lave-linge ou le sèche-linge sur le socle.
Important:
vous devez fermer et verrouiller chaque collier à la
main. N’utilisez pas de pince ou d’outil similaire pour fermer le
collier. Vous risquez de briser ce dernier. Si vous ne parvenez pas
à fermer le collier à la main, déplacez légèrement le lave-linge ou
le sèche-linge et essayez à nouveau.
Caution / Atención / Attention
If a clamp won't close properly, use the screwdriver instead of
plyers to hold down the end of the clamp to close as shown.
Si una abrazadera no cierra correctamente, use un destornillador
en vez de unos alicates para presionarla hacia abajo por el
extremo tal como se muestra.
Si un loquet ne se ferme pas correctement, utilisez le tournevis
au lieu des pinces pour maintenir l'extrémité du loquet pour
fermer de la manière indiquée.
Attach a Guide Cover to each corner of the pedestal. Each Guide Cover is labeled (RF for Right
Front, FL or LF for Left Front, RR for Right Rear and LR for Left Rear.) so you can identify the
correct corner to attach it to.
To attach a Guide Cover, grasp the tab at the corner of the Guide Cover, and then, holding
the Guide Cover at a 45 degree angle, slide the 4 prongs (circled on the Guide Cover in the
illustration above) under the clamp area, then flatten and push into place.
After you have attached the Guide Cover, close the drawer.
Fije una guía de cubierta en cada esquina del pedestal. Cada guía de cubierta está rotulada
(RF para frontal derecha, FL o LF para frontal izquierda, RR para posterior derecha y LR para
posterior izquierda) de modo que le permita identificar en qué esquina debe fijarlas.
Para fijar una guía de cubierta, sujete la lengüeta de la esquina de la guía de cubierta y,
manteniendo la guía de cubierta en un ángulo de 45 grados, deslice las 4 puntas (marcadas
con un círculo en la guía de cubierta de la ilustración superior) por debajo de la zona de las
abrazaderas, aplánelas y colóquelas en su lugar.
Una vez fijadas las guías de cubierta, cierre el cajón.
Fixez une protection sur chaque coin du socle. Chaque protection porte une étiquette (RF pour
l’avant droit, FL ou LF pour l'avant gauche, RR pour l’arrière droit et LR pour l’arrière gauche)
afin que vous puissiez identifier le coin sur lequel vous devez la fixer.
Pour fixer une protection, saisissez la patte au coin de la protection, puis, tout en maintenant
cette dernière à un angle de 45 degrés, faites glisser les 4 languettes (encerclées sur
l'illustration ci-dessus) sous la surface du collier, aplatissez la protection et poussez-la en place.
Après avoir fixé les protections, fermez le tiroir.
G
8
9
1
3
2
10
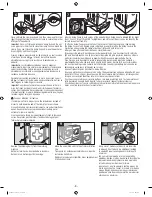
Remove the Shipping bolts from the washing
machine.
Retire los tornillos de transporte de la lavadora.
Retirez les vis de transport du lave-linge.
Move the assembled units to their final installation
site.
Transporte las unidades ensambladas a su lugar de
instalación definitivo.
Déplacez les appareils assemblés à leur emplacement
d'installation finale.
Using a level, make sure the units are level side
to side and front to back. Do additional leveling
as needed. Proper leveling keeps vibration at a
minimum.
Con un nivel, compruebe si las unidades están
niveladas de lado a lado y de adelante atrás. Realice
la nivelación adicional necesaria. Una nivelación
correcta reduce la vibración al mínimo.
Assurez-vous que les appareils sont de niveau de
droite à gauche et de l'avant à l’arrière à l’aide d’un
niveau. Réglez à nouveau le niveau si nécessaire.
Une bonne mise de niveau permet de maintenir les
vibrations au minimum.
6
PEDESTAL-02931A-03_Creation.indd 3
2015-06-17 8:12:28


