background image

English - 15

02

 SE

TTING UP

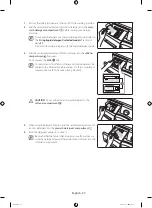
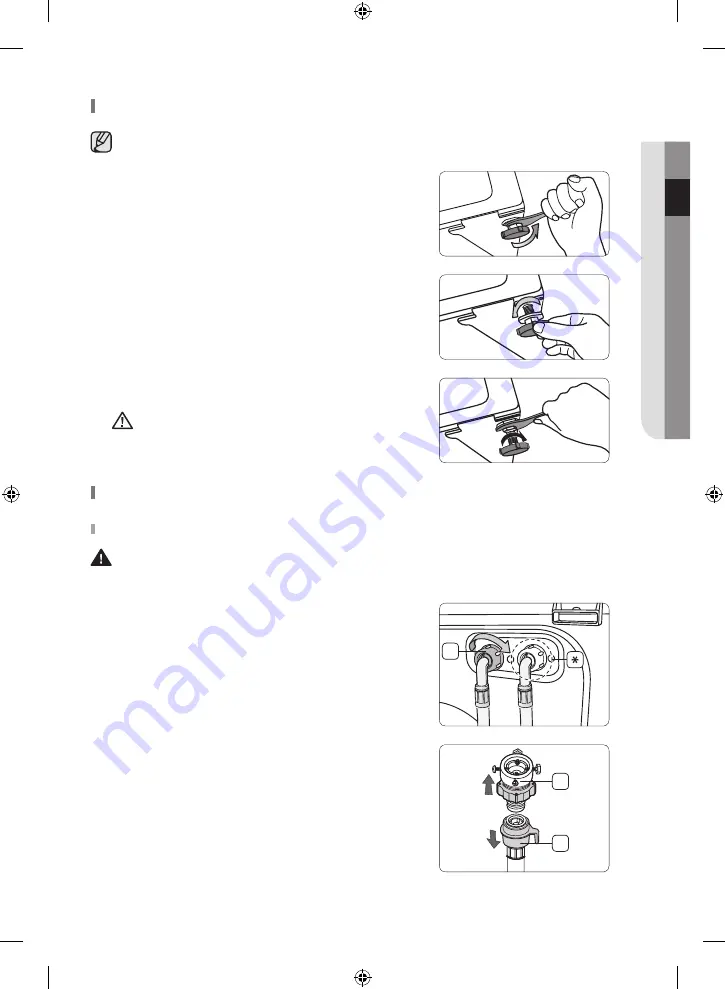
STEP 3 - Adjusting the levelling feet

When installing your washing machine, ensure that the power plug, the water supply, and the drain are 
easily accessible.

1. 

Slide the washing machine into position.

2. 

Loosen all the lock nuts with the wrench.

3. 

Level your washing machine by turning the levelling feet as necessary 
by hand.

4. 

When your washing machine is level, tighten the lock nuts using the 
wrench.

CAUTION

: Do not move your washing machine unless you 

tighten the lock nuts. This may result in damage to the leveling 
feet.

STEP 4 - Connecting the water and the drain

Connecting the water supply hose

WARNING

: Do not connect multiple water supply hoses together. This may result in a water leak and 

electric shock due to the water leak. If the hose is too short, replace the hose with a longer, high pressure 
hose.

1. 

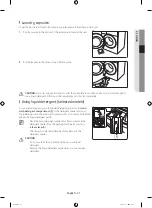
Connect the L-shaped arm fitting for the cold water supply hose to the 
cold water supply intake at the back of the washing machine. Then 
tighten it by turning 

part (A)

 clockwise by hand.

(*)

: Optional

A

2. 

Remove the 

adaptor (B)

 from the other end of the 

water supply hose 

(C)

.

B

C

Untitled-1   15

2016-11-17     2:59:14

Summary of Contents for WF9 F5 Series

Page 1: ...WF9 F5 Washing machine User manual imagine the possibilities Thank you for purchasing this Samsung product Untitled 1 1 2016 11 17 2 59 11...

Page 2: ...ng 13 Surrounding temperature 13 Alcove or closet installation 13 Installing your washing machine 14 Using your washing machine 19 Detergent and Additives Information 19 Using the proper detergent 19...

Page 3: ...t drawer and drawer recess 34 Cleaning the mesh filter 34 Maintaining your washing machine 35 Repairing a frozen washing machine 35 Storing your washing machine 35 Troubleshooting and information code...

Page 4: ...d operating your washing machine Because the following operating instructions cover various models the characteristics of your washing machine may differ slightly from those described in this manual a...

Page 5: ...derstand the hazards involved Children shall not play with the appliance Cleaning and user maintenance shall not be made by children without supervision 3 Children should be supervised to ensure that...

Page 6: ...hild places a bag over its head it may suffocate When the appliance power plug or power cord is damaged contact your nearest service centre This appliance must be properly grounded Do not ground the a...

Page 7: ...sposing of the appliance remove the washing machine door lever If trapped inside the product children may suffocate to death Make sure to remove the packaging sponge styrofoam attached to the bottom o...

Page 8: ...glass may be broken by a strong impact Take care when using the washing machine If the glass is broken it may result in injury After a water supply failure or when reconnecting the water supply hose o...

Page 9: ...machine when the detergent drawer is removed This may result in electric shock or injury due to a water leak Do not touch the insides of the drum during or just after drying as it is hot This may resu...

Page 10: ...g or performing maintenance unplug the appliance from the wall socket Failure to do so may result in electric shock or fire Instructions about the WEEE Correct Disposal of This Product Waste Electrica...

Page 11: ...aged during shipping or if you do not have all of the parts contact the Samsung Customer Service or your Samsung dealer 1 10 11 12 3 4 5 6 7 8 2 9 1 Release lever 2 Detergent drawer 3 Control panel 4...

Page 12: ...modify the plug provided with the washing machine If it does not fit the outlet have a proper outlet installed by a qualified electrician Water supply Your washing machine will fill properly when your...

Page 13: ...install your washing machine on a platform or poorly supported structure Surrounding temperature Do not install your washing machine in areas where the ambient temperature may drop below water s freez...

Page 14: ...ilation Is not exposed to freezing temperatures below 0 C Is away from heat sources such as oil or gas Has enough space so that the washing machine doesn t stand on its power cord STEP 2 Removing the...

Page 15: ...less you tighten the lock nuts This may result in damage to the leveling feet STEP 4 Connecting the water and the drain Connecting the water supply hose WARNING Do not connect multiple water supply ho...

Page 16: ...supply hose is not twisted or bent If the hose is twisted or bent there is a danger of a water leak and electric shock due to the water leak If necessary you can reposition the water supply hose at th...

Page 17: ...own A Connecting the drain hose The end of the drain hose can be positioned in three ways Over the edge of a wash basin The drain hose must be placed at a height between 60 cm and 90 cm To keep the dr...

Page 18: ...detection it is recommended running Calibration Mode immediately after installing the washing machine Follow the steps below to run Calibration Mode Before running Calibration Mode make sure that ther...

Page 19: ...se properly or result in the overflow becoming blocked Using the detergent drawer Your washing machine has separate compartments for dispensing detergent and fabric softener Add all laundry additives...

Page 20: ...e softener compartment if required Do not exceed the MAX line Concentrated or thick fabric softener and conditioner must be diluted with a little water before adding it to the compartment prevents the...

Page 21: ...detergent selected models To use liquid detergent place the liquid detergent guide into the main wash detergent compartment of the detergent drawer and pour liquid detergent into the main wash compart...

Page 22: ...oor seal after a wash cycle Remove any remaining detergent before you close the door as it may cause a water leak CAUTION Make sure that laundry is not caught in the door as this may cause a water lea...

Page 23: ...laundry remains in the drum and no spin cycle is performed after the final drain 6 Option button Press this button repeatedly to cycle through the options Soak Intensive Prewash Soak Intensive Soak P...

Page 24: ...ed garments and less than 2 kg laundry that you require quickly It takes a minimum of about 15 minutes but can vary from the indicated values depending on the water pressure water hardness water inlet...

Page 25: ...leaning the drum It cleanses dirt and bacteria from the drum Regular use after every 40 washes is recommended No detergent or bleach is required Super Eco Wash The low temperature Super Eco Wash cycle...

Page 26: ...old down the Rinse and Spin buttons at the same time for 3 seconds The Sound Off indicator will light up when this feature is activated Delay End You can set the washing machine to finish your wash au...

Page 27: ...the Smart Check button Smart Check may be changed to Smart Care depending on the language selection 4 Focus your smart phone s camera on the Smart Check code displayed on the washing machine s displa...

Page 28: ...are Baby Care Wool and Bedding The relevant indicators will light up on the control panel 8 At this time you can control the wash temperature the number of rinse cycles the spin speed and the delay ti...

Page 29: ...most efficient wash Always check the care label on clothing before washing Sort and wash your laundry according to the following criteria Care Label Sort laundry into cottons mixed fibres synthetics...

Page 30: ...he load If the laundry is unbalanced the spin efficiency may be reduced When washing bedding or bedding covers the wash time may be lengthened or the spin efficiency may be reduced For bedding or bedd...

Page 31: ...Chemical residue in the drum deteriorates the washing performance Eco Drum Clean auto alarm function After a wash if it is detected that cleaning the drum is required the Eco Drum Clean indicator on...

Page 32: ...en A 3 Prepare a bowl The remaining water may be more than you expected Use a large bowl 4 Pull out the emergency drain tube C and put the end of the emergency drain tube C into a bowl B 5 Hold the em...

Page 33: ...ilter without draining the remaining water the remaining water may trickle out 3 Unscrew the debris filter cap A by turning it to the left A 4 Wash any dirt or other material from the debris filter Ma...

Page 34: ...filter You should clean the mesh filter at least once a year or when the 4E error code is displayed 1 Unplug the washing machine from the electrical outlet 2 Turn off the water supply to the washing...

Page 35: ...it The washing machine can be damaged if water is left in the hoses and internal components before storage Prepare your washing machine for storage as follows 1 Select the Cotton cycle press the 15 Qu...

Page 36: ...in the upper position Remove the rinse cap and clean the detergent drawer Excessive vibrations or makes noise Make sure the washing machine is installed on a level solid floor that is not slippery If...

Page 37: ...machine starts to fill it will make a series of clicking noises to check the door lock and does a quick drain There may be a pause or soak period in the cycle Wait briefly and the washing machine may...

Page 38: ...hose connections are tight Make sure the end of the drain hose is correctly inserted and secured to the drain system Avoid overloading Use high efficiency HE detergent to prevent oversudsing Has odour...

Page 39: ...k the water pressure Clean the mesh filters of water supply intakes Make sure the water supply hose is not kinked or clogged 5E Clean the debris filter Make sure the drain hose is installed correctly...

Page 40: ...ox 20 minutes longer 2 The cycle duration data has been measured under the conditions specified in Standard IEC60456 EN60456 3 Please run Calibration Mode after the installation refer to the STEP 6 Ru...

Page 41: ...ean Hand wash only Dry flat Dry clean only Can be hung to dry Can be bleached in cold water Dry on clothes hanger Do not bleach Tumble dry normal heat Can be ironed at 200 C max Tumble dry reduced hea...

Page 42: ...Weighted Power in left on mode P_l W 5 Annual water consumption AW_c 2 L yr 9400 Spin efficiency class 3 A most efficient to G least efficient B Maximum Spin Speed rpm 1400 Residual moisture 53 Progra...

Page 43: ...left on mode P_l W 5 Annual water consumption AW_c 2 L yr 9400 Spin efficiency class 3 A most efficient to G least efficient B Maximum Spin Speed rpm 1200 Residual moisture 56 Programs to which the i...

Page 44: ...cotton laundry and they are the most efficient concerning water and energy consumption for this type of laundry Please run Calibration Mode after the installation refer to the STEP 6 Running Calibrat...

Page 45: ...Memo Untitled 1 45 2016 11 17 2 59 26...

Page 46: ...Memo Untitled 1 46 2016 11 17 2 59 27...

Page 47: ...Memo Untitled 1 47 2016 11 17 2 59 27...

Page 48: ...QUESTIONS OR COMMENTS COUNTRY CALL OR VISIT US ONLINE AT UK 0330 SAMSUNG 7267864 www samsung com uk support EIRE 0818 717100 www samsung com ie support DC68 03367W 01 Untitled 1 48 2016 11 17 2 59 27...

Reviews: