2
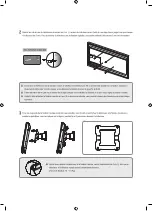
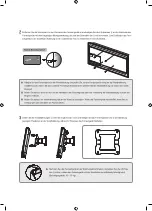
Remove the screws from the back of the TV and fasten the 4 screws
ⓑ
onto the back of the TV with the enclosed assembly tool
until each of the screws projects out by 5mm. To hang the TV onto the adjustable mount, a projected part of at least 5 mm is nec-
essary.
Hang the TV onto the wall mount and make sure to check if the TV has been installed properly onto the wall mount by
observing the assembled TV as you move the wall mount from left to right.
Take care not to hurt your fingers when you install the TV or adjust the wall mount.
Make sure to fix the wall mount onto the wall firmly. If the TV falls, it may result in injury or damage to the product.
3
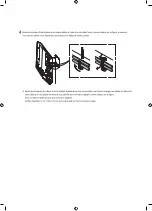
Pull the wall mount brackets as far forward as possible and hang the TV onto the wall mount at the specified positions as
shown by the figure while 2 persons are holding the TV.
After fixing the TV onto the wall mount, firmly fasten the 4 screws
ⓑ
so that the TV and
the wall mount are completely fastened.
(Fastening force: 10 ~ 15 Kg)
TV
Flat-type fastening hole
Summary of Contents for WMN4070TT
Page 36: ...WMN4270S WMN4270S 1 2 4 3 4 5 WMN4070TT 1 7 7 4 1...
Page 37: ...50 10 10 10 30 30 25 25 50 MDF PW 0 24 1 9X70 WMN 2370 4X25...
Page 38: ...2 4 5 5 3 2 4 10 15 TV...
Page 39: ...4 2 3...
Page 56: ...WMN4270S WMN4270S 1 2 4 3 4 5 WMN4070TT 1 7 7 4 1...
Page 58: ...2 4 5mm 5 mm 3 4 10 15 Kg TV...
Page 59: ...4 2 3...
Page 61: ...WMN4270S WMN4270S 1 2 4 3 4 5 WMN4070TT 1 7 7 4 1...
Page 63: ...2 4 5 5 3 2 4 10 15 TV...
Page 64: ...4 2 3...
Page 66: ...1 2 4 3 4 TV 5 TV TV WMN4070TT 1 7 7 4 1...
Page 68: ...3 TV 2 TV 4 TV 5 mm 5 mm TV 4 10 15 Kg TV...
Page 69: ...4 2 3...
Page 71: ......
Page 72: ......

