background image

English - 1

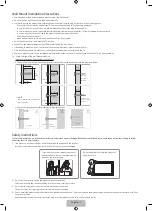
Wall Mount Installation Precautions


Use only the provided accessories and parts to install the wall mount.


Do not install on any surface other than a vertical wall.


In order to ensure the product’s performance and prevent malfunctions, do not install it in the following areas:

 - Areas with strong vibration and/or impact: Can cause the product to fall and become damaged.
 -

In the vicinity of a fire sprinkler: Heat generated by the product may trigger the sprinkler.

 - In the vicinity of a high-voltage cable: Interference from the cable can prevent the TV from displaying images correctly.
 - In the vicinity of a heater: Can cause the product to overheat and malfunction.
 -

Check the stability of the wall.

 -

Weak walls will need to be reinforced before the TV can be mounted.


Do not hollow out a wall and install the TV inside it.


Connect all the external devices to the TV before installing the wall mount.


• If intending to mount on a non-concrete wall, contact a professional installer and verify first.


Once installed, maintain a distance of at least 28mm between the wall surface and the TV.


• Check the model of your TV, the corresponding installation guide on the back, and the types of walls the TV can be mounted on.


[

Check the type of the wall before installing.

Standard Installation Requirements by Wall Type


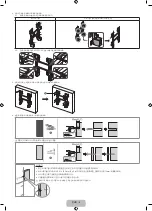
• Can only be mounted on a concrete or interior wall of sufficient thickness. Refer to the diagrams below.

Min. 50mm

Min. 10mm

MDF, PW

Min. 10mm

MDF, PW

Min. 10mm

MDF, PW

MDF, PW

Concrete

MDF, PW

(Exc. drywall 

thickness)

Mixed Concrete 

Wall (Exc. drywall 

thickness)

Art Wall

Art Wall

Min. 30mm

Min. 30mm

Min. 

25mm

Min. 

25mm

MDF 

PW, etc.

With reinforcement

Min. 

50mm


NOTE

MDF = Medium Density Fiberboard
PW = Plywood


Cannot be mounted on unreinforced wall or drywall surfaces.

0~24mm

MDF, PW, 

Concrete

Without

reinforcement

Cannot install on drywall

Drywall

Art Wall

Safety instructions

These safety instruction are intended to protect you and prevent property damage. Read them carefully and comply with these instructions. Failing to follow 

them may result in physical injury.
1.

  This product must be installed by a qualified technician assigned by the retailer.

Install by a non-professional may result in physical injury or product damage.

If you want to move or replace the product 

after installation, contact the technician as-

signed by the retailer again.

Do not hang from the installed product or 

apply force to it.

2.

  Do not let children play around the product without supervision.

Children may bump their heads or bodies into the corners, resulting in injury.

3.

  Do not install the product on a wall that will not support its weight.

The product may fall, resulting in physical injury or product damage.

4.

  Do not install the product under abnormal or non-standard site conditions. The product may be severely damaged. In these circumstances, contact a local Sam-

sung service center.  

Keep the product away from dust, chemicals, high or low temperatures, humidity, and/or vehicle traffic.

Summary of Contents for WMN8200SFXEN

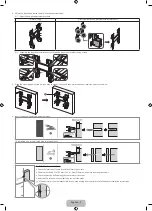
Page 1: ...ness Refer to the diagrams below Min 50mm Min 10mm MDF PW Min 10mm MDF PW Min 10mm MDF PW MDF PW Concrete MDF PW Exc drywall thickness Mixed Concrete Wall Exc drywall thickness Art Wall Art Wall Min 30mm Min 30mm Min 25mm Min 25mm MDF PW etc With reinforcement Min 50mm NOTE MDF Medium Density Fiberboard PW Plywood Cannot be mounted on unreinforced wall or drywall surfaces 0 24mm MDF PW Concrete Wi...

Page 2: ...us of the wall type thickness flatness LFD Wall Surface LFD Wall Surface Object Object 28mm 1 1 If the wall surface isn t completely flat unsightly gaps may form after installation 1 2 It is not possible to mount the LFD to the wall if there are objects that are 28mm or thicker attached on the wall surface 2 Check the installation conditions Verify the type normal or slim based on the LFD model No...

Page 3: ...nchor insertion points on the wall E 6 Insert the anchors and screws where marked F Installing on a drywall with stud reinforcements E 15mm Installation Requirements Check the location of the studs and then insert the screws Minimum Stud Size 51 x102 mm 2 x 4 in Predrill 3mm holes before inserting the screws The holes must be drilled along the center axis of the studs Inserting the screws without ...

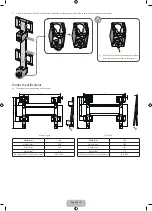
Page 4: ...the pieces into the right holes A Up Down M8 X L35 M8 X L49 M8 X L64 LH82DME QET82 QMR85 QBR85 WMR85 QER82 QPR82 QPR98 M8 X L71 M8 X L40 1TWashers 9 Work with at least two another people to lift the LFD and mount it on to the bracket as shown in the diagram 10 Lift the bottom of the LFD and then secure it in place as shown in the diagram Connect the cables Wall Wall Wall ...

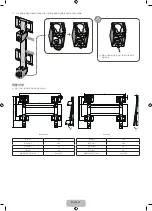
Page 5: ...ontallyleveled adjust the level byturning the screws as shown in the diagram Product Specifications Tilt angle mayvary depending on the model Normal Type Width mm 764 Height mm 580 Depth mm 100 Weight Kg 4 6 Wall Mount VESA Specifications mm 600 x 400 Slim Type Width mm 764 Height mm 580 Depth mm 28 Weight Kg 3 4 Wall Mount VESA Specifications mm 600 x 400 ...

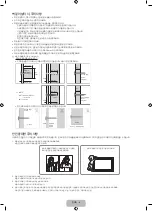
Page 6: ...PW 합판 최소10mm MDF PW 합판 최소10mm MDF PW 합판 MDF PW 합판 콘크리트 MDF PW 합판 석고보드 두께는 제외 콘크리트 복합형 벽 석고보드 두께는 제외 아트 월 아트 월 최소 30mm 최소 30mm 최소 25mm 최소 25mm MDF PW 합판 등 보강목 있을 시 최소 50mm NOTE MDF Medium Density Fiberboard PW Plywood 벽면 내부에 보강부가 없거나 석고 보드 벽면에는 설치할 수 없습니다 0 24mm MDF PW 합판 콘크리트 내부 벽면에 보강부분 없는 경우 석고보드 단일 벽면에 설치 불가 석고보드 아트 월 안전을 위한 주의 사항 사용자의 안전을 지키고 재산상의 손해를 막기 위한 내용입니다 반드시 잘 읽고 제품을 올바르게 사용해주세요 지키지 않...

Page 7: ... X 60 16 M5 X 65 16 앵커 x 4 사용설명서 보증서 설치 안내 1 먼저 벽면의 상태 종류 두께 및 평면도 를 확인하세요 LFD 벽면 LFD 벽면 물건 물건 28mm 1 1 벽이 평평하지 않다면 설치 후 틈새가 벌어져서 외관 품질이 좋지 않습니다 1 2 두께가 28 mm 이상인 물체가 LFD와 벽면 사이에 있으면 LFD를 벽에 거치할 수 없습니다 2 설치조건을 확인하세요 설치 모델에 따라 Normal Type 또는 Slim Type을 확인합니다 Normal Type Slim Type 3 수평조절 나사를 설치조건에 맞게 떨어지지 않을 정도로만 살짝 조립해주세요 Normal Type Slim Type ...

Page 8: ...하여 조립하세요 5 설치하고자 하는 벽면에 위치 후 벽면에 앵커 삽입 위치를 표시해주세요 6 벽면에 표기한 위치에 앵커 및 나사를 고정하세요 벽면이 석고보드 나무기둥 STUD 일 경우 설치 방법 15mm 설치조건 벽 안쪽 나무기둥 STUD 의 위치를 반드시 확인 후 벽면고정용 나사를 설치해주세요 최소 나무기둥 STUD SIZE 51 x 102 mm 2 x 4 in 벽면고정용 나사를 조립 전에 미리 구멍 3mm 을 뚫어주세요 나사 구멍은 나무기둥의 중심부에 뚫어야 합니다 구멍을 뚫지 않고 바로 고정 시 나무가 갈라질 수 있습니다 설치가이드에 있는 조건 미준수 시 발생하는 문제는 당사에서 책임을 지지 않습니다 ...

Page 9: ...용 플라스틱 를 나사를 이용하여 그림과 같이 결합해주세요 반드시 결합 구멍 위치를 확인해주세요 위 아래 M8 X L35 M8 X L49 M8 X L64 LH82DME QET82 QMR85 QBR85 WMR85 QER82 QPR82 QPR98 M8 X L71 M8 X L40 1T 와셔 9 LFD를 반드시 두 사람 이상이 들고 벽걸이 지정부위에 그림과 같은 방법으로 걸어주세요 10 LFD하단을 들어 그림과 같이 고정한 후 케이블을 연결해 주세요 벽 벽 벽 ...

Page 10: ... 회전하여 걸이용 플라스틱을 고정시켜 주세요 제품의 수평이 맞지 않을 경우 그림의 나사로 수평을 조절하세요 제품 사양 회전 각도는 LFD 모델에 따라 달라질 수 있습니다 Normal Type 폭 mm 764 높이 mm 580 깊이 mm 100 무게 Kg 4 6 벽걸이 VESA 규격 mm 600 x 400 Slim Type 폭 mm 764 높이 mm 580 깊이 mm 28 무게 Kg 3 4 벽걸이 VESA 규격 mm 600 x 400 ...

Reviews: