Samsung Electronics
5-3
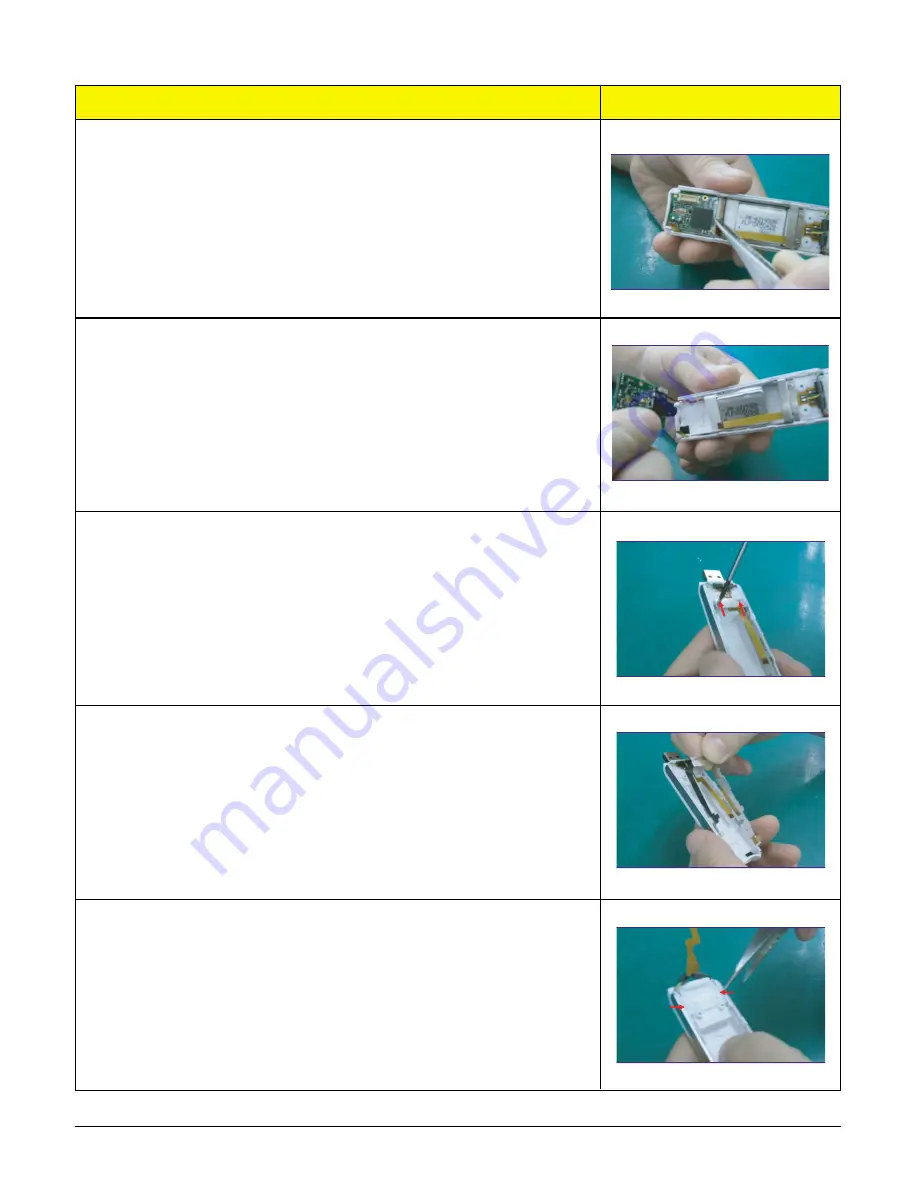
9. Lift the Main PCB up with the tweezers and separate the
board.
10. Separate the battery with the Main PCB.
11. Remove the 2 Frame Chassis screws.
12. Remove the Frame Chassis.
13. Open up the part indicated by the arrows with the
tweezers and remove the Cover USB.
Order(Description)
Picture
Summary of Contents for YP-U1
Page 17: ...Samsung Electronics 4 1 Samsung Electronics 4 Adjustments 1 How to recover the device ...
Page 18: ...4 2 Samsung Electronics ...
Page 19: ...4 3 Samsung Electronics 2 How to upgrade Firmware ...
Page 24: ...Samsung Electronics 6 1 6 Troubleshooting 1 Power failure ...
Page 25: ...6 2 Samsung Electronics 2 No audio sounds ...
Page 26: ...Samsung Electronics 6 3 3 Cannot make a voice recording ...
Page 27: ...6 4 Samsung Electronics 4 Buttons do not work ...
Page 28: ...Samsung Electronics 6 5 5 Connection with the pc is abnormal ...
Page 34: ...Samsung Electronics 9 1 9 Block Diagram ...
Page 35: ...Samsung Electronics 10 1 10 Wiring Diagram ...
Page 37: ...11 2 Samsung Electronics This Document can be used without Samsung s authorization 2 BUTTOM ...
Page 39: ...12 2 Samsung Electronics This Document can be used without Samsung s authorization 2 SUB ...
Page 40: ...Samsung Electronics 12 3 3 SELF TEST Manual ...
Page 42: ...13 2 Samsung Electronics ...
Page 43: ...13 3 Samsung Electronics 1 2 Main Functions by Block ...
Page 45: ...14 2 Samsung Electronics Yepp Block Diagram ...
Page 53: ...14 10 Samsung Electronics Small Form factor Cards Comparison ...


