background image


C

C

h

h

a

a

p

p

t

t

e

e

r

r


4

4


S

S

y

y

s

s

t

t

e

e

m

m


S

S

o

o

f

f

t

t

w

w

a

a

r

r

e

e


Summary of Contents for RUGGEDBOOK SR800

Page 1: ...ELL GROUP A4 Size Portable IP54 MIL 20C 60C 7 hours Battery 10 4 XGA ULV AN ISO TS 16949 9001 ISO 14001 OHSAS 18001 2002 CERTIFIED GROUP Since 1975 Dust Proof Sunlight Readable Water Proof Drop Proof...

Page 2: ...SR800 ver 1 1 U Us se er r s s M Ma an nu ua al l...

Page 3: ...ightness stylus 9 Turning off Your Tablet PC 10 CHAPTER 2 GETTING STARTED 11 Hardware and Software 12 Getting Started 12 Front View 13 Right View 14 Top View 15 Bottom View 16 Power Indicators 17 Fron...

Page 4: ...NT AND USING SOFTWARE 33 Power Management 34 When to Replace The Battery 36 Heat Considerations 36 Using Software 37 APPENDIX A STATEMENTS 40 Statements 41 European Notice 44 Safety CAUTION 45 Canadia...

Page 5: ...C Ch ha ap pt te er r 1 1 I In nt tr ro od du uc ct ti io on n...

Page 6: ...rmation you need to set up and use your Tablet PC It describes all the features of the Tablet PC in an easy to read yet thorough manner Inventory This Tablet PC is designed for years of productive and...

Page 7: ...the system cabinet are for ventilation purposes Do not block or cover these openings or the system could overheat Do not use or store the Tablet PC near a source of heat or dust On the base or rear pa...

Page 8: ...n the following STANDARD Tablet PC with a hard disk drive Standard battery AC adapter with power cord Service DVD User manual Driver Recovery DVD bundled with OS model WLAN Module Hold Belt Bluetooth...

Page 9: ...ly those accessories that are approved for use with your Tablet PC The above accessories are proprietary items Your system vendor can obtain these approved accessories If you use items that are not ap...

Page 10: ...imedia files Built in Wireless LAN Modem and LAN Capability A built in 802 11 a b g 56k modem and 10 100 1000 Mbps Ethernet port allows you to access the Internet or a local area network LAN Where to...

Page 11: ...om side of your Tablet PC 3 Connect the AC adapter power cord to an AC outlet 4 Press the power button to turn on the power Note The battery is not fully charged Allow your battery to fully charge bef...

Page 12: ...n details After the Start Wizard updates your system settings the Welcome to Windows screen will appear You may disable this feature by clearing the check box labeled show this screen each time Window...

Page 13: ...ey volume down Alternatively you can adjust the volume with the Windows volume control applet located on the taskbar Adjusting the Brightness Use the following hot key combinations to adjust the LCD p...

Page 14: ...enu click Turn Off Computer 2 Click the Turn Off radio button in the Turn Off Computer Windows screen and then click OK If you are going to be away from the Tablet PC for a short period there are ways...

Page 15: ...C Ch ha ap pt te er r 2 2 G Ge et tt ti in ng g S St ta ar rt te ed d...

Page 16: ...omponents and controls of your Tablet PC including the hardware components the software and the audio and video systems Getting Started Before you begin using your Tablet PC read this chapter to famil...

Page 17: ...trol Key Up Down Volume Control Left Right Brightness Control Enter Button 3 WiFi BT Trigger Button 4 Screen Rotate Button 5 Function Button 6 Security Access Button 7 Power Button 8 LCD Panel 9 Inter...

Page 18: ...14 Right View 1 MIC 2 Earphone 3 CF Slot 4 USB 2 0 X2 5 Modem Connector 6 DC in Jack 7 Cradle Connector 8 RS232...

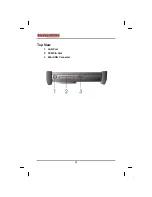
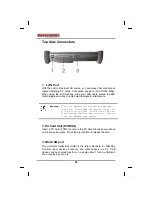
Page 19: ...15 Top View 1 LAN Port 2 PCMCIA Slot 3 Mini USB Connecter...

Page 20: ...16 Bottom View 1 VESA Holder Foot Screw 2 Reset Button 3 Digitizer Touch Switch Button 4 Stylus...

Page 21: ...emain active and viewable even when the LCD panel is closed Icon Light Description Blue Wireless LAN Bluetooth is in use Green Tablet PC is reading from or writing to the built in hard disk Green Batt...

Page 22: ...ystem These settings can be changed Security Button Implement Secure Attention Sequence SAS Similar function as pressing Ctrl Alt Delete on a standard keyboard Function Button Access to secondary oper...

Page 23: ...ight Function Keys Hold the Fn key while pressing the function key Function key Description Fn Down Volume down Fn Up Volume up Fn Right Brightness Increase Fn Left Brightness Decrease Fn Security ESC...

Page 24: ...sily damaged by static electricity Leave the module inside its static proof bag until it is ready for installation Removing a Memory Card 1 Turn off the Tablet PC and disconnect the AC adapter Turn th...

Page 25: ...llow angle about 25 degrees and insert the edge connector into the connector slot 4 The gold teeth of the edge connector should no longer be visible when the card is fully inserted 3 Press the card do...

Page 26: ...bluetooth module attach harness and secure it with screws 5 Replace the RAM compartment cover and secure it with the two screws Your Tablet PC will automatically detect the change in RAM capacity when...

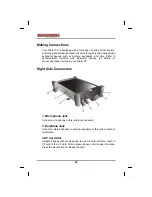
Page 27: ...C Ch hp pa at te er r 3 3 M Ma ak ki in ng g C Co on nn ne ec ct ti io on ns s...

Page 28: ...ividual devices for details on connecting these devices to your Tablet PC Right Side Connectors 1 Microphone Jack Connect a microphone to this jack to record audio 2 Earphone Jack Connect a stereo hea...

Page 29: ...ing the 56 Kbps V 90 protocol and send and receive faxes at 14 4 Kbps In some countries local regulations may not permit the use of the fax modem designed for this system In this case you may use a PC...

Page 30: ...only Most homes use analog lines Do not use digital lines such as the PBX and ISDN systems found in many offices Digital lines may damage your modem 2 PC Card Slot PCMCIA Insert a PC Card PCMCIA card...

Page 31: ...C Ch ha ap pt te er r 4 4 S Sy ys st te em m S So of ft tw wa ar re e...

Page 32: ...overy System in DVD content Follow the steps in the appropriate section below to recover the operating system and the system software The factory has pre partitioned your system s hard disk so you may...

Page 33: ...SR800 2 Press power button to start up the system then press Delete key to BIOS setup menu 3 Move to Boot device setup menu and set USB DVD ROM to priority 2nd HDD to priority 3rd then put recovery DV...

Page 34: ...very OS please type Y b If you do not want to recover your OS please remove the service DVD first and then type N to reboot system 5 Continue recovery step you can see message as below Option 1 Recove...

Page 35: ...31 Option 3 Quit the recovery asking 6 If you choose 1 and type Y to recovery system You will see below picture Then click OK to execute system restore process...

Page 36: ...overy system You will see below picture Then click OK to execute system restore process 8 When restore operation completed the system will show below picture Then you can remove the service DVD from D...

Page 37: ...C Ch ha ap pt te er r 5 5 P Po ow we er r M Ma an na ag ge em me en nt t a an nd d U Us si in ng g S So of ft tw wa ar re e...

Page 38: ...unning off an external power source through the AC adaptor Battery Power Indicator Monitoring Battery Power There are two ways to monitor how much power the battery has left 1 Click Start Settings Con...

Page 39: ...adapter to connect your Tablet PC to a power outlet the internal battery will automatically begin to recharge While the battery is charging the Battery Charge icon on the Indicator panel will be acti...

Page 40: ...ry Bay Cover shown right 3 Make sure the replacement battery is properly orientated Then insert the battery into the battery compartment Check that the latch locks back into position Heat Consideratio...

Page 41: ...he wheel moves to another location on screen 3 Repeat the exercise as above several times until the screen returns to the Calibration Applet 4 Click OK The recalibration tales place immediately upon e...

Page 42: ...e wheel moves to another location on screen 3 Repeat the exercise as above several times until the screen returns to the Calibration Applet 4 Click OK The recalibration tales place immediately upon ex...

Page 43: ...39 Screen Rotation To rotate the screen form Portrait to Landscape mode or vice versa press the Work Screen Rotate hotkey on the front of the Tablet PC Please refer Chapter 2 in this user s manual...

Page 44: ...A Ap pp pe en nd di ix x A A S St ta at te em me en nt ts s...

Page 45: ...reception which can be determined by turning the equipment off and on the user is encouraged to try to correct the interference by one of the following measures z Reorient or relocate the receiving a...

Page 46: ...r antenna or transmitter Federal Communication Commission FCC Radiation Exposure Statement This EUT is compliance with SAR for general population uncontrolled exposure limits in ANSI IEEE C95 1 1999 a...

Page 47: ...ne company will notify you in advance that temporary discontinuance of service may be required However if advance notice isn t practical the telephone company will notify the customer as soon as possi...

Page 48: ...be a 900 number or any other number for which charges exceed local or long distance transmission charges To program this information refer to the manual of the communication software European Notice...

Page 49: ...power cord and batteries indicated in this manual Do not dispose of batteries in a fire They may explode Check with local codes for possible special disposal instructions Canadian Department of Commun...

Page 50: ...CAUTION Users should not attempt to make such connections themselves but should contact the appropriate electric inspection authority or electrician as appropriate The Load Number LN assigned to each...

Page 51: ...nment regulations arising from failing to comply with these guidelines IMPORTANT NOTE CO LOCATION FCC RF Radiation Exposure Statement This equipment complies with FCC RF radiation exposure limits set...

Page 52: ...iated power EIRP is not more than that required for successful communication This Class B digital apparatus complies with Canada RSS 210 Cet appareil num rique de la classe B est conforme la norme CNR...

Reviews: