background image


Installation  and  Operation  Manual 


13 


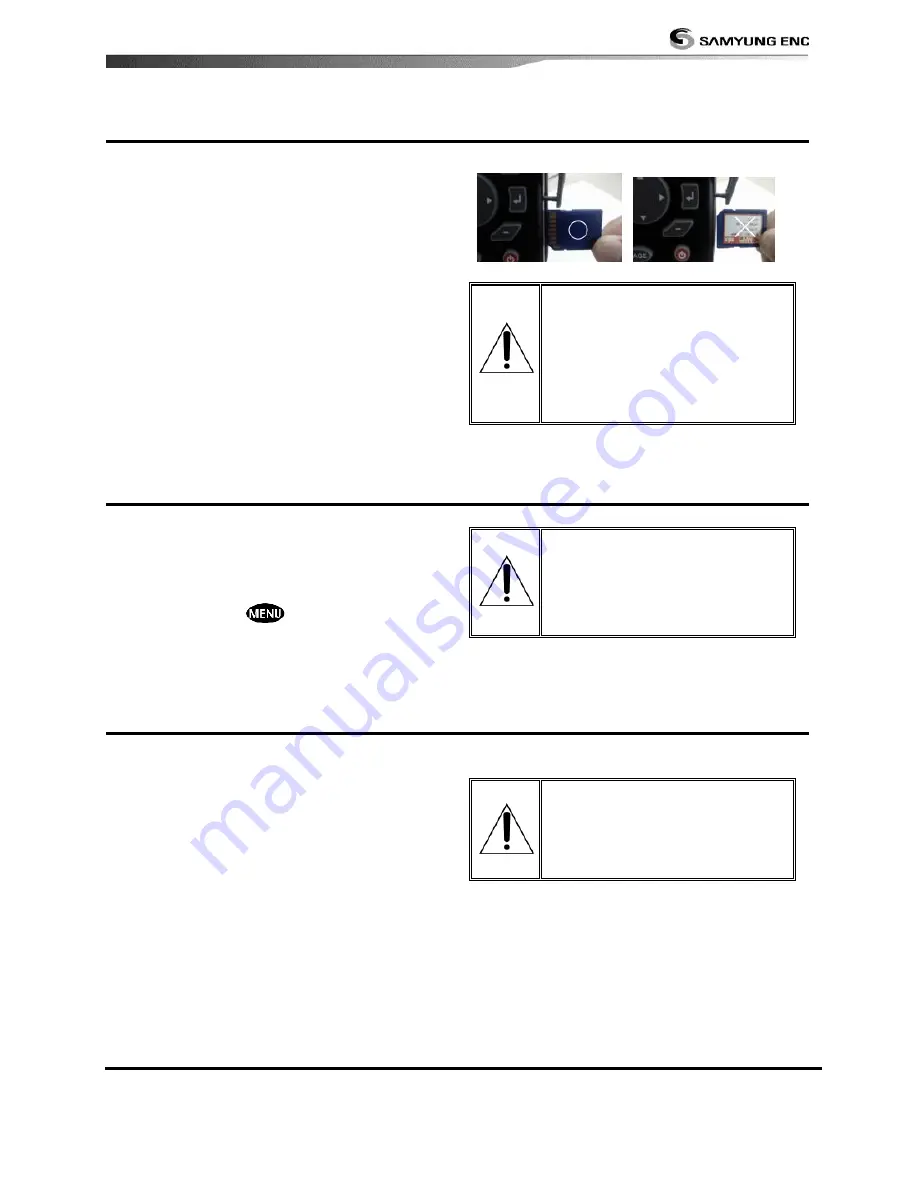
2-3 NAVIONICS SD Card 

This section provides instructions for inserting 
and removing NAVIONICS SD card 

procedure. 


Inserting the SD Card 

1  Hold  the  SD  card  so  that  you  can 

see the NAVIONICS label. 

2  Open  the  door,  gently  push  the  SD  card 

into the slot; push the SD card in as far as 

you hear click sound, then close door.   


Removing the SD Card 

1 Turn o

f

f the unit. 

2 Open the door and push in on the SD card 

until it is released. 

3 Close the door.


Insert NAVIONICS SD card 

correctly.   
(DO NOT FORCE) 

Close SD card door firmly all 
the times.   

Do not remove SD card 

during reading and writing.


2-4 

Chart Selection


A user can select a map between NAVIONICS 
and S-MAP. 


A user can select a map as follow instruction, 

Chart Selection 

1 Press and hold 

2 Select the system setting icon. 
3 Select Chart then a chart you prefer.


NAVIONICS SD is optional. 
User can purchase it 
themselves or contact 
Samyung agent for 
purchasing. 


2-5 

Simulate Mode


Simulate Mode is great for practicing the 

actual use of a product when the satellites 
signals and internal alarms are not available. 

In the simulate mode, the unit turns the GPS 
receiver off and ignores data from all optional 

devices.


Two simulate modes are available as below. 
• 

Normal:

 Allows a user to practicing the 

actual use of a product without satellites 
connection. 

• 

Demo:

 boat travel alone given route at 

given speed and show different 

function of the unit.


Do not try to navigate in a 
simulate mode. While the 

simulate mode is turned on, 

the GPS receiver is not 
active.


2-6 

Data Bar


Summary of Contents for N430

Page 1: ...Installation and Operation Manual 1 9...

Page 2: ...Installation and Operation Manual 2...

Page 3: ...ust handle Exposure of the display to UV rays may shorten the life of the liquid crystals used in you plotter This limitation is due to the current technology of the LCD display Avoid overheating whic...

Page 4: ...Installation and Operation Manual 4...

Page 5: ...ight mode and Background 18 3 3 The page window 19 3 4 Chart 21 3 4 1 Chart window 21 3 4 2 Latitude and longitude 22 3 4 3 Chart scale 22 3 4 4 Finding a chart symbol 22 3 4 5 S Map search 23 3 4 6 C...

Page 6: ...oints 35 3 8 7 Deleting all waypoints 35 3 9 Routes 36 3 9 1 Managing a route from the chart window 36 3 9 2 Managing a route from the route window 37 3 10 Satellites 38 3 10 1 Satellite information 3...

Page 7: ...eed 49 4 3 8 Magnetic Variation 49 4 4 Track Log Settings 50 4 4 1 Track 50 4 4 2 Log 50 4 5 Memory Settings 51 4 5 1 Save 51 4 5 2 Load 51 4 5 3 Delete 51 4 5 4 Format 52 4 5 5 Screen Snap Shot 52 4...

Page 8: ...Restore default 55 5 INSTALLATION 56 5 1 Options and Accessories 56 5 2 Connections 57 5 3 Power Data Cable 57 5 4 GPS Antenna 57 5 4 1 External Antenna 57 5 4 2 The Antenna by using NMEA 58 5 5 Sonar...

Page 9: ...ting 400 mA LCD full backlighting Operating temperature 10 50 C ALARMS User set Arrival radius anchor XTE danger low battery loss of DGPS fix dangerous AIS vessels GPS NAVIGATION Chart card NAVIONICS...

Page 10: ...er Z8 2M 05 Bracket mounting screw N430 BP Protection Cover N430 CB User s Manual E N430 ME Quick User Guide E N430 BE GPS Antenna Stand type Support 57745 GPS Antenna GPS Antenna Support SAN 60 10 Fu...

Page 11: ...ve of bracket 3 Turn the knob to clockwise to lock Removing the display unit 1 Turn the unit off 2 Turn the knob to counter clockwise and pull the display unit out 2 1 2 Flush Mounting 1 Find a locati...

Page 12: ...d allow you to setup displays as you like CURSOR Moves the cursor on the display screen zoom out to multiple chart level POWER Turns power on off Opens display Brightness Night mode and settings SD Ca...

Page 13: ...VIONICS and S MAP A user can select a map as follow instruction Chart Selection 1 Press and hold 2 Select the system setting icon 3 Select Chart then a chart you prefer NAVIONICS SD is optional User c...

Page 14: ...ht the data field you want to change then press 4 Select Data type 5 Select a desired data you want to display in the field then press 6 Repeat above steps if necessary Selecting the Data bar size 1 P...

Page 15: ...y reading and recognition there is a compass needle at top right side When the compass is displayed COG is always displayed in data field Also when you are navigating to a point COG and BRG is always...

Page 16: ...Split icon on bottom 2 Press or to change the height of the windows if there is only two windows If the unit is displaying more that three windows press or to change the height of the windows Deletin...

Page 17: ...monly used windows are called favorite displays and up to six favorite windows can be saved Also each favorite display can have data bar and compass Displaying a favorite display 1 Press twice 2 when...

Page 18: ...ge the brightness select Brightness and press to dim or to brighten Press to return to the previous screen Night mode The chart plotter has preprogrammed settings allowing you to customize the look of...

Page 19: ...The page window Press to show the page window and select a function icon you want to display Note 1 Some function icons require optional units and connected sensors 2 If you press one more time in the...

Page 20: ...Installation and Operation Manual 20 Waypoints Data AIS Satellite Tides DSC Navtex Engine Faults Engine Faults Chart Chart Sonar Highway Routes...

Page 21: ...window Press and select Chart icon by pressing A typical Chart window shows Data bar To turn the data off or on or to change what data is displayed Compass Chart scale Boat position Boat track Boat co...

Page 22: ...ition 3 4 4 Chart scale The chart scale change by pressing to show more detail information of chart and by to show wider view of the chart When you press or the scale of chart is display in the chart...

Page 23: ...NICS is selected Using NAVIONICS Max card allows you to show different kind of symbols and their information on chart plotter display On some objects such as a port you can see a picture of landscape...

Page 24: ...ges requiring a series of route points waypoints which you navigate to one after another The sequence of waypoints leading to the ultimate destination is called a route You can save up to 100 routes a...

Page 25: ...g 4 Repeat 2 3 steps for more legs 5 Press to exit Deleting the last leg 1 Press and select Remove 2 Repeat above step if you want to remove more legs Saving as a route 1 Once you set all the legs pre...

Page 26: ...Installation and Operation Manual 26 3 4 14 Tracks Log Settings in the chart window For tracks log setting in the chart window press and hold See 2 4 for Track Log Settings...

Page 27: ...bottoms such as rock and coral shown as wide bands Soft bottoms such as mud weed and sand show as narrow bands Range of display Data from right to left 3 5 2 Mode There are two options you can select...

Page 28: ...picture appears on the left and the 200kHz picture on the right The display is useful for comparing the same picture with two different frequencies High Frequency 200 kHz Low Frequency 50 kHz NF430 is...

Page 29: ...y a set value When you use the manual mode and threshold the values of gain and threshold need to be set very carefully In the Gain window you can set for a gain mode and threshold To change a mode 1...

Page 30: ...nar history on the right This display is useful for comparing the same history with two different frequencies see section 3 5 10 NF430 is a 200KHZ only Split A Scope Display Sonar history and echo str...

Page 31: ...n is adjusted automatically so that the bottom is always displayed in the zoom section To turn Bottom lock on or off press Full Screen zoom Full screen zoom displays only the zoom section of split zoo...

Page 32: ...frequencies NF430 is a 200KHZ only 3 5 11 Split A Scope This display shows echoes at each transmission with amplitudes and colors proportional to their intensities on the right of the screen it is us...

Page 33: ...r 3 7 Gauges The Gauges window displays all the information you need during navigation such as water engine fuel related information etc To select the Gauges window press and select Data icon Selectin...

Page 34: ...aypoint data change alphanumerical name choose between 48 icons 16 colors and display option 4 Select Save 3 8 2 Moving a waypoint To move a waypoint from the chart window 1 Move the cursor to place i...

Page 35: ...final destination of navigation is the waypoint 3 8 5 Find a waypoint To find a waypoint from the chart window Finding waypoints from the chart window is a simplified function 1 Press and select Find...

Page 36: ...press 5 Repeat step 4 to enter more waypoints 6 Once you entered the last waypoint in the route press and select End Editing a waypoint in route while creating a route 1 Move the cursor to the waypoi...

Page 37: ...lect Edit 2 Highlight a leg where you want to insert a waypoint 3 Press and select insert 4 Highlight a waypoint and press 5 Press to exit Editing a route in the chart window 1 In the route list press...

Page 38: ...tion about the GPS satellites and GPS position as below To go to the satellite window press and select Satellite icon The satellite window shows Ship s Coordinates Time received GPS satellites Date re...

Page 39: ...displays the tide information nearest your boat in the tides windows Choosing the date of the tide information 1 In the Tides window Press and select one of the following options Set date manually se...

Page 40: ...e the cursor on the AIS object then AIS information displays at the bottom of window AIS equipped vessel Dangerous Vessel Projected Course AIS equipped vessel Data Box Range Rings 3 12 2 AIS Windows T...

Page 41: ...Installation and Operation Manual 41 AIS Vessel Information 1 AIS Vessel Information 2 AIS Vessel List AIS Vessel Safety message...

Page 42: ...a distressed vessel in the chart window 1 Highlight a received distress call you want to display 2 Press and select Display Going to the distress position 1 Highlight a received distress call you want...

Page 43: ...a poll you want to display 2 Press and select Display Going to the poll vessel position 1 Highlight a poll you want to go 2 Press and select Goto Edit a distress waypoint 1 Highlight a poll you want...

Page 44: ...X 3 Press and then press display from the top page then select NAVTEX Reloading NAVTEX messages NAVTEX messages need to be loaded from NAVTEX receiver manually Up to 50 messages 1 Press and select Rel...

Page 45: ...the language for menus and data screens 4 1 2 Chart Selection Select a chart between S MAP or NAVIONICS chart 4 1 3 Beep volume Select the level of beep sound 4 1 4 Auto power See section 3 1 4 1 5 F...

Page 46: ...Installation and Operation Manual 46 4 2 Chart Settings To go to the chart settings 1 Press and hold 2 Select the chart icon...

Page 47: ...l cartographic objects which are not present on the original paper chart These objects have been obtained from other sources and then merged to the electronic charts in order to provide more informati...

Page 48: ...on 1 Press and hold and select chart icon 2 Select general and Map datum 3 Select a desired map datum 4 2 6 NMEA datum offset When you select other Map datum different from WGS84 latitude and longitud...

Page 49: ...owly This option allows you to set a minimum speed at which movement is assumed The value range is from 0 00 to 9 99 4 3 4 Speed Filter Occasional waves and wind at sea affect the boat speed In order...

Page 50: ...urse Display Off Display no track on the chart 1 to 5 select a track number Display a selected track on the chart Record color Select the color of recording track Thickness Select the thickness of rec...

Page 51: ...a data type you want to save in the user card then the data will be saved in the user card automatically 1 If you select waypoint for saving data enter the file name and press 2 If you select routes f...

Page 52: ...it 4 5 5 Screen Snap Shot To take the snap shot of current screen press twice To save the captured image press and select Save or Save all to save the captured images on the user card 4 6 AIS Settings...

Page 53: ...larm Option Dangerous Vessel Alarm When this option is selected an alarm will activate Even this option is not selected dangerous vessels will still be on the chart TCPA Limit Set the Time of Closet P...

Page 54: ...rm when the reported temperature from the transducer is same as a set value 4 7 4 Temperature rate Trigger an alarm when the rate of temperature change from the transducer is same as a set value 4 7 5...

Page 55: ...nected to other marine electronics through any compatible NMEA instrument NMEA0183 NMEA2000 This option to transmit NMEA sentences to other marine electronics NMEA0183 and NMEA2000 interfaces are gene...

Page 56: ...essories Optional sensors and instruments GPS or DGPS Antenna DSC VHF Radio Other instruments The chart plotter can receive data from other instruments and send data to other instruments by NMEA Conne...

Page 57: ...e below picture for Power 5 4 GPS Antenna 5 4 1 External Antenna It is available to connect to an external GPS Antenna with BNC type of Connector Install an External Antenna If an external antenna is...

Page 58: ...areas where WAAS or EGNOS are not available Such a DGPS antenna has both a GPS receiver and a beacon receiver and it automatically applies the beacon correction to the GPS position To set the DGPS opt...

Page 59: ...sition and other navigation data to an autopilot or other instrument An autopilot requires APB APA and VTG sentences For information on sending NMEA data to the instrument contact Samyung ENC During s...

Page 60: ...UNG ENC authorized Service Centres SAMYUNG ENC will at its discretion repair or replace any defective products or its components at no cost to you This is your exclusive remedy for defective products...

Page 61: ...Installation and Operation Manual 61...

Page 62: ...Installation and Operation Manual 62...

Page 63: ...Installation and Operation Manual 63...

Reviews: