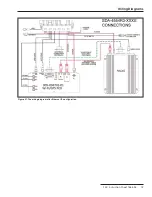
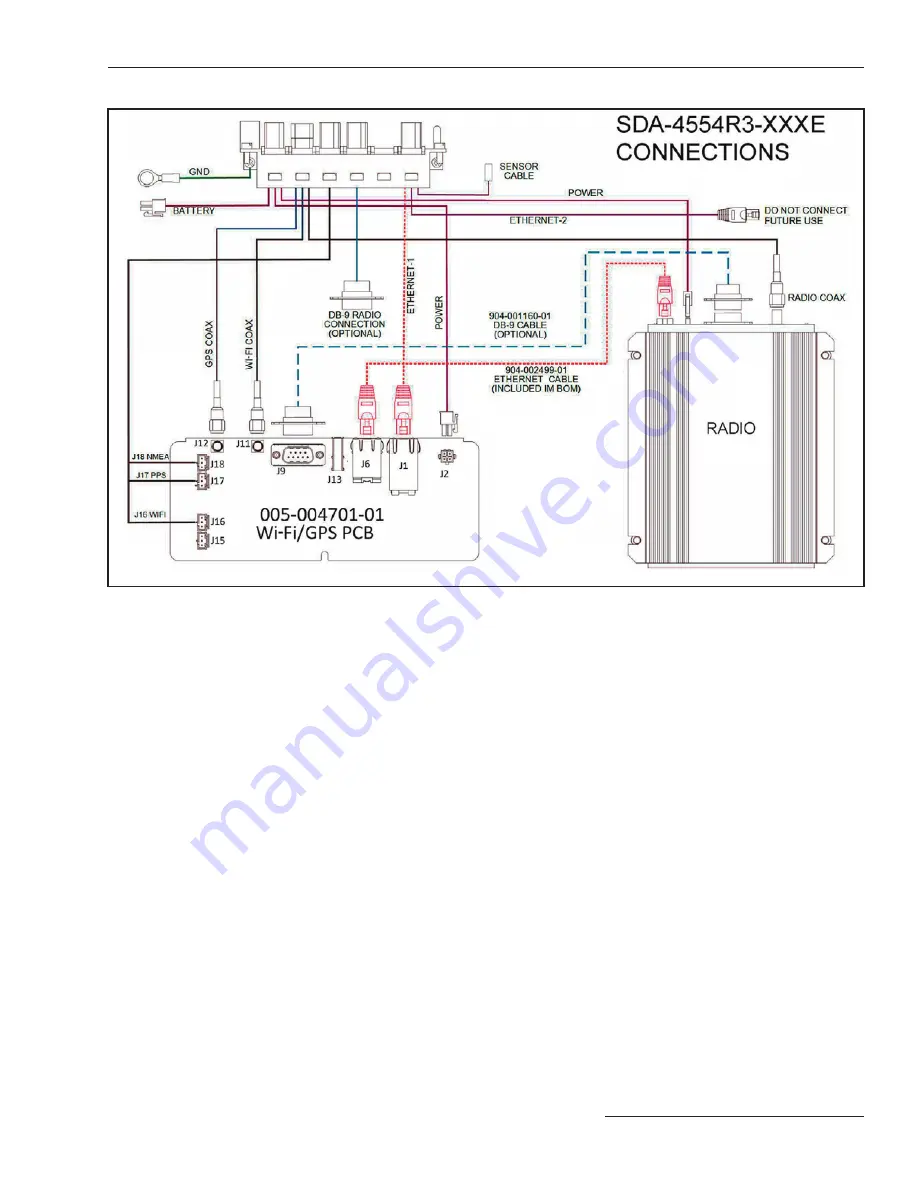
background image

Wiring Diagrams

Figure 27. The wiring diagram after Ethernet IP configuration.

S&C Instruction Sheet 766-526    19

Summary of Contents for IntelliRupter PulseCloser R3

Page 1: ...ommunication Module Retrofit Tools Required 8 Removing the Radio Tray 8 Removing the R0 Wi Fi GPS Module 9 Installing the R3 Wi Fi GPS Module 10 Reinstalling the Radio Tray 12 Setting the R3 Communication Module to Ethernet IP Configuration 13 Inserting the Communication Module Into the Base 15 Wi Fi GPS Board Configuration Details 16 Wiring Diagrams 18 R3 Communication Module Retrofit and Configu...

Page 2: ...d only for such qualified persons They are not intended to be a substitute for adequate training and experience in safety procedures for this type of equipment Read this Instruction Sheet NOTICE Read this instruction sheet thoroughly and carefully before installing or operating your IntelliRupter PulseCloser Fault Interrupter Familiarize yourself with the Safety Information and Safety Precautions ...

Page 3: ...l for all goods pur chased by the immediate purchaser No such delay shall extend the warranty period Replacement parts provided by the seller or repairs performed by the seller under the warranty for the original equipment will be covered by the above special warranty provision for its duration Replacement parts purchased separately will be covered by the above special warranty provision For equip...

Page 4: ...rocedures or requirements that can result in product or property damage if instructions are not followed Following Safety Instructions If you do not understand any portion of this instruction sheet and need assistance contact your nearest S C Sales Office or S C Authorized Distributor Their telephone numbers are listed on S C s website sandc com or call the S C Global Support and Monitoring Center...

Page 5: ...ed The integrated power module IPM contains components that can retain a voltage charge for many days after the IntelliRupter fault interrupter has been de energized and can derive a static charge when in close proximity to a high voltage source Voltage levels can be as high as the peak line to ground voltage last applied to the unit Units that have been energized or installed near energized lines...

Page 6: ...ult interrupter remains fully operational during the communication module swap There will be no service interruption Note When establishing a rotation procedure to swap communication modules at the site each SCADA radio must be configured in the shop for the specific site at which it will be installed NOTICE These instructions are intended for use only by personnel trained by S C Power Systems Sol...

Page 7: ...xtendostick This may cause minor injury or equipment damage Remove and replace the communication module from a bucket truck using the module handling fitting attached to a suitable hookstick Follow these steps to remove the communication module STEP 1 Insert the handling fitting into the module latch and push up on the hookstick Rotate the fitting 90 degrees counterclockwise as viewed from the und...

Page 8: ... of the communication module See Figure 5 STEP 4 Placetheradiotrayonastaticdissipativemator static grounded workbench See Figure 6 Figure 4 Removing the radio tray bolts Figure 5 Removing the radio tray assembly Figure 6 The SCS 8501 Field Service Kit NOTICE Handling the R3 Wi Fi GPS module without effective electrostatic protection will void the product warranty To effectively protect the R3 Wi F...

Page 9: ... remove the radio and radio mounting plate STEP 2 Disconnect the two antenna cables They are labeledGPSandWi Fiforcorrectreinstallation STEP 3 Disconnect the connector at the left side STEP 4 Cut the two indicated cable ties See Figure 7 STEP 5 Cut the cable tie indicated in Figure 8 STEP 6 Remove the six standoff mounting nuts will not be reused and remove the circuit board See Figure 9 Figure 7 ...

Page 10: ...sting harness connector See Figures 10 and 11 STEP 3 Install the R3 Wi Fi GPS module mounting plate to the side of the radio tray with the six screws provided See Figures 12 and 13 STEP 4 Install the ferrite choke around the gray cables and install the three cable ties at the ferrite See Figure 13 STEP 5 Install two cable ties near the connector and two cable ties near the gray cable plugs See Fig...

Page 11: ... the appropriate connector Connect them from top to bottom in this order J18 J17 and J16 Connector J15 is not used Communication Module Retrofit Figure 14 The R3 Wi Fi GPS module connections with no communication device installed GPS antenna Ethernet 1 Ethernet 2 USB connector not used Polarized power connector Serial Wi Fi antenna J18 J17 J16 J15 S C Instruction Sheet 766 526 11 ...

Page 12: ...net IP configuration has been set install the E label on the front panel recess Figure 15 Removing the radio tray assembly Figure 16 Removing the radio tray bolts Radio tray mounting bolts Locking screw Connecting the cables as instructed in this step emulates operation of the R0 Communica tion Module which is a serial communication configuration For Ethernet IP configuration go to the Setting the...

Page 13: ...n configuration wiring to the IP configuration module wiring STEP 1 See page 9 for R3 Communication Module removal STEP 2 At the communication device unplug the RJ45 cable that runs between the communication device and the control module See Figure 14 on page 11 STEP 3 At the Wi Fi GPS module plug the RJ45 cable from the control into Ethernet 1 on the Wi Fi GPS module See Figure 18 STEP 4 Locate t...

Page 14: ...sion 3 0 00512 and later and S C Instruction Sheet 766 524 for earlier firmware versions See Figure 20 STEP 8 Use IntelliLink Setup Software to change the IntelliRupter fault interrupter control module IP address setpoint to 192 168 1 2 See S C Instruction Sheet 766 530 for information about setting the IntelliRupter fault interrupter IP address This will be a private IP address The R3 Communicati...

Page 15: ...ick Follow these steps to install the communication module STEP 1 Inspect the wiring connectors and insertion guides of the communication module and communication module bay for damage See Figure 21 STEP 2 Push the handling fitting into the module latch and simultaneously turn the fitting 90 degrees counterclockwise STEP 3 Position the communication module so the alignment arrows line up and inser...

Page 16: ...r LED uP pulse Yellow LED bootup pulse A B C D E F G H I J K L M N A B C D E F G H I J K L M N Interface Pinouts The RS 232 Radio Maintenance Port of the R3 Communication Module is configured as data terminal equipment See Figures 23 and 24 Figure 24 The R3 Communication Module RS 232 interface pinout Pin Function Description 1 NC No connection 2 RX from radio RS 232 receive 3 TX to radio RS 232 t...

Page 17: ... Figure 25 They are auto sensing for assignment of transmit and receive lines no crossover cables required and auto negotiate for 10 Mbps or 100 Mbps data rates as required by the connected device Pin Function Description 1 TXD Transmit 2 TXD Transmit 3 RXD Receive 4 NC No connection 5 NC No connection 6 RXD Receive 7 NC No connection 8 NC No connection S C Instruction Sheet 766 526 17 ...

Page 18: ...Wiring Diagrams Figure 26 The wiring diagram before Ethernet IP configuration 18 S C Instruction Sheet 766 526 ...

Page 19: ...Wiring Diagrams Figure 27 The wiring diagram after Ethernet IP configuration S C Instruction Sheet 766 526 19 ...

Reviews: